Powered by Blogger.

New Collections...(yay!!)

These are new collections for my shop. No no..it's not made by me, but by my Aunt's Sister...she's very talented and very good in making all these small dresses (size: new born to 3T). I'll put them all up here for you all to see....If you are interested just leave me a message;) In the mean time I also keep sewing my small dresses and few purses on the pipeline..:D

1. Polka dot white and blue

The detail


2. Pale Yellow with smocking design

Posted by Picasa
The detail
3. Sky Blue for new born with smocking design
Smocking Design


These dresses are simple yet very cute...I mean, in these days where malls are coming up with hundreds of choises for baby clothes, these simple handmade dress is still very much in demand:) at least here where I live..;)

That's all for today...I'll update more later...in the mean time lets pray that the viral will go away....;)

Wrap around craze...:)


Been sewing few wrap around skirts these few days...Its the easiest and quickest skirt to make:D I'll make the tute when time permits...cos these few days viral flu seems linger in our house..:( one by one we got the nasty viral...ugh..hopefully my elder son will stay ok, cos he'll have his "exam" next week...pray for me...
Oh and I've been sewing like crazy and have all projects line up..I hope to have an exhibition next month...(yay!!)..pray for me, folks...


*got few more skirts, but havent taken the pics..will update again later..:)*

Posted by Picasa

Quickie PJ Pants Tutorial ~~for toddlers

PJ Pants is the easiest to make…it takes hardly 1,5 hours from drafting the pattern to stitching.
I just would like to share how I usually make PJ Pants for my toddlers.

So, here we go:
You need:
1. Marker pen
2. Tailor chalk (If I don’t have one, my son’s crayons make a good substitute..;)
3. News paper
4. Pins
5. 5/8” width elastic
6. Scissors

Now we can start:
1. take out your toddler’s PJ Pants which fit him/her and fold it


2. Trace the PJ pants on to the paper and cut it off --> like this


3. Fold the fabric into half & Put the pattern on the fabric with the straight side on the fold -à add 1” seam allowances** For the waist side add 2” seam allowances**


4. Put right side of fabric together, pin the upper part and stitch along the side up to the crotch part

Stitch along the blue line (I hope it's visible enough..;)
5. Open and match the stitching, Open the seam


6. Stitch all along the leg inner seam.


7. Hem/stitch the leg bottom. I dont have serge machine so I double fold & stitch it.


8. Fold inside the waist and stitch it around the waist, leave +/- 2” opening to insert the elastic.
Insert in the elastic and stitch close the opening.

VOILA, your quickie PJ pants is ready..:D


with the peasant top (I made with the tute from HERE)

Another PJ Pants ~~ this one is 3/4 PJ pants

** If you don’t have serge machine just zigzag the fabric to avoid fraying or just cut it crisscross


Something from the past..;)

Nothing serious...it's just when I first came here with nothing much to do and no sewing machine ;) I tried my hands on glass painting (or it's stain glass??). It seems so easy then but it really took a lot of concentration and patience...these two were my only PILOT PROJECTS (hah!!)..and no more glass painting afterwands..well, I prefer sewing anyday...

The design I took from embroidery book..;)


This one still hanging proudly in my room :P, the design I took from some Greeting Card

**My Embroidery**

I learnt embroidery from my sister-in-law. She's got such a good hand and her emboidery is very fine. Mine is still far from that but I'm working on it (whenever I feel like doing :D)

Anyway...here are few of the emboidery I've made last year:
  • I made plain white top then I embroidered the front collar part. I took the design from Ondori Embroidery book. It's very simple satin stitch with cotton embroidery thread

and here's the closer look at the emboidery


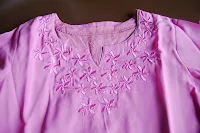
  • This one was plain top gifted to me by my sister-in-law. So, why not do some embroidery on it I thought. I draft the simple design my self and I didn't want something too bright. So, here it is now...just a little embroidery can brighten up a simple top, rite??

and here's the close up view...;)

  • This one was a challenge, the color is such that I didn't find any suitable colors that will look good on it. I tried to embroider few flowers with different design in the beginning but it was looking so horrible. So, I unpicked everything, washed it and then I decided that the same color thread will do for this...and i took me alooooooong time to finish this one too..:D and the result is not so bad, at least I think...;)

*** If you feel small and worthless, do something great - HELP SOMEONE IN NEED***


Another Diapers Bag

Finally I finished my drawstring Diapers Bag with matching baby quilt/changing mat today...The quilt was my first try but I'm very happy with how it turn out. The quilt blocks I use here are from here . She made quilting look so easy. I think I have to start join the quilt along in her blog. So here is the final result of my first quilt:

And about the drawstring bag, I took the idea from my sheepskin bag. It's fully lined and has lots of pocket in the inner side to hold to bottles, diapers, etc..The Fabric is pure cotton so it's washable...:). So, what do you think??

Thanks for looking and let me know what you think..

Have a nice day

More and more bag

I made few more bags/totes/wristlet these days...some I gave them to Zia for her birthday (hope she liked them..*_*). Still trying to better my zipper...and still wanna do more and more bags...but with my limited time I think it's gonna take me ages ha ha ha...Tried made one wallet which did not come out well but I liked it all the same..(hihi..muji diri ndiri nih..)

Any, here they are....


It's not 100% finished but....

Finally I got a little time to do some crafty things. I've been wanting to try making some purses n bags. So without further a do, here are the things that I've made. It's not 100% finished, I still have to put the magnetic snap but I was so excited that I want to post it here..:)

SMALL DIAPER BAG:


This bag is a small diaper bag. It's very convenient to take along when going out for few hours or just going for window shopping. It's quite spacious where you can fit in 2 diapers, watter bottle, wet wipes tissue, and a pair of change clothes for your little one. Made of 100% cotton material and it's washable. What's more, when your little one goes to school, it can be used as a tiffin bag...


CLUTCH/PURSES:


I also made these clutch/purses with satin curtain fabric with black& white synthetic lining. Though they look small but quite spacious inside. I made one without handle and one with handle (WRISTLET).

Latest Video