Powered by Blogger.
Showing posts with label photography tips. Show all posts

{HOW TO} - How to Edit Instagram Photos that Sells - Simple Guide

Hello again, 

Everyone is on instagram nowadays. It's the best social network to share your photos, videos and now even life event. People love instagram more because we want to SEE. Yes visual is very important, especially if you are a  mompreneur  and running an online shop or selling via instagram but don't have time to edit photos from editing apps. You want your product to stand out, to be drool worthy. 

Most of us mompreneurs don't have time to go back and forth from editing apps to Instagram. And we are not quite happy with the stock filters too.  

Here's what I usually do before sending out my product photos to the world. 

1. Open your instagram and click your profile, and click that + sign at the bottom of the screen. 


2. Instead of using photos from the gallery, choose PHOTO.  Position your mobile camera in the angle that you you like best. This way, your photo is just perfect size for Instagram. Cropping your stock photos will (more often than not) make your photos size look odd for Instagram frame. 


3. I know there are so many apps out there offering various of filters including instagram. Don't use that. Instead, click EDIT where you can adjust the photos to look bright and natural. 


4. What I am using most is  BRIGHTNESS. Adjust it so that it looks natural. If you set your phone brightness to Auto, change it. That way you know how the photos will look in reality. 


5. My next step usually CONTRAST. Especially if the object is dark or bright colors. Adjust it to look like the real color as much as possible. 


 6. Next is SHADOWS. Use this if your source of light is not evenly distributed. 


 You can see the difference here. 


7. I  use TILF SIFT if I want to focus on one part of the photos. It's perfect for highlighting your speciality, your new label, your perfect stichetes, etc. 


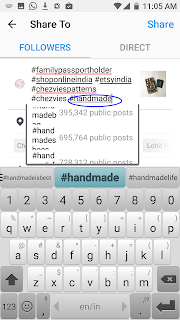
 8. You can experiment with the rest of the Editing taps. Now, you're ready to post your photos. Don't forget to add those #hastags. Use suggested popular hashtag. 


It's super easy right? I know many mompreneurs out there who don't have time to sit and edit every single photos before posting it. I hope this simple guide will help you improve your Instagram photos. Write your comment if you want more simple guide.

I will talk about #hashtag your post in my next post. Subscribe for my post at the top of this blog to get updates. 

Until then,

Happy Posting


Almost Holiday

Summer holiday is almost here! It's time to pack my bags and make few handmade for my family and friends in Indonesia. 

I always prefer to give handmade stuff even if it's small.

two of my sisters already told me to make them passport wallets :D

Mickey Mouse Family Travel Wallet
 and I already order one Bag from my fave bag-maker bestie, BagStock . My mom loves her Saddle bag that I gave last year. 

****************

Black and white is always favorite. Last weekends, hubby's cousin came to visit me and she wanted  wallet and pouch set in black and white and Blue. I showed her my photos from my previous custom order and she wanted same combo. 


I really love this combo. I thought black, white and red is perfect but this linen blue and this chevron really look classic. 


If you notice that stone car, it's my current fave photo props. I collected that stone when we went to Umngot River in Meghalaya few months ago. Hubby was laughing when I collected stones to take as souvenirs.

What is your fave photo props? 


Personalized your Wallet with Hand Embroidered Names

Photo props is really important, I feel, esp when you are selling online. But not too much. You have to make props that visually appealing yet not crowding your product that it takes away the focus. 

I love my canvas board white background. And always try to take photos before noon in a room which does not have direct sunlight. 


Ethnic Traveling Vanity Pouch

I have screen door in my sewing room that facing the front porch. I recently put an off-white lace curtain to block the direct afternoon sunlight. And that's my fave photo spot now. Since I got my new 50 mm lens, I love taking photos here. 

Ballerina Small Pouch

As much as you can do not take photos with auto setting. Try to tweak the setting a bit and you will get  perfect photos. Do take a look at your camera setting and try to search for online tutorial. YouTube is a great source of information. 
Here, I give you sneak peek on how I did it. The photo below was  taken using my Sony Pocket Camera. I put my canvas board near the screen door and I put a white card stock paper (it was  bed sheet wrapper or whatever you call it). 


The paper is a bit shiny so it gives perfect reflection. The white paper will sort of block the light from the door/window and reflect it back. It reduces the shades that you normally get when you take photos without one. 

by the way, my handmade shop in Etsy will be closed from next week until end of July since I will be going for holiday. So until then do check my READY to SHOP section in my shop. 

Thank for dropping bye

Until then,


Simple Guide - taking good photos for your online shop


When you are selling online, a GOOD, professional looking photography is a MUST. I've done a lot of reading {and I still do} on how to take a good product photography.

I follow these few simple guides:

1.Natural Light is the BEST

But not direct light. Which means, take your photos in the room which doesn't get direct sunlight. I have a small balcony adjacent to my room, which is has a good natural light. The balcony is facing North. The best time is before 11 am and around 3-4 pm. And you ask WHY? because indirect natural light will give you the best color of your product.


This is unedited, taken under indirect natural light
My sewing room has natural light most of the time, but it's facing East, so it gets direct light most of the time. When I took photo in my sewing room, the result is either too bright or too dark. 


Never take your photos at night, even with sufficient light

I took this photo at night with a poor background and I had a tough time editing it.


2. NO FLASH

NEVER use flash light. The best picture is the one which doesn't need much of editing. Whether you take with DSLR camera, pocket camera or your mobile camera. Flash will a harsh shadow on your product and you will have a hard time editing it. Especially if you are not expert in it. I don't know how to use photoshop, I love using picasa or photoscape which is easier.

with flash
without flash


3. BACKGROUND


Background is very important. Remember your product is the CENTER of attention. So, to many thing in the background will distract the buyer. Use minimal prop which can enhance your product. If your are not sure what prop you should use, white background always works best.

I'm using this inexpensive canvas board as my background. I put it on top of my trunk, and cover it with tablecloth when I don't need it. Since it's very dusty here I make sure to cover it.


As much as you can, try to convey the uniqueness of your product. Less is always better. I usually like to browse craft magazines and pinterest to get ideas  on how to use the prop.


Make sure the background is less busy or less colorful than your product. The FOCUS is on your product, not the green leaves or the Chrystal vase behind the product. 

Look at this photo, the idea was to show that you can use the mat for the chrystal vase. But the vase is too big that you cannot see the design of the mat


Compare to this one
The simple prop makes the mats pop out


4. Camera Setting 

It's always best to use camera with higher  resolution. At least 8 mega pixel and above for Android Phone. For iPhone 5 mp is sufficient to give an editable and clear picture. Why? because you need to crop your picture.  If you are using lower resolution camera, when you crop it, the picture will not give you a clear image and sometimes it breaks/grainy

The size of an image taken at different resolutions
Photo courtesy Morguefile
You can read more about Digital Camera Resolution HERE

If you have DSLR but not very familiar with it, go with the automatic setting. In my Canon its the P sign. When I am in a hurry, that's what I do. If I am using mobile camera I always turn OFF the flash. 

Always click many photos, try different angles, and different props. For one product I took around 15-20 pics.


Of course DSLR camera gives a better result, especially for close up pictures 


and it also can capture more natural color of the product. Especially for my fabric shop I try to always use my DSLR


But
some photos in my handmade ETSY shop was taken using my mobile camera. If the light is good, sometimes it gives a good natural color which doesn't need much editing.

It's as simple as that. All you need is an extra time and patience. 

I'm not an expert and I'm still learning. If you want to know more
Etsy has a good guide in its blog from Beginner's Guide to Smartphone Photography .You can check Etsy BLOG for complete list.


Happy Clicking


Latest Fabrics

Latest Video