Powered by Blogger.

Fabric Flowers


After 2 weeks of making little dresses, yesterday I was browsing the net and found lovely Tutorial on Fabric Flowers. Laurie of Tip Junkie collected few tutorials from across the blogsphere to share with us freely. Thanks a lot Laurie.
There are several fabric flowers tutorial but Multi Petal Flower   from  Sew Ritzy Titzy  I love the most.


If you like ruffled flower, you can try Sew Serendipity's summer flower. I'm yet to try that one. But I'm surely will give it a try. it looks so pretty & better than yoyo...ehm..I love yo yo flower simply because it's easy and fast to make, since I'm always in a hurry :-).

Sew Serendipity's Summer flower

Until then....Happy Sewing ^__*

Posted by Picasa

Tutorial: banded scrub hat, chemo hat, hijab inner or whatever you call it -__*

UPDATED Version of this Post available HERE

I have been meaning to make this hat to wear with my hijab. I bought several hats made of Lycra (synthetic) but it's too slippery. I always prefer the cotton one, anyway. I used to make these hats back when I was in high school.


So, now I'd like to share the tutorial. it's simple and fast to make. So, here we go:

What you need:
1. One rectangular fabric 7" x 22"
2. One rectangular fabric 7" x 9" (you can make it longer if you like it a bit bouncy) - cut oval shape at one end
3. One strip of fabric 4" x 32" (this is what I use, you can make the band less/more broad though)
4. 1/4" elastic - 9"


How to do it:

1. Pin the small rectangular fabric to the big one (right side facing). Put the oval one in the middle of the big rectangular one. I usually pin the the middle, and both ends and adjust the in-between fabric accordingly. Otherwise you can baste the oval part a little bit for ease while maneuvering the middle one.


2.  Stitch all the way around and you'll get something like this:


3. make an elastic casing in the bottom part by folding inside around 1". Stitch.


4. Insert the elastic. When the elastic reach the end of the casing, stitch it in place and then continue inserting until it reach the other end and stitch it in place. You will get something like this.


5. Now fold & iron the band.Attach it to the other end of the hat beginning from the middle part. Pin all the way. Start by sewing from inside of one end of the hat. Turn the fabric around and sew it close from the end of the band, all the way to the other end.


6. Voila...you're done..:)


Link back if you use this tutorial..I'd love to see how your one turn out ...:)
I hope it's clear enough... if you have any questions simply TWEET me -__*.


Happy Sewing & have a lovely weekends


Applique Table Runner

This table runner finished few days back, together with the red dress in my previous post. I used cotswool fabric which I bought last winter. I love the tartan cotswool and I got quite a few small pieces from my regular shop.


I used polycotton lining which is very soft. It was the only fabric I had which matched the main runner..:D.

Now, thinking of making cushion covers to match. I guess my mom would love this ^__^


Until then...Happy Sewing
Posted by Picasa

Trial Peterpan Collar Dress for Kids

This is actually pattern trial :D. I got few custom on baby dresses so I decided to make a trial version first. And here's the first result...


Peterpan collar with rickrack


Button-down closures at the back


White ribbon with rickrack at the bottom


and now I'm in the middle of the second trial...


So this week is gonna be a busy week for me...

Happy Sewing

- Elvira -

Midnite sewing

Lately I just couldnt sleep at nite. After dinner at about 10 pm (yup, Indian have late dinner) sleep is just avoiding me. So what to do? I started doing my sewing after dinner when the kids are already asleep. It was kind of peaceful..and I like it.
So here' s what I did today. I'm quite happy with the collar..it turned out well..:-D .

Blog Award


I got this award from lovely Janelle from of Pinks and Fairy Tales last month. Thanks a lot Janelle. She lives in the beautiful Phillipines with her daughter Andrea. She made lovely stuff. You should check her tutorials and you'd agree with me.

Ok, so here's the rule for the versatile blogger award:

1. Thanks the person who gave you the award.
So, THANK YOU again Janelle for the award. You really lift up my spirit..^__^

2. Tell us 7 things about your selves:
so here we go:
* I'm Indonesian who now married and settled in India for the last 9 years
* I'm a lawyer by education
* I'd love to travel the world, well maybe someday
* I love BON JOVI and have all his albums
* I mad about FABRICS and have collected quite a lot.
* I work better when my studio is in a mess..lol..
* My current wishlist is I-Pad (who doesn't?) but then it's too expensive here in India

3. Share the award with 15 blogs you just discovered.

Ahh..this is what I love..I spend so much time blog walking and doesnt even check my own blog sometimes. Hence I came to know about the award quite late (shame on me)..Sorry Janelle..>__<. There are just too many bloggers out there who are more creative than me. My apology I just could not name 15 of them, but here are few Indonesian bloggers whose work I love to share with you :). I don't know them personally and I just stumble upon their blog recently:

1. Hayano handmade

2. Sew Stories

3. Cemprut

So that's all...and I hope you really have a lovely crafty weekends...^___^

Warm regards from India


Fabulous Giveaway : FairyFace Designs: My Big Scrappy Giveaway


Check out this fabulous giveaway..lots of pretty scrap which you can turn them into fab patchwork...so what are you waiting for? go and submit your entry :


Meanwhile I'm doing something with my check fabric. Will show it in later post...now I got some sewing to do....

Good Luck & Have a nice crafty weekends ^____^

My Red and Blue

I've been shopping too many fabric and make very few projects. God, I wish I had more than 24 hours >.<. Sometimes I wish I had 10 hands like Goddess Durga, so that I can be more productive. Sometimes I wonder how those creative people can be so productive and create beautiful stuff. I guess I have to loosen up a bit. Let me tell you, I have this 'bad' habit, every morning unless my house is cleaned (swept, mopped, dusted) properly I can't have my bath. I knowwww...but this is INDIA...dust is part of your daily life..lol. And no..no vacuum for me, it has to be wet mopping. So by the time, I finished with house cleaning routine it's almost 11 am... Anyway, enough rambling....I guess I have to start live up to what my fridge magnet said "Both of us can't look good, it's either me or my house" lol... So, on one of those days when I decided not too bother so much about the dust, I can actually a bit productive...and here's what I made..


Not so bad I guess....what do you think? Actually I was supposed to make placemats with these blue & red fabric, but then when I started, I decided making something else. And I'm quite happy with it...I mean, I don't need placemats anyway...:)

Now I'm eager to go back to my janome and..let's see what I will end up making....

Thanks for dropping by....Happy Crafting ^_^
Posted by Picasa

Zipper Pouches


I made these lovely pouches few days back. Got the fabric last week from my visit to nearby hill station and just couldn't resisit it. I thought of making a bigger bag, let's see...
and I was going through my fabrand fic piles ound this gorgeous pink flowers fabrics. So I thought making another pouch with it.


Let me know what you think...thanks for stopping by & have a great crafty day ^__^

Mini hair clips

Made these cute hairclips last night for my friends. I'll be meeting them for the first time and thought of giving their kids something handmade. I wanted to make pouches or something like that...but the neck n shoulder just won't compromise. I hope they will like them....<3

Have a nice crafty weekends @-}--


Hello 2011


Helloo.....this is my first post in 2011 and one of my resolution this year is MORE SEWING and less Facebook-ing....LOL..And another resolution is to learn Photography. I've been learning from the net since last month and I think I did improve abit. Please visit my photos at my Flickr album and let me know what you think...

OK, so this is my first project..Folklore Bag from One Yard Wonders. I made this as a birthday preset for my dear friend, Agnes.

So, here it is...with Longer handle than the original pattern


and zipper closure instead of magnetic snap. Finally I made it. I was really want to try zipper and after one technical error finally I did it...YAY!


This is the inside pocket....the bag is roomy enough to carry your necessities even water bottle :). It's just perfect size.

Side View. I use this interface. It gives a good & smooth finish, eventhough stitching is it a bit painful ...LOL. I mean it's not iron-on so I sort of got to hang on to it while stitching. Well, I can always stay-stitch it but just tooo lazy to do all those....Especially when attaching the zipper, handle & bag. Finally I did handstitching first then I did the machine...but all in all, I'm quite happy with how it turned out...I hope she will too...*fingerscrossed*


Thanks for dropping by....happy crafting ^_^
Posted by Picasa

The Gift

The Set


I finished making x-mas gift for my friend today. I wish I could make more and send to as many friends as I could. Though I don't celebrate x-mas, but it's always a pleasure to make x-mas gift for my friends. Well, I usually send cards but this time I decided I'll make a proper handmade x-mas gifts so this particular friend of mine can celebrate x-mas properly ^_*

I made X-mas tree decorations (I hope she buys one already) or otherwise she can hang them on her wall..

Xmas hanging


She loves Korean/Japanese craft, so I thought these simple embroideries will delight her....if I can be a bit narcissistic here, I love the Santa plush. It's really cute.

Xmas Star & Santa

I used chain stitch and buttonhole stitch for the 'belt'. The only drawback was I didn't have x-mas green embroidery floss and I didn't get the time to go to the shop & get one...

Anyway, I hope she likes them...and I hope they can cheer her up a bit...:D

The Santa Embroidery is now available in PDF in my SCRIBD.

Merry Christmas & Joyful New Year everyone....


DIY Labels

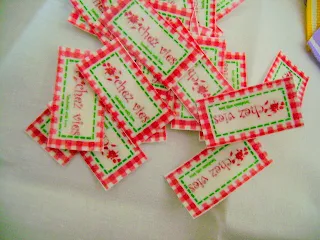
I got this Iron-on Transfer paper which I always wanted to have from my BIL in Indonesia. I've been wanting to try the fabric label like I saw in Patchwork Pottery's Tutorial few months back. Finally, yesterday I got the chance to try it after my DH bought me a canon pixma ink jet printer...Thank you so much, dear..:). The printer worked wonderfully. In fact, I tried both using my friend, Agnes' design and I tried the plain letter one.
 I love the colored ones (though I should have made it bigger). It turned out very clear and I iron it on a plain  cotton fabric and know what..after I cut it, the fabric don't fray...yay!!!..


Second one, I used the plain letters "chez vies" and I iron it on  grosgrain ribbon. The mistake I made here is I cut the strips too narrow. Well the letter perfectly fit in the middle part of the ribbon but I should have cut it about 1' wide. Lesson learnt!


Another lesson I learn is that while ironing, DO NOT move your iron (like when you're ironing). Just press it firmly on the design. Otherwise it will smudge.


Now let's get down making something and start using those labels...:)

Happy Crafting


Latest Fabrics

Latest Video