Powered by Blogger.
Showing posts with label hand quilting. Show all posts

Simple Kantha Coasters for Two


Today is quite a busy day. Besides the usual home chores, I have several orders to send out in the afternoon, so I spent the first half of the day packing and printing labels. I am using DHL e-com and FedEx to shipping out my Etsy orders. 


Sometimes, we're scared to start something new because we're so comfortable in our current situation. This is what's been happening to me in the past year or so. As much as I enjoy making wallets and small bags, I truly miss the joy of "just create" something! Experimenting with my crafts and sharing joy with others. And if you're an Etsy seller, sometimes the pressure is more. You feel like everybody is doing much better than you, especially if you spend more time on social media (Instagram or Facebook). This year, it will be about me enjoying making my craft. I will not take too many custom orders so that I will have more time to learn new things, experiment, and sharing a few tutorials or sewing tips with you all. 


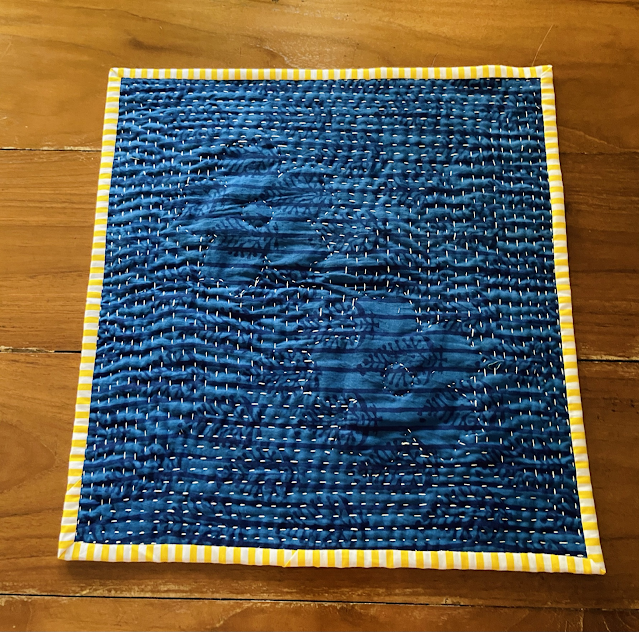
Ok, so this is what I've been working on after the Heartbeat Kantha Coasters! I have this beautiful block print fabric and want to make something with it. I guess, when you start your first step, the inspiration will just flow into your brain. I know I wanted to do more kantha but not sure what design. I wanted something simple and one day after dinner, I thought, why not using the design from the fabric, and this simple linen Kantha coaster is born. The design is about 3" in diameter and the inner circle is about 1" in diameter (I used my machine's bobbin to draw the circle). I used tricot interfacing for these coasters. I'll write more about it in my next post, Insha Allah. And if you want to try the design, be my guest! I'm trying to draft the template, hopefully, I'll have more time this week to complete it. 


Kantha and Block Print Coasters


I sent out 2 sets of Kantha coasters today and I'm so happy and grateful for the response I received on my small quilt shop! I really love making these small quilted coasters and practicing my hand quilting while I binge-watching my C-Drama on Viki after dinner. 


A customer wanted a round and rectangular coaster set. The round coaster was a bit of a challenge to do in a kawandi style of quilting, but it was a great experience. Maybe I will make a few more round coasters. Hmm, another idea to try! 


It's been quite cold in the past few days but today is better. After dealing with couriers almost the whole afternoon, I decided to make muffins but didn't turn out so good, because I found out afterward that the oven was set on upper heat only. This is why you should not multitask or arguing with your son while baking LOL. But the boys enjoyed it, anyway. I need to lookup more muffin recipes! 


That's all for today. Thank you for stopping by! 
Take care & stay safe!

The Kawandi Style Mini Quilted Wall Decor


And here's my first finished quilt of 2021. A mini wall hanging which took me quite a while to finish:)

I started making the Bali batik background in 2019 I think. The plan was to make a panel for a tote bag. I even drafted the bag in detail! But then lockdown happened and we stuck at home. I know I won't need a tote bag! I kept the panel in my UFO Bin and got busy making face masks and whats not :D


And then the Kawandi class happened and I'm hooked to the Kawandi style of quilting. It's therapeutic to just do running stitch round and round, and the result is always satisfying! 

So I decided to make a mini wall hanging. And as I browsed Suzuko Koseki books, I saw the cherry blossom applique quilt. I made the applique before for my kindle cover and I decided to add applique. I chose a chikan white fabric which I have in stash and started making the applique pieces. I have not done applique for a long time so it took me a while to get finish the first flower. Well, practice makes perfect, the second one came out pretty quickly. 


Unlike my previous hand quilting projects (THIS and THIS) where I used cotton batting,  this time I decided to use needle punch batting. Actually, I tried using polyester batting but after I started quilting it, it shifted so much even with a lot of pinning. Although I quite like the result when I did the outline stitching around the flower. 

this is using polyester batting


So I unpicked the whole stitches and changed the batting. The best part about hand quilting is unpicking stitches is so much easier :). Well, there are a lot of learning experiences here, as I incorporated the Indian Kawandi/Gaudi style of quilting and the quilting from Suzuko Koseki's book. In her Playful Patchwork book, she did outline stitching around the applique and then quilt the background in diagonal gridlines. The Kawandi style quilting is done from outward going inward in a circular motion. In this quilt, I did the quilting by section as I quilted circling the appliques. Sometimes, I did the quilting from the back as I can see more clearly :)


As I was finishing the quilting, I drew the last lines using an erasable pen to keep track of where I should go. Oh, by the way, the quilting is around 1/4" apart. It's quite dense :).  While the kawandi quilt doesn't have binding, I used yellow and white stripes as binding here. It gives a good contrast with the indigo block print fabric at the back, doesn't it?

Well, I am happy now it's done and probably I will frame it! I will keep practicing hand quilting this year, Insha Allah, and let's see how this year will unfold. No more resolution for me. I will go with the flow, doing what I can, and hopefully, I can share more tips with you all.

I posted the video on my Youtube Channel from the process and a more detailed view.


Quilting Stats:

Finished Size: 15" x 15" 

Fabric: Bali Batik for background, Indigo block print for the backing, chikan cotton fabric for applique. 

Thread: Anchor Pearl Cotton No. 8


Thank you for stopping by!

Take care & Happy Sewing!

Elvira

Linking up to these wonderful BLOGS

Hand quilted Trivets - Moonshine and Valentine

 Here are some 9980 hours to mastering hand quilting 😃


I'm a big fan of Suzuko Koseki and I collected a few of her books. The one I particularly love and want to learn from is the Modern Quilts book. It has an interesting quilt pattern from simple to complicated ones, or at least it looks complicated to me :D. 

In these 2 mini quilts, I am using Indian Handloom fabrics in high contrast colors. I was not sure in the beginning but once done, they turned out really pretty. Sometimes, we have to try something out of our comfort zone! 


Colorful Trivet


The book only gave dimension of the block but not really gave instructions. But I supposed it was to be pieced in half circle. So I did with this teal and orange one. 

I made another one which I cut 5" square and piece quarter circle block. I don't know if this is the correct term :D. 


I called these block my Moonshine and valentine - just because it the shape remind me of the moon and I was watching C-Drama with the same title. Johnny Huang is stunning in the drama 💙! 


Hand Quilted Trivet
Mug Rug

On the back, I used glace cotton fabric in dark teal and I love the texture of the finished quilt. They turned out very soft. The trivets finished at 8" x 8" and it's just the perfect size for anything. From mug rug, doily, trivets, or even for indoor plant mat.

I am still curious about the block and plan to make more but using poplin cotton instead of handloom fabrics. Although handloom colors are gorgeous, it's a bit too stiff for circle piecing. Maybe I can do better with cotton or Bali Batiks! 


I bought this local brand needle Jyoti Needles before I did the Kantha Workshop. I was skeptical in the beginning but the shop owner didn't have Pony Needle when I went. And guess what? It turned out really good and all the needles are sharp. I always have a problem with Pony Needle for hand sewing my wallet. But this one turned out better than Pony. I may need to stock up now.


I am still doing the quilting based on the Kawandi Quilt as I really love it. I plan to make more small kawandi quilts too, but it may take a while before I finally get down to make it. I have a few UFO quilts that I want to finish. Most of them are small quilts and a few single bed quilts. 


If you want to know how I did the quilting, I uploaded a small video on my Youtube Channel. It was recorded during my first Instagram Live. You can watch it here. 


Thank you for stopping by, I hope you enjoy your visit!

Happy Sewing,

Elvira

***Linking up to these wonderful Blogs ***


Resources:

Book: Modern Quilts by Suzuko Koseki

Fabric: Handloom / Shotcotton


Reopening My Etsy Shop after Vacation Mode

 As you know, I really enjoy making simple and small quilts. And since I took the Kawandi Quilt Workshop last month, I've been hook to hand quilting. I have many small patchworks waiting to be made into something, but always got sidetracked. Well, I always have several projects going on besides working on orders. But you know what? Working in something you love is a great mood booster. And no, you don't have to follow so and so design or style or trend. Just simply do what you're happy to do. Even if it's a simple project. 


Last week I finally open my UFO/WIP bins and started working on small hand quilting projects and I am so happy with the result. In the Kawandi workshop last month, Saba told us about big stitch quilting (check out this post), which apparently trending now. I looked up about it on Pinterest and it's basically running stitch hand quilting like sashiko, Kantha, boro, and kawandi. Now, there is more than just running stitch! All those arts have a significant style and history behind it. And I'm so happy I'll be learning more about Kantha in next month's Workshop with Brinda Ma'am. so stay tuned and make sure to subscribe to my blog :D. 


I've been procrastinating about re-opening my small quilt shop on Etsy and finally a few days ago I did it! Wish me luck and if you have a little time, do check it out and favorite the shop! Thanks!!

VISIT MY QUILT SHOP

Right now, I only listed ready to ship items. Mostly are mug rugs and coasters! I really love the rectangular coasters. I used solid color at the back, so it will have a unique design and make it reversible! 


The coasters come in a set of 2 and since the gifting season is here if you buy 3, I offer free Express Shipping (5-7 days delivery)! The offer is also valid in my Handmade Shop.


What happened during Vacation Mode? 

Well, if you also thinking of re-opening your Etsy shop after a long hiatus like me, there are a few things you have to keep in mind.

According to Etsy, here's what happened when you put your shop on Vacation Mode:

  • Your shop will still appear if someone searches for your exact shop name, but will not appear as an auto-suggestion in Search or other shopping tools.
  • Your items won’t appear in Search.
And when you re-open your shop, it's basically like starting a new shop. What I noticed tho, my products still WON'T appear in searches for at least 24 hours after I activated the shop. Well, I used to put my fabric shop and handmade shop on vacation mode when I travel for a month or two, but I always able to bounce back within a few days. 
I think it's because the shop was not active for a long period of time, and during that time many changes have happened in Etsy, and all my previous data sort of deindexed. Now, I will have to work from scratch again! How exciting is that! :D

Now, how to get your shop up and running again after a long vacation mode?

I've been reading a few blogs and articles and I'm trying out a few things right now. When I checked my stats, I still have visitors every month even though it's very minimal. The visit mostly comes from my other shops. 
Here are a few things I am doing now:
  • Edit my shop - fill up all the shop policy, announcement, about info, etc
  • Editing the listing photos. If you have stock of your previous products, you can retake the photos, editing the title, tags, and description. 
  • Adding new products at least one every day! If you have many items to list, DO NOT list them all at once. By listing one or a few products each day, your shop will get a little booster in search placement. 
  • Post shop updates every day and
  • Share it on Social Media as much as you can. Using Etsy social media updates comes with a link to your listing. It's very convenient instead of copy-paste the link from the browser.
  • If you have a blog, it's a good time to post about it too (like what I am doing now).
  • If you have a small budget to spare, you can consider using Etsy Ads, starts with a minimum amount, and increase it as needed.
I've seen an increase in views and visit since yesterday and hopefully will hear a ka-ching soon :D

If you're thinking of opening an Etsy shop, use this LINK to get 40 free listings! 

Thank you for stopping by today.
Happy Sewing!

~ Elvira


Learning Traditional Indian Kawadi Quilt


When there was Kawadi Quilt workshop a few years ago in Bangalore, I really wanted to go but couldn't. It's been on my bucket list to learn this Indian traditional quilt. 
When Brinda Ma'am from Moments of Quiet announced on Desi Quilters Group on Facebook that she will have another workshop, I quickly registered. And I am glad I did.

 I already learned so much during the first lesson. The story and the wisdom behind Kawadi Quilt, also what set it apart from the other form of quilts in India. Kawadi or Kawandi is originated from Siddi tribe in North Karnataka. Apparently, every tribe has a different unique design. 

We are given a list of materials we have to gather. Preferably old muslin saree or muslin dupatta. I have this pink muslin dupatta which I don't use and it's just perfect. 
Also, we have to provide some kind of saree borders. I decide to use this fancy one. Though traditionally they are using saree border. 

My stitches are not even as yet but I thoroughly enjoyed this! I finished sewing 3 lines running stitches around the border and looking forward to the next class where we will add more fabrics and special design! 

Check out the Moments of Quiet Facebook Page if you want to know more information about the next class. Choosing fabric was fun, cos I have lots of Indian mulmul/muslin scraps and pre-cuts

In the second class, we learned to add patches to the border and also make a special design. The special design is quite tricky for first-timer, I had to rip it several times before I managed to do a decent one. These special designs or motifs symbolizes everyday life like Kites, Angan (Courtyard), and temples. The Kawadi quilt also always has 4 flowers at the corners. This a must-have. Without the flowers, the quilt will look incomplete. 


As for the quilting, it is done by doing running stitches from the outside border going around towards the inside. We don't use any measuring tape or ruler, instead, we learn to measure using our fingers. The space between stitch lines is usually 1 finger apart and you can use any fingers. 


Another unique thing is we should "feed" the quilt before we finish with a few grains of rice. The wisdom behind it is that the quilt must be nurtured, and that is by feeding the quilt so that it will last for along time.


While doing Kawadi, I learned that I should only focus on the patch and stitches that I am working on, don't worry about how it will turn out cos this is supposed to be organic. When we reach the end of one patch, we simply pick up another one, fold and cover the raw edges and move on. We don't need a design wall. The result will always be a surprise. It reflexes who you are and how you feel at the time you make the quilt. It's liberating! 


Most of us finished our quilts before the last class. So on the 3rd meet, Brinda Ma'am told us more history about it and we kinda have a show and tell what quilt we're working on. You can check her experience when she did a residential workshop with Nirmala Akka
Check out these few quilts from Nirmala Akka that Brinda Maam shared with us. You can also see her Kawadi Quilts  on her BLOG.


It was a really lovely workshop and I'm looking forward to more! We need to learn this ancient art and preserve the authenticity of this art. 

I'm looking forward to making more of kawadi quilts. I really enjoyed the freedom and the hand quilting process. 

Update: This post is featured on Handmade Monday! Thank you Julie!!

Thank you for stopping by!

Stay safe & happy sewing!
Elvira

(Mini Tutorial) How I do my Foundation Piecing Quilted Pouch

Hello again,

I hope you all had a great weekend. Well, I did. Last Saturday the boys went to school picnic and would be back by evening. That means I have a whole day and afternoon free. Woohoo!

I was working on one custom order of mini sling bag, but my mind kept wandering to the bag under my computer table. The Pandora bag (not box) that hold my  Quilted Bag Kit from my bestie, Winda. She gave it to me 2 years ago when we met in Jakarta. The kit was a bag kit and she already started making 2 or 3 blocks. So I put away what I was working on and pulled out the bag, sorting out the pieces, interfacings, batting, etc. That was on Friday evening. The next day, after the boys were out of the house and a quick housework,  I started piecing the blocks and here's my pouch. 


At first, I thought of making a tote bag after I saw this Instagram Post. Then decided to do less ambitious one first.

Here's what I learned during the weekends. 

Many blogs wrote about using Freezer Paper for foundation piecing, which is not available here in North East India (or even India for that matter). The kit (it's Japanese Craft Kit) used a fusible stabilizer which is a thicker version of what we called "pasting" in here.  That is a thin lightweight nonwoven fusible interfacing. So I tried using our own desi interfacing and it worked like a charm. Yay! I remake the pattern on my computer based on the original size and print it on the interfacing. I cut the interfacing slightly smaller than the A4 size paper, fuse it lightly on the paper and run it through the printer, et voila! No more tracing pattern one by one !! (it's the same method I used for this DIY Printed Label)


 I didn't really follow the pattern instructions. What I did as cutting a strip of fabrics that will be used and do it like quilt as you go method. 
First, lay the 1st piece of fabrics on the glue side of the interfacing, right sigh up. 


Then place Fabric No. 2 on top of fabric No.1 right side together matching the seam. Make sure that when you flip the fabric (no.2), it will cover the triangle no. 2 plus around 1/4" seam allowance. 


Flip it to the reverse side, pin and sew on the line 

Like this


Now open fabric no. 2 away from the seam and finger press. 

Trim fabric No. 2 so that it has 1/4" seam allowance. 

Continue in the same manner until you cover the template. Don't be discouraged when it looks ugly ^v^.


Because after you trim the excess fabrics you will get this pretty little blocks.

Reverse Side After trimming
Aren't they cute?
Front View

I almost proud of my self (well, I do actually) to be able to complete this. Paper Piecing is something that I always feel it's difficult and a lot of work. Especially if I have to trace the pattern one by one. 
After an hour here what I got!

Blocks size : 3 1/4" x 3 1/4" after trimming

After lunch and a quick nap, I started working on the pouch. I decided to do hand quilting. Hand quilting is one thing that I always want to do. I realized with the right batting, hand quilting is so easy to do. And if you have your fave Korean drama on, it's the better. It's like killing 2 birds with one stone. LOL. 

Hand Quilting with Gutterman Cotton Thread
I didn't tear off the interfacing since I am making a pouch and I love a slightly structured pouch, so the interfacing will work out great. I just needed to add the batting. 
Front Side 
I used Sevenberry fabric for the back of the pouch. Isn't that lovely? I picked up the fabric during my visit to Indonesia last year. 


Sometimes, we have to face our fears and just do it. Sometimes things look difficult and complicated until you actually do it.

So, what are you making this week? 

Until then,

Happy Sewing, 

Linky Party:


Latest Video