Powered by Blogger.

Snappy Pouches


I need something to keep my wonder clips then I saw several tutorial about this snappy mini pouch. There are several technique to do it but I found this one the easiest.  (thank you Nancy-ssi for the tutorial)


I use my own measurements for this. Since it's pretty small, I decided to make several. It's always nice to have one handy for gifting, right? The blue cat  print is leftover from a passport wallet I did for a customer a few months ago. I thought I'd cut and added into my pre cut bin, but it was big enough to make this pouch :D

The blue and green is Indian fabrics. The leaf print blue is a handloom fabric, also leftover from passport holder and the patchwork print was a gift from a friend. 


The pouch is very cute and we can use it to keep many things, coins (the most popular), sewing kits , or like me to keep my wonder clips:)

I keep the other two for gift. 

It's always nice to learn something new, right?   Here's the video in case you want to make one too: 


Happy Sewing ^^

- Elvira -

Granny Squares Quilt Progress

Hello,

Just a quick update on my Granny Squares. I added 4  blocks yesterday. Yay! It feels so good to see all those blocks together. I don't have a design wall, so I made a makeshift wall by hanging a piece of batting on my curtain rod . Sometimes I just leave it there for days that my MIL thought I have a new curtain. Well, that's not a bad idea! 


The picture above was from last week after I added the blue and orange blocks. I kinda like  the blue stripes one. I have same stripe in red and yellow. Maybe I will make another blocks with those 2 colors. 


My scraps are not all of the same weight, mostly local fabrics that I bought more than a decade ago when I started sewing and making dresses. They bring back memories when I used to passionately try different kind of sewing craft, sewing technique, getting to know different kind of cotton fabrics, etc. All these fabrics are part of my sewing journey and I am glad I don't throw them away because they will be part of the quilt that I'm making. Some of them I bought from a small shop in the market before the market was gutted by fire few years ago. Now I wonder if the old man still have the shop! 

So, anyone else doing scrap buster this year? Leave your comment and link below, I'd love to see your projects!

Until next time,
Happy Sewing

- Elvira- 

*********

Linking up to:

Design Wall Monday

Scrap Buster Challenge

I mentioned in my previous post that I started another quilt after organizing my scraps. Since the beginning of the new year, I've been on the process of sorting out my scraps. So far I cut orange, yellow, pink, red and low volume. 


I always love scrappy yet structured quilts and the easiest will be log cabin. Though I love making scrappy log cabin (like THIS ONE), I always want to make something else. I realized I love small squares, esp 2.5" and 2" and always drooling over those postage stamp quilts on Instagram and Pinterest. Hmm, maybe this time I will be able to make one too.


This year, there are a lot of quilters are doing scrap/stash buster challenge on Facebook and Instagram! If you want to tackle your scraps this year, just enroll on one of them! Well, I did sign up for Pat Sloan Stash Buster Challenge Traffic Jam and I'm still cutting up my squares. I made 4 trial blocks but I think I'm going to change the background color.


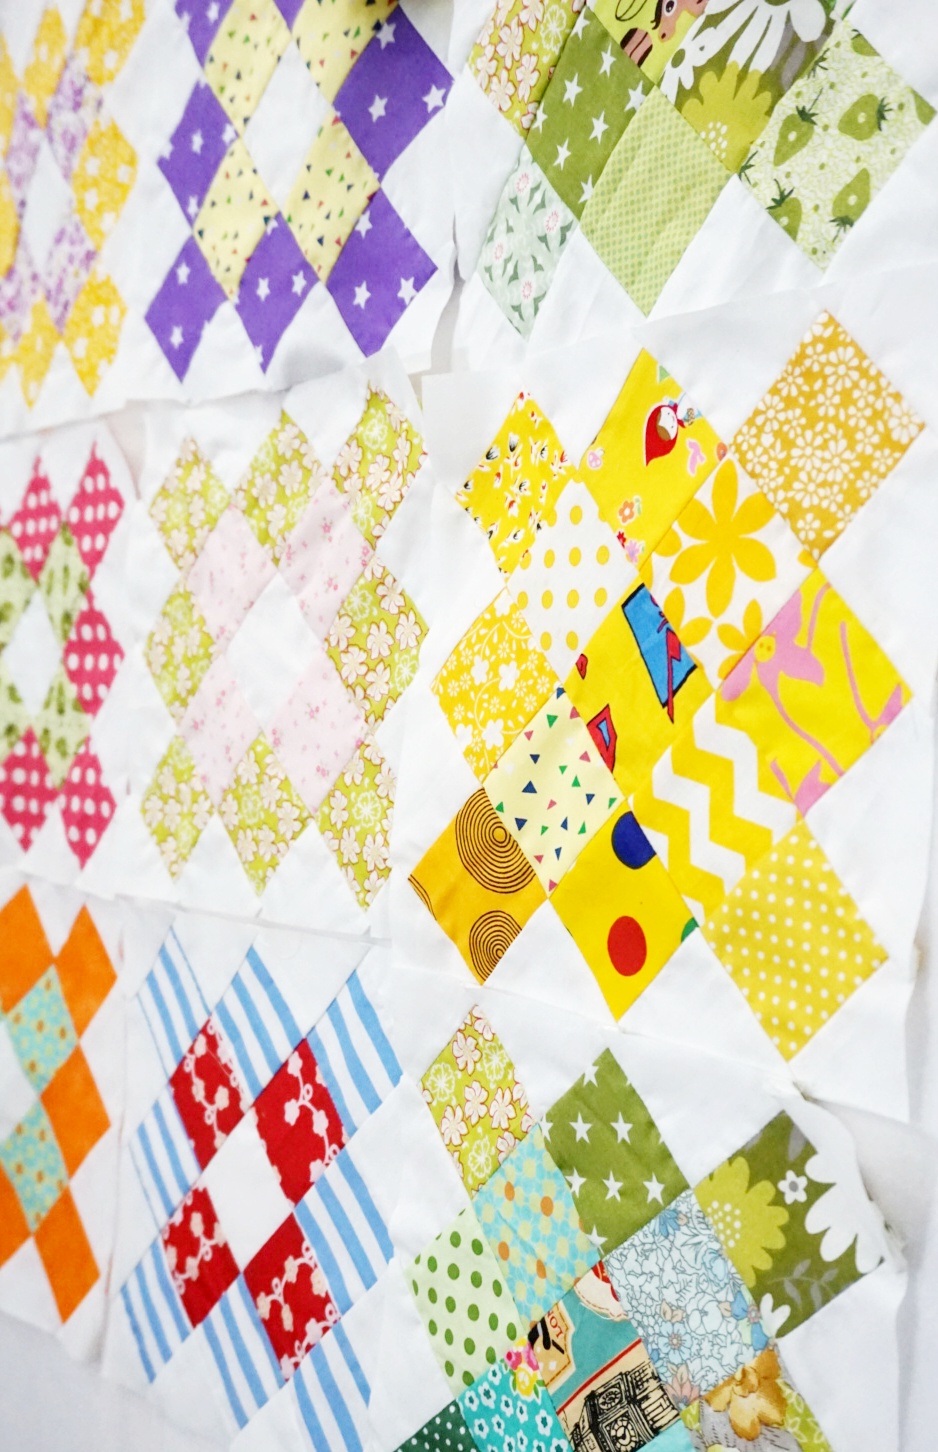
I started Granny Squares quilt too from the scraps that I already cut. Oh, I have so many plan in my head already! Many times I have to remind my self to go easy and do one block at a time LOL. I'm not racing with anyone here. I just want to enjoy this process


If you see the picture above, I have 4 blocks of Granny Squares which used scrappy prints in single color. Those were my trial blocks and after looking into so many GS quilts in Pinterest I think, I prefer using 2 prints on white background. I think I will make a cushion cover with the initial 4 blocks. Each block is almost 9" squares, so it will make a nice 18"pillow case, right? Oh I am so excited! 


So far, I am filling up 3 plastic containers. Two of them for 2.5", 2" , 3" and 3.5" squares. For 4" and 5" squares I keep them in another container. It's so satisfying to see all those squares neatly stored ^^. 

If you want to start organizing your scraps, here's few of my tips
1. Sort your scraps by color first. Use the background color or the dominant color(if it's big print) as to determine the color group. 
2. Iron and starch (if necessary) the fabrics.
2. Cut your favorite size first.
3. If you're not sure, you can cut into 5" and 4". I find those size is versatile. You can make 2.5" squares from 5" and 2" from 4". Those size is great to make Half Square Triangle too. 
5. If you don't have big container, put them in shoe boxes by stacking them. That way, your pieces are always ready to use. I used to keep them in sealed plastic but they get crushed and I have to iron them again :D. 
6. Put on your fave show or music. Trust me, this cutting business is fun but tiring. But it will be so worth it!! 


This is going to be FUN year!! 

Happy Sewing

- Elvira-


Passport Wallet Pattern Improvisation

Hello again,

I made this Mini Passport Wallet few weeks ago. This is an improvisation from the original pattern. This time I used faux leather and I really love how this turned out.


Ok, let's start!
First you have to download the Passport Cover Pattern from ETSY or HERE
You also need BIAS BINDING strip(around 10 inch long or so). 

Take the card slot base and cut the fabrics and interfacing by 1/2" and draw a curve on the TOP RIGHT corner only. Now, place the card slot as per pattern instructions on the card slot base. From the reverse side, attach the bias binding. Go easy on the curve and do not pull the binding. 


Snip along the curve, be careful not to cut the stitches :D


Fold the binding over the raw edge of the card base and pin in place


Carefully stitch the binding edge. Now your card slot is ready to be assembled. 


Finish the wallet as per the pattern:) It's super duper easy, right?


 I use all purpose interfacing for the faux leather to stabilize the stretchy leather.
I've been experimenting with faux leather in the past few weeks. I bought high grade FL from local shop and oh I love the colors they have!! I will show you soon. 

Do tag me using #chezviespatterns when you're posting on social media, or tag my INSTAGRAM account. I'd really love to see your creations! 

Happy Sewing!!

- Elvira - 

Latest Fabrics

Latest Video