Powered by Blogger.

TUTORIAL: MOBILE PHONE POUCH with POCKET


I love making this easy peasy mobile pouch. It’s great gift and it needs only a little bit of scraps and time

So, now here we go:

First of all, measure you mobile phone from sides to side and ADD 1 inch (or you can add a little more if you’re unsure/newbie)


Mine was 3” x 5 “ (4” x 6” with seam included).

Now the FUN part:

1. Get your scrap and do the following


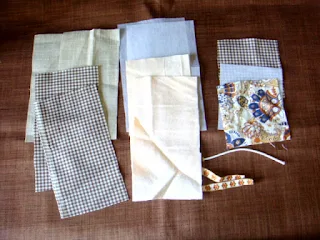
a. CUT 2 pcs ( 4” X 6”) of each MAIN FABRIC, LINING, INTERFACE & BATTING

b. Cut 1 pcs of (4” x 4”) of MAIN, LINING &  INTERFACE (for pocket)

c. Cut 1 elastic cord according to your desire

d. Cut 2 decorative ribbon for the side loops


2. Iron the Interface to the MAIN fabric


3. Let’s do the pocket now. 


Put the MAIN  the LINING (right sides facing) and stitch along the TOP part (1/4”). Turn it around, press nicely and top stitch it.


4. Put the pocket to the bottom front part of the MAIN fabric and stay stitch around the sides the bottom.


5. Attach/Stay stitch the elastic cord and the ribbon to the back part of the MAIN fabric


6. Now arrange: MAIN (right sides face up),  LINING (Right sides face down) & Batting,.


7. Now sew along the TOP part (3/8”).


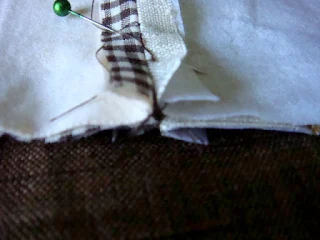
8. Open the seam (I put the batting with the LINING which is actually NOT ADVISABLE), put the LINING &  the MAIN (with batting) Together, good sides facing. Match the seam & carefully PIN it.


 I usually pin this part first and then pin the rest . 
Once you satisfied, start stitch it around, START from the SIDES of the LINING fabric (do reverse stitch when start and end your stitch). Leave around 2” gap (when making small pouches I love to leave the gap a bit more at the sides. It’s easier to maneuver it later.


9. You’re almost there….Cut the corners and make a small snip at the corners) and now you turn it around. Ok it’s a bit difficult but you’ll manage…there you go…do a little bit of poking on each corner. It will look more of less like this..


10. Stitch close the opening and push the lining part inside the main part. Do a little more poking and when you satisfied, stitch down the top edge. This is how I usually do it.


11. Attach the button and now your mobile pouch is ready. 


You can put long cord on the loop or detachable strap.


(*TIPS: while doing No. 8, I usually stitch the lining a bit smaller than the main part. It gives a better finish for bags  & pouches).

I hope this is clear enough, do email me if you have any question(s) ^_^

Have a nice CRAFTY weekends


Tutorial: Placemats in a Jiffy

My sons badly need a new set of placemats. I want something in dark and bright color plus easy to wash & dry. So I rummaged through my fabric stash and found this dark blue fabric with cartoon character and I took out my fave red gingham. The red gingham is cotton Ssnthetic mix and the blue one is pure cotton.

and here's how I made it:

1. Cut the Main (Blue) fabric as desired.  Mine is: 17" x 14"
 Cut the backing fabric (red gingham)  approx. 1 " more of the main fabric (on all sides) => 19" x 16"


2. Place the main fabric on the backing (wrong sides facing) and fold in the remaining inches. Pin all around.


3. Sew sew sew...zzzggggzzggg...


4. Voila you're done...


Now your lil one can have one or two of her/his favorite cartoon too...^_^

Have a great CRAFTY weekends


It's been a long time


It's been more than a month I haven't updated my blog. I've been quite busy in the past months. I've made few dresses for my friend's DD and making few pouches too.


I bought few back issues of craft magazines (handmade & country craft) from Australia and quite excited to make few items there...it's simply mind blowing ...

here's the pouches
and the dresses


Posted by Picasa

and here's my WIP this week


Thanks for stopping by...Happy Crafting ^_^


Birthday Dress For Anisha

Just a quick post...My best friend, Wulan, last minute asked me to make a birthday dress for her little princess, Anisha. There was hardly any time. Until Saturday night we were still discussing what will suit her best and what fabric are available with  me right now. Sometimes back, on a wimp, I bought few yards of Dupioni Silks. I bought few colors and one of them in this maroonish wine color, which is go gorgeous and soft. It's polished dupiony silk. It shines beautifully.
And I had 1 yard left of crepe silk fabric in off white. I thought that'd be a good combo. Wulan is really easy to work with..and thanks alot for TRUSTING me, dearest. This is the first time I attemped making a party dress.
I had only 2 - 3 days to finish and as luck would have it, I have all the material ready, including the poly cotton lining fabric. Wulan wanted something that will be comfortable to wear on Anisha's birthday party. You know India is very hot during the summer, even with the AC on. So, we thought this will be great cos we don't want to make the little lady cranky cos the dress is uncomfotable.

We thought of adding a netty pettycoat to make it fuller, but it turn out okay without one. First, because there was nation-wide strike in India so going fabric shopping was out of the question, secondly, to find a matching coloir will be another hard task. Luckily, the silk fabric is 42" wide.

I sewn tiny faux pearls around the neck & sleeves, and added a bunch of small ribbon flowers in the sash.

and there's the little princess...isn't she cute???


Oh and I made one more dress for Anisha too..here it is


NOTE:  Dupioni Silk still available at my ETSY SHOP

So, that's all ...until then...happy crafting

Red zig zag table top

Last week has been a little slow on sewing side. And now the summer holidays is around the corner so I have to think of how to keep my energetic sons busy. I enroll them into a summer camp sort of things, so that will keep them amused for sometimes.

Meanwhile, I managed to finish my (yet again) table runner. Yup, the zig zag quilt one. I was thinking of giving a white border (sash?), but it wasn't look good so I opened it again and decided not to give any border. Instead I chose red polkadots as a backing & binding.  What do you think?


There was a little bit binding left and one morning I made this pencil holder out of Fox can..now it looked more decent, don't you think?


So, now the #1 block of the BLACK & WHITE Quilt Along of Crafty gemini....(sorry my progress is very very slow). What do you think? It's fun to work with and can't wait to finish the next block. I have to play hide and seek with my little one since he always after my precious rotary cutter..:P


Thank you for stopping by....happy crafting


Blue Knotted Dress and everything else


I've been a bit busy recently. Not so much of sewing though. I still have the Red zig zag runner to finish. However I was so excited with my new toy..Olfa rotary cutter which I finally bought from Yvette at Etsy. She's so nice to double wrap it without any additional charge.


I found this nice blog of Crafty Gemini where she gives video tutorial on sewing. Recently Vanessa started a Black & White Quilt A Long . I'm going to participate (yay!), since I've been wanting to make quilt for my sons. I hope I can finish it. It's going to be my first big quilt. So here what I've got:


And one more thing, I made this knotted dress for my friend's niece. Got the fabric from one of my regular shop. It's the last 1.5 yards fabric. I love the color, it's perfect for summer. I was thinking of yellow solid for the strap but I didn't have it in stock so I went ahead with the blue one instead.


 End of this week, my sons mid term assessment will start, so all the sewing craft related will be put on the back seat for awhile...until then...Happy Crafting


Hour Glass Table Runner

Yup, it’s done. Yesterday I just couldn’t stop my self to finish it.  I settled for burnt orange backing and I used thin foam as a batting (still no luck with the batting, the company I wrote to only take bulk orders ). For the binding, I was thinking of a lime green fabric, but I didn’t have it in stock and I went for the 2nd best, the green polkadots. I guess it’s not look bad..don’t you think?

               hour glass-4               

 hour glass-5


I pieced the squares using my DIY Quilting Rulers. Well, I must say I’m quite happy with it. I guess I will make a bigger one:). 
This one I quilted by machine. I was thinking of doing free motion but not sure how will I do it since I don’t have a proper shoe for that. I think I will do small quilt (maybe a pot holder?) and will use it as a practice piece for my free motion.
hour glass-3    

                              
  hour glass-2

I ‘found’ this nice corner in my SIL’s drawing room where it has a perfect lighting in the afternoon


Now, I already thinking of another runner project to try, but I got to finish few custom orders and I saw  SKIRT WEEK at Crafterhours. I don’t know whether I will be able to make one but I really  want to try. As it is I got several fabrics which I thought I’ll make skirts. PLUS…check out the PRIZES…..Hmmm…let’s see….


Until then……happy crafting
Phiphi SIGNATURE

WIP Wednesday: Hour Glass Table Runner


I hate to unpick stitches:(. This orange squares have gone through a lot. I love the fabric and wanted to make table runner. First I just put the squares together and put a solid white in the middle, but it didn't look good. And since i hate unpicking it, I thought of doing some applique works on the solid or some hand embroidery. Again it was not good.


So I decided to unpick (yay) n make hour glass squares instead. N been playing with layout ideas the whole afternoon. Can't wait to finish it.


 This is what's I've done so far. The backing fabric is from one if my Tunic.


Happy Crafting everyone..:)

Shot Cotton Pinwheel Runner and Patchwork Pouch

These are 2 more patchwork projects I have finished recently.

Pinwheel table runner


hand quilted, this one now available at the SHOP


Triangle Pouch is sort of hold-all pouch. The size is very generous, great to hold all your craft tools


Still remember the Handmade Label Tutorial? I'm getting better..;)


Ok Ladies, now time to take those restless kiddos out...catch you later..have a great weekends

Latest Fabrics

Latest Video