Powered by Blogger.

More Family Passport Holders

Guwahati, Assam, India
Hello again,

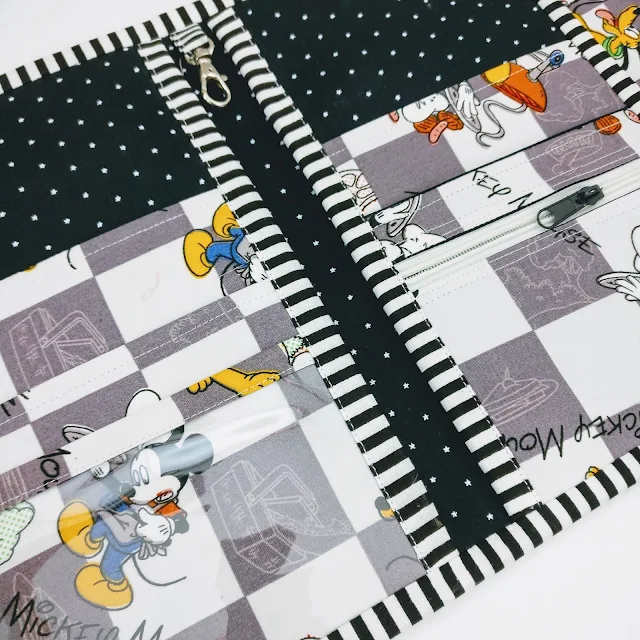
I finally finished this Disney theme Family passport holder for 4. I started the wallet last Sunday. I am currently taking medicine for my chronic allergy which make me very drowsy especially during the morning hours.


This Paris theme is another family passport holder I finished last Sunday. It went out for delivery on Monday but turned out there was a Bharat Bandh. That is a national strike called by the opposition party. 


This one is for 6 passport. I found the fabric during my konmari cleaning session and so happy to find it. I thought I didn't have more of the fabric. 


I think even fabric, every piece of them has their own destiny! I made similar passport holder earlier but I this time I used a different fabric combo. I always try to make every wallet different, so everyone will get special one!

Both the passport holder using the same pattern. I wrote a Tutorial on how to adjust the pattern to make 4 passport holder

I hope the recipient will be happy and love the passport holder! 

Thank you for stopping by!

Happy Crafting

~Elvira~

Linking up to:
Handmade Monday
Show Off Saturday


What is your favorite wallet?

Guwahati, Assam, India
Hi there,

It's already September and the festival season is started here in India. And also exam season for the sons. The elder one will have Trinity piano exam at the last week of this month. I hope can prepare well, since his midterm exam also will start from tomorrow. 

The sheep double zip wallet

Sewing wise, I finished 2 wallets this week!  One is the double zip wallet from Noodlehead's book the Handmade Style. It's been on my list for quite a while. It was quick and fun sewing. 


I'm quite minimalist when it comes to wallet. I normally carry 2 cards and a few business cards. The double zip wallet has 6 card slots, 1 slip pocket and 2 zipper compartments which can be used to carry your phone! 

Wallet Phone case

I really liked the flap with magnetic snap that keep the 2 zipper compartments together. Here I used a gingham black and white fabric to contrast the cute sheep print that I got from my trip to Japan earlier this year. 

Slim and Minimalist Wallet


The second wallet is the bifold slim wallet. This is my own design/pattern. I found the hexagon print fabric in my stash and I know I am going to make a wallet with it! I used the lacy zipper too!! I think I need to get more of the lacy zippers, I really love it!!


Hexagon Bifold Wallet

This bifold wallet can also hold 6 cards, has 1 zipper pocket and 2 slip pockets. It closes with flap and snap button. I made a pointed flap this time to match the hexagon print.


I finished the wallet with hand sewn binding as always. I decided to stripe bias binding and I love how this wallet turned out! 

What is your fave wallet to carry?

Thank you for stopping by! 

~ Elvira~

Happy Sewing

======

This blog post is linked to these beautiful blogs:
Handmade Monday

Paris Theme Travel Wallet

Guwahati, Assam, India
Hello,

The last couple of weeks I've been quite productive. I guess the Konmari mission brings a good energy! 

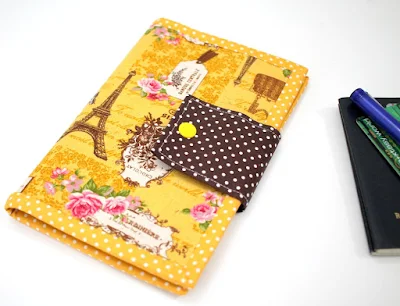
Today I finished this yellow Paris Travel Wallet which has been in my WIP bin for quite a while. 


Working with directional fabric is tricky sometimes. This yellow Japan linen has Eiffel Tower and bag print all over but they are not in the same direction. I didn't pay attention when I cut and turned out the Eiffel Tower was upside down. So I decided to cut another one and will think of way to use the previous one. 


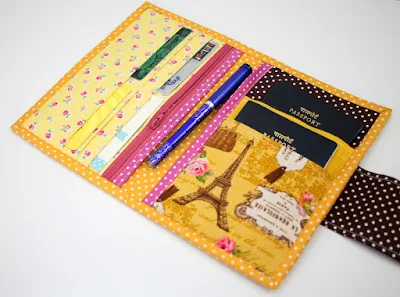
Since I finished tidying up my fabric stash, now searching for fabric combo is much easier. For this particular wallet, I decided to use this pretty small roses print in butterscotch yellow from sevenberry for the card slot. I had the fabric for quite a white and I am so glad to finally able to use it!


This travel wallet is very handy since it can hold up to 6 cards, 3 passports, boarding passes, pen holder, zipper pocket for your cash and 2 slip pockets to keep your documents. 

Paris Travel Wallet

It closes with snap button and the polka dots binding to make the passport holder sturdy. 
I am happy with the result! Sometimes, it's worth it to do that extra works to create beautiful things. 

Thank you for stopping by!

Until then,
Happy Sewing

~ Elvira ~

=====================

Link Up Party

Konmari Method for Sewing Room - Progress update 1

Guwahati, Assam, India
Hello,

Putting things away created the illusion that the clutter problem has been solved. Marie Kondo

It's been very hot and humid these days. I always say, the summer holiday should be extended or changed to August. 
But the heat didn't stop me from continuing my mission of tidying up the konmari way.

Marie suggested in her book "the Life-Changing Magic of Tidying Up" to do it based on category and do it all at once for each category. This part is a little bit difficult to do, since I don't have much time. 
Instead, I do little by little every few days. One subcategory at a time. The past 2 weeks, I've been busy doing KM-ing for my sewing room. The first I did was the bag hardwares and sewing notions. Those were kept all over the place, so I took out everything and kept them in one rack and labelled each containers and bottles. And next to it is all the interfacing rolls. 


Fabric wise, I divided the category into several sub categories. 

1. More than 2 yards 

For over 2 yards of fabrics, I keep them in a saree bag with clear top which I got from Amazon. They are very handy to store fabrics. 


I fold them the KM way and store them in a cupboard under my sewing table. 


2. Less than 2 Yards. 

For this subcategory, I divided into: 
- 1 yards
- Half Yard
- Fat Quarters
- Fat Eighth 

For 1 yard fabrics, I folded the KM way around 10" wide. Fold and store them vertically in back row of my fabric cupboard. 
For Fat Quarter fabrics, I fold them smaller and place it in the front row. This way, I can still see the yard fabrics too. 


I don't have to sort them by colors too, since you can literally see everything there. 
For the Fat Eighth Fabrics, I roll  and put them in a box vertically. That way, I just check them when I need just a small piece of fabrics. 


The idea was from Japanese fabrics I bought from my Japan trip. Once rolled, I secure it with washi tape. 


3. Fabric Strips and Scraps 

For Strips, I divided into 1.5" wide , 2" - 3" , 4" - 6" . I put them in separate containers and mark each of them. For the 4-6 inches bin, I fold each fabric and store them neatly in the bin. This way, I will know at a glance which fabrics I can use. 


For 1.5" bin, it's always a mess, since I open it very often for binding my wallets and small quilts. I am still thinking a better way to store them. Maybe using cards. I want something that take less space. 

For scraps, the size can be varied as long as I know I won't be needing them for wallet and bag projects.  And I already have buckets with cover and separated by colors. My biggest problem in here is the dust. That's why I want everything to be covered. 

I have a book case which I used to store the 2 yards fabrics. For now, I use the top row to keep the solid fabrics. I plan to make a curtain for the book case. Let's see.


I'm yet to tackle the books, which I think I will do it last. But I already sorted out my paper patterns. 


I keep the pattern pieces in a folder. So far I have 3 folders. I threw away any pattern pieces which I know I won't make it anymore. Since I have the digital version, I can always print them whenever I need it in the future. I used to keep the paper patterns in a saree bag and I threw away most of them. I wonder why did I keep all those trash! LOL

I used to have boxes filled with fabrics and most of them are all gone now. I still have more shoe boxes to sort out and then there are more scraps I kept under my computer table *sigh*. 

In the beginning, it was difficult to decide which stuff do not spark joy anymore. But as I keep going, it is easier for me to decide. Now I have one  28" suitcase filled with my personal fabric collection which I wish to destash. Most of them I bought from my trips. I decided I will keep less than a yard for each fabrics. 

What I learned so far:

- Have a clear vision of what you want to keep and how you'd like to organize your sewing room. That way you will save time organizing it. Write down your categories and subcategories. 

- Deal with scraps immediately. The "I will deal with it later" will ultimately never get done. 

- Storing vertically, give you a clear birds eye view of things that you have. Now I can find fabrics within minutes, which normally take 2 days! 

- Do exercise (physical exercise) before embarking to KM journey. Believe me, sitting on the floor folding fabrics can break your back!! Plus exercise give you more energy!! 

- I feel more inspired after clearing up some stuff! I even managed to finish 2 orders in one evening after whole day of organizing. 

I still have a long way to go! So far from my sewing room alone I throw away more than 5 big bags of garbage. While from the home, we threw away 11 huge bags of useless stuff! Well, it's going to be a long journey and I am not in a hurry. 

That's all for the Konmari Method update. If you think you don't need to learn about tidying up, you might consider buying her book. 

Thank you for stopping by! 

Happy Sewing

- Elvira-


Reversible and Foldable Fabric Storage Bin

Hello,

Fabric storage bin is a great way to get your home organized. There are plenty tutorials you can find in Pinterest. This week, in between finishing my wallet orders, I made these fabric bins based on Japanese book I bought last year. 


 I always love browsing (and buying) Japanese books and magazines. They make simple things look so pretty! Nowadays, everything you can find online. And with pinterest, you can just pin stuff you love for ideas. But I find, books and magazines are still the best! In the sense, that we can easily go back to it, and read every details. Mark which project you'd love to do in the future.

reversible and foldable fabric box

We can slowly enjoy the book, while sipping our mid morning tea, without being distracted by "More like this" pictures ^_^.
Just like these storage bins, I was having my mid morning tea and picked up a couple of Japanese books. I needed storage boxes but the idea of buying plastic storage bins is out of the question. Because in the future when I don't need it anymore, it will be difficult to store them, right? 

Book Storage Organizer

I've been looking and watching lots of tutorials on fabric bins on the net, but when I see this particular one in the book, I felt so inspired that I got down to work immediately. 

Crochet Wool Storage

I decided to use denim, black and blue denim, which I had in my stash. Since denim is already thick, I put the interfacing only on the contrast fabrics. These storage bins are meant to be reversible so I chose some fun fabrics.

DVD Storage

The size is perfect to hold books, DVDs, or even craft supplies. I want to make more of these, maybe will try out a different sizes depends on my needs. I also added these storage bins for custom orders in my webshop .

So, what inspired you this week? 

Thank you for stopping by,

Until then,
Happy Sewing

~ Elvira ~

****************

Linky Party


Latest Fabrics

Latest Video