Powered by Blogger.
Showing posts with label handmade bag. Show all posts

{TUTORIAL} Adding Zipper Pocket

Hello,

The last two days was euphoria for me. It's the first time I got published in an online media and that too on Ecwid Blog! I was contacted by them by email early this month and was so excited about it. You can read my Behind the Scene Story in Ecwid Blog. I hope I can inspire more mothers who decided to left 9 to 5 job and pursue her dreams.

adding zipper pocket tutorial

Now let's get down to the fun stuff. I got email from Patti, asking about how to add zipper pocket on the Phone Pouch. Thank you so much Patti!!
Adding zipper pouch is very easy. If you already got the pattern  here is what you have to do. (if you haven't,  you can get it at the end of this post)


After you cut all your Exterior, Lining and Interfacing pieces as per pattern instructions, cut 2 extra lining pieces of Main Panel.


1. Fuse the interfacing on to the wrong side of the back exterior piece. Mark 1.5" down on one of the short end and cut.

Mark down 1.5" 

Do the same with one of the lining piece.


2. Put the lining and exterior pieces right side together (see picture below) and sew with 1/4" seam allowance. Once done turn right side out and press the seams.

sew with 1/4" seam allowance

3. Take 8" zipper and place the lined exterior pieces you just made on both sides of the zipper. Refer to the picture for placement.


4. Top stitch close to the seam and repeat with another line of stitching, approximately 1/4" apart.


I used a leftover zipper and added a contrast color zipper pull. So fun!!

I hope you can see the double line stitching there. 
5. Now, take one piece of lining and place the zippered exterior panel on the lining. All right side up.


6.  Pull the zipper head to the middle and baste stitch all around. I love doing baste stitching instead of using pin or wonder clip. It's totally personal preference.


7. Trim the excess zipper and now your Main Exterior with Zipper pocket is ready.  


Once this part is done, you can proceed as per the pattern instructions. 

It's easy, isn't it? 

You might ask whether you should cut the main exterior piece - that you want to add zipper pocket - bigger? It's not necessary. The zipper will make up for the seam. But if you're not sure about the 1/4" seam allowance, you can cut the exterior piece and 1 lining slightly bigger. Maybe 1 inch bigger to be on the safe side. You can always trim it later.


While making this pouch, I also made the flap slightly rounder. YOu can do that too by drawing  a curvy lines like in the picture below. Use a bottle cap or  plate to draw the curve.

You can use this technique to add zipper pocket in any pouch or bag.


I hope you enjoy the tutorial. Let me know what you think about it and don't forget to share so others can learn too. Sharing is caring ^^.

Thank you for stopping by


Until then,

Happy Sewing

Like this tutorial? Subscribe to get more updates !


It was a good week

Yes, it was a busy week for me. Inspired by Sarah of Confession of a Fabric Addict post  Make a List Monday, I started noted down my order list last Monday. And I'm glad I did, because I could cross few orders off the list!


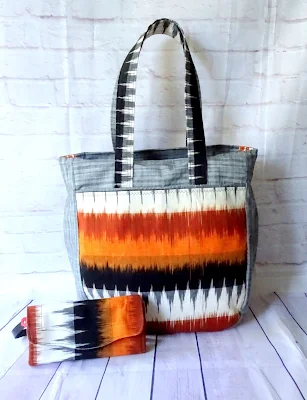
I love this handwoven ikat! The one I made earlier I gifted to hubby's niece. It's such a versatile clutch. I'm currently using one too. 


 And who doesn't like this bag? It's so spacious that you can carry everything in it. 


This time, instead of using grey burlap, I used handwoven grey linen. It's such a beautiful fabric. The texture itself give a bag so much of character, isn't it? This  ikat tote bag is perfect to carry while traveling. 


This African inspired print is one of my favorite print. It's unique and colorful. The customer wanted to be personalized with the family name. 
I did the embroidery by hand. Personally I prefer hand embroidery any day. I love doing it and I wish I had more time to do. 


I had so much fun working on this passport holder. When the customer messaged me that she was originally from Shillong and now living in the UK, I was pleasantly surprised. In her words " Hi! I was browsing on Etsy looking for a large travel wallet to keep all our passports in for our upcoming holiday at hoe and your product came up. I almost fell off my chair when I saw your shop location!! Gauhati!! I come from Shillong and now stay in  the UK 😊😃 It is a small world!".


She chose the fabric combo from my fabric shop. working with the new fabric combo is always exciting. 


And I'm happy with how this passport wallet turned out. Such a happy girl color :)


Even though I'm not a "plan it all" kind of person, I think by making List every week or month can help me stay focus on my work because I tend to get easily distracted. 

Image result for stay focused images

What have you completed this week?


Until then,

Happy Sewing


Pattern Lists :


Linky Party : 


I'm the happiest

birthday girl in town!!

I was thinking, I must have been done some good deeds that I am rewarded with my fave stuff!!!

Look what came in the mail this week from my fave bagmaker bff Namrata of BAGSTOCK 

You all should check her Facebook Page or her ETSY  to see her bags!  They are simply awesome. 

This birthday gift make my 7th bag from Bagstock :D
Yep, I am a big sucker for handmade bags!! 


I took the bag to piano class today and loved it! it's very spacious and easy to carry. 
btw in case you wonder, it's my sons who are doing the class, while me teaching the piano teacher quilting after class...that will be in another blog post :D

Here's another variations of Boho Bag from Bagstock

Photos by Bagstock

and of course who doesn't like these pretty threads??? 
Namrata bought them when she was learning to quilt and now since she doesn't quilt and the threads didn't work on her machine, she sent them to me


it's 79 spools in total!!!


and the Indian batik Jelly Rolls!!!


I was dancing a happy dance when the package arrived!! 

Now, I feel like making more quilts!!

Thanks a lot Namrata!! Thank you for being my friend!!
Love you, Gal!


Until then,

Happy Quilting


Ella Bucket Bag

 I have this unique African print for few months. The print is huge. I put up for sale in my facebook page Chezvies Fabrics for a long time and there's no taker :(


I believe that all my fabrics will come of use someday {I think all the hoarders have the same believe ^_* ) and it's true. I was browsing Etsy for Totebag and found SOTAK handmade's pattern, The Ella Bucket Bag, and I know that it's perfect for my fabric.


Svetlana's pattern is very thorough and easy to follow. With step by step pictures which is a huge thing for me. I am one of those who cannot follow written instructions. So having step by step photo tutorial is really a big help.

I made few improvisation here, because of the print I decided to put the zipper pocket inside and I skipped the inner pocket.


And for the magnetic snap, instead of attach the snap onto the bag, I made a little button flaps and attach it to the bag. Since the fabric I use is Indian mulmul fabric which is quite lightweight, attaching the snap this way is safer.


The interface I used is fusible interfacing. I used in both exterior and lining. I added foam in the exterior fabric.


I definitely will make more of this bag. It's super easy. 

Bag will be available for custom order in 
www.chezvies.etsy.com
www.facebook.com/chezvies

Fabrics used are Indian cotton by Chezvies Fabrics


Until then,

Happy Sewing


Red Riding Hood Tote Bag

This is also a custom order from the Exotic Lady (that's her boutique's name) - the story in my previous post . She wanted a pink tote bag /diaper bag. 

I have this red riding hood fabric from my trip last year which she chose. It has a drawstring closure which is very convenient for diapers bag. 


I match it with a dark grey cotton. I used interfacing and batting for this bag and it's perfect. It's sturdy and soft. 


a wide box bottom give it enough space to carry baby's stuff around. 


polkadots is always my favorite lining. it gives a happy aura ..or is it just me ^_^


and of course my fave hexies has to be there. I spy Red Riding Hood hexies ^_^

Until then

Happy Sewing


Latest Video