Powered by Blogger.
Showing posts with label DIY Dust Mask. Show all posts

How to Make Three Layers Slim Face Mask with Video Tutorial

India

How's everyone doing? Lockdown has been relaxed with certain limitations here in my city since yesterday. We're in the green zone as of now, and I hope & pray it will remain that way.
Anyway, in between mask making, I am tidying up my fabric stocks. Since my fabric shop is closed temporarily due to lockdown, might as well do some care and love for them :D.
And when I saw these pretty fabrics, I know I wanted to make a face mask but then the fabric is quite lightweight. So I decided to make three layers mask. Super quick and easy. You only need 1 piece of fabric and 2 pieces of binding fabrics. (More about binding later on).


And as I progress making three layers masks, I made a slim pleated mask!! I kinda love how slim this mask turns out that you can literally slip it in your pocket or even wallet. 

Here is what you need : 
1 rectangle fabric 7.5" W x 19.5" H  (6.5" x 16.5"  for kids) - use fun fabric with border if you have. 
2 binding pieces 2" W x 3.5" H

Let's get sewing :

1. Place the fabric right side down. If you're using fabric with a border like I did, fold the border side first by 6.5" like the picture below. 


2. Then fold the other side on top of the first one and you will end up with 7.5" x 6.5" piece. 


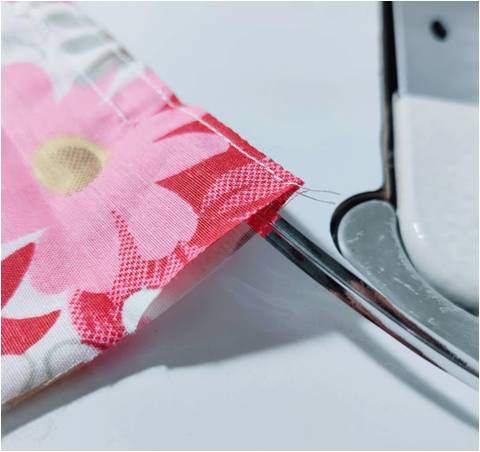
3. Clip or pin to secure it and topstitch (on the 7.5" sides) using 1/4" seam allowance (mark with yellow line)


4. Turn the mask inside out on the pieces where the right side is facing. Press the seam and topstitch using 1/8" allowance (yellow line). Then make a marked line 1.75" from the top and bottom edges. (red line). 

5. Fold on the red line  


and then fold it back again to line up with the bottom edge. (I hope  I make sense here).


Repeat with the other side, pin it and sew the short edges with 1/8" seam allowance. 


6. Place the mask with a pleated side down on the right side of the binding.
Wrap the sides and pin as shown in the picture below and sew the binding using 1/4" seam allowance.


7. Open the binding and fold the raw edge.


8. Now wrap it around the raw edge. Topstitch using scant 1/8" seam allowance. Repeat with the other side and you're done. Now insert the elastic and using fabric ties

It's super duper easy, right?
So which one is your fave?
The regular pleats, the box pleats, or this slim pleated one? This slim pleated mask is finished at 2" x 7,5". If you wish yo make broader, you can use 21" x 7.5" fabric panel.


This is how it looks when worn. Basically, it will cover the same way since the face mask is made from a flat fabric panel. If you want a mask that has breathable space, you can try the 3D Face Mask with Filter Pocket or the new TRIO 3D Face Mask which has more specious breathing space.


Now, why three layers? Well, they said the more layer the better. Add another extra layer of cotton fabric still make the mask breathable and comfortable to wear especially during Indian summer. 

I personally prefer using binding to create a casing for the ties or elastic, instead of sewing the elastic or ties on the mask. That way, when the elastic becomes loose, I can always change it. Also if you notice my (mug)  photo above, the elastic can minimize the gap on the cheeks. Which I believe is important. 

I've been making three layers mask in the past few days using Indian fabrics for hubby's staff at the office. Indian soft cotton fabric is very soft and breathable. I used to make to wear it during springtime, but now with COVID-19 Pandemic going on, it's better to have an extra layer.

By the way, I don't add nose wire when I use soft fabric, because the fabric is lightweight, the twist and tie that I am using for nose wire tends to pierce out of the fabric. (I tried :D) 

I hope this tutorial will be helpful to you. I will try to make a Pdf version or a video tutorial next time when I sew. Here's the video tutorial to make this 3 layers face mask.


Thank you for stopping by! 
Stay safe, everyone!

- Elvira- 


Linky Party:
Craftastic Monday

Video How to Make Pleated Surgical Face Mask

Hello,

I hope you're all doing fine. We're in the third week of lock down now and I sort of get used to it. Few day ago I recorded video while making the pleated mask and just have time to edit and put it up on my YouTube channel. I hope this video will help. You can download the pattern in the link below this post. 


I'm still learning how to record a better video. This time, I am using my pocket camera and I sort of like it better. I am still editing it form my mobile though. 


Anyway, I hope you enjoy the video and inspired to learn or make  one ^^.
I gotta go and finish few more mask now.

Until then,
Take care and stay healthy!

Elvira


3D Fabric Mask With Filter Pocket Pdf Pattern with Video


I've been working on this mask for a couple of weeks. I tried different model but not really happy. I want the mask that leave a little space in between for ease of breathing. Especially for mask that I wear when I go out, since I usually layer it with tissue. At home, while doing my chores, I wear the surgical type mask. So, I came up with this easy to sew 3D mask. 


Mask with Crochet Cord 

I realize that your nose shape play important role here, when you make mask without nose wire. Because nose wire is not easily available here,  I have to come up with something else. My younger son who has long /sharp nose, said he likes this fit best, because it doesn't make him feel suffocated :D. Here's my pictures wearing the mask (my sons refused to be my model -_-). 


Kids Size Mask
Filter Pocket at the back

I'd suggest tight woven fabric, especially for the exterior and softer cotton for the lining. Layer of Tissue or non woven fabric  will help in filtering. (Read this article).


The pattern has 2 sizes for Adult and Kids
Adult Size : 7.5" W x 5.5" H
Kids Size : 6" W x 4.5" H


The Pattern is available in ETSY as well as on  Payhip 


UPDATE : 

I just added a video tutorial how to make this mask: 


Thank you for stopping by! Please take care of your health and stay safe!

- Elvira - 


Free Pattern - DIY Dust Mask with Nose Wire

Winter in my place means dry and dusty. It's time to make a dust mask again. This time I share how to make a surgical mask type. It's super-duper easy.


All you need is :
- 2 pieces of fabrics - 7.5" W x 6" H
 (Kids Size : - 6” W x  5.5” H)
(widen and lengthen as needed)
- 2 pieces of binding strip - 1.75" w x 5" H
- 10" Long Elastic Cord

  Although cloth face mask may not be as effective as N95 mask in filtering fine dust, but it is better than nothing. I'd suggest adding a layer of folded tissue paper when you wear the mask, which I believe can screen as much as 75% of dust particles, according to THIS report. I'd suggest using tightly woven fabric for better results.


I'd also suggest to wash the cloth mask everyday after your use it. It's always better to make a few, especially if you're highly allergic to dust and pollen. I hope this little bit of information will be helpful for you. 


You can download the full PDF Version below  and start making.

Pattern Update : Added instruction for adding nose wire, as follows:


Adding Nose Wire :


I use twist and tie as nose wire, it works like a charm.  To add nose wire, BEFORE making the Pleats,  sew one line 1/4 Inch away from one of the long edges, approx 5” long and centered. 


Cut twist and tie approx 5” long (or as needed) and insert it in the tube line you just created. 


 Stitch both end of the tube to prevent the wire from sliding off. 


And now you have a surgical mask with a nose wire that can properly fit. 


I hope this helps, let me know if you have any questions. 


Buy Now

Other Mask Patterns:

Pleated Mask with Filter Pocket


3 D Mask with  Filter Pocket & Video Tutorial


Happy Sewing! 

- Elvira - 


Latest Video