Powered by Blogger.
Showing posts with label DIY fabric mask. Show all posts

Still making mask

New Pleated Mask

Hello, how's everyone doing? Are you still making masks? well, I do though now I am slowing down a lot. I've got a little pain in my wrist which makes sewing a bit uncomfortable. A little stretching exercise does help. The sew must go on, right? :D


My recent fave is making this pleated mask. The measurement is based on the Free Dust Mask tutorial. The difference is I use 2 fabrics measuring 7.5" x 7.5" for adult size. And for the pleats, after making the small box pleats at the center (like in the video below), I added another pleat on top and bottom. it's a bit of a hassle in the beginning. I usually make the center box pleat, sew it in place, and then add the additional pleats and sew it again. It's because I don't like using pin or clip so much. You can definitely use pin or clip to hold the pleats prior to sewing them in place.


Here are a few more I finished recently. This type of pleated mask is comfortable to wear. The multi pleats create more room for breathing. I've been wearing one myself. The size is quite generous, it covers the face nicely. I added nose wire for a better fit.

Mustard Floral Pleated Face Mask 2 Layer Cotton Face Covering image 0
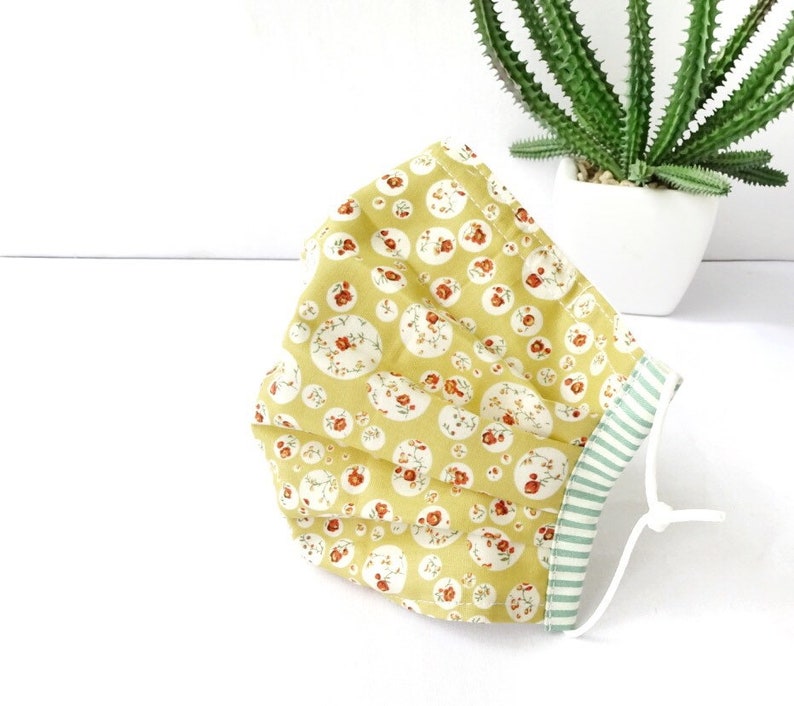
Small floral face mask


Pink Floral Pleated Non Surgical Face Mask 2 Layer Cotton image 2
Pink Floral Pleated Mask

Yellow Floral Pleated Non Surgical Face Mask 2 Layer Cotton image 1
Paisley Pleated Mask

****

These guitar 3D Face Masks were for the giveaway winners on Instagram. There was a loop giveaway organized by ZoomIn with 3 other brands (all small businesses) and it was fun. It was my first time doing loop giveaway :D.  


It was supposed to be a gift hamper but since all of us are from different cities, we decided to send directly to the winner. During lockdown domestic shipping has been severely delayed. It takes at least 10 business days to deliver, especially from my place here in Guwahati to the rest of the country. 


Another thing I really like these days is the weekly review video that's generated automatically on my phone. I took a LOT of videos and photos every day and this weekly video sort of a glimpse of what's going on in the week. What do you think?


Thank you for reading my blog, stay creative, & stay safe!

Have a nice weekend ^^

- Elvira


******

TUTORIAL - How to Make Easy Fabric Ear Savers

Necessity is the mother of invention.

That quote is so true and looks at how people can be so creative with a mask during the pandemic. They even come up with the name, yes, ear savers.
I remember during my trip to Japan 2 years ago, I struggled with earloop masks because I'm wearing a hijab. Luckily my dear friend brought masks from Indonesia which is designed for hijaber, like me. Basically, it was like ear saver only it was a string of elastic. When I saw many people started making and sharing in Pinterest, I remember the one I wore in Japan. 

Today I finally get a chance to make one for myself and here is how I made it. The measurement is based on my measurement, so please feel free to reduce or add the length as necessary. 

Materials and Measurements: 

1 piece of fabric 8" w x 4" H (20 cm x cm)
1 piece of lightweight interfacing or all-purpose interfacing 7" x 2" (18 cm x 5 cm)
2 pairs of kam snap button 


Let's Have Fun : 

1. Center and fuse the interfacing on the wrong side of the fabric and fold in all around seam towards the wrong side. 


2. Now fold the fabric lengthwise, clip it using wonder clips, and sew all around the perimeter using 1/8" seam allowance.


3. Installing snap buttons. Remember, the button stud and socket should be installed on the same side. First, install the stud on the outermost (3/8" or 1/2") from the edge. And the socket 1" from the stud. 


And voila! Your DIY ear saver is ready.  Now go ahead and make a few in different colors! If you wear hijab, you maybe want to pull the ear saver a little up so the mask won't slip down your face. I was thinking to use velcro but velcro tends to ruin my hijab or tangle your hair.  If you need more inspiration, I put together a board on Pinterest for this. Check it out. 


I hope you enjoy the tutorial. Do share with people who you think might benefit from this tutorial. After all, sharing is caring.

Thank you for stopping by today!

Take care & stay safe,

- Elvira - 


Alternative Filter Pocket for 3D Fitted Face Mask

Face Mask with Filter Pocket

Everyone has their own preference and that's including masks. Some people prefer a surgical pleated mask, some prefer box pleated masks, some people prefer 3 D mask without filter pocket (including yours truly). As I wrote in my previous post, in a homemade mask the most important is as long as it dense enough. 

As I progress making more 3D masks, I improvised the pocket construction for the 3D Fitted Mask. Instead of cutting 2 lining fabrics like in the pattern, I cut one piece of lining and reduce the sides to create a pocket. The advantage of this pocket is you need less time to sew them together. 

So here's how to do it:

  1. Cut the short sides of the lining fabric by 0.75". I usually fold it in half, mark it using an erasable pen and cut it on the line. 

2. Fold the raw edge by scant 1/4" and fold it again by 1/4" and topstitch the short edges. The mask lining will look like in the picture below. 


3. Sew the lining and exterior panels together as per the pattern and turn the mask right side out.  Now, with the lining facing up, press the seam of the exterior panel nicely and topstitch all along the top and bottom seams only. 


4. Fold the short edge of the exterior panel towards the wrong side by scant 1/4 inch.


5. Fold it again by 1/2" and pin/clip in place.


6. Now the tricky part (don't worry, you can do it!). As you feed the fabric under the needle, pull the lining fabric gently so that it's away from the fold that you're going to stitch. Put the needle down, backstitch a couple of stitches and sew to the end. As you reach the end, gently pull the lining fabric again, away from the end of the fold. Finish sewing with a couple of backstitches. 


7. Tada! now your mask with filter pocket is ready. Insert elastic or fabric ties as you prefer.


Here I used a kitchen paper towel and folded it a couple of times. Insert the paper and you're ready to head out. 


3D Fitted Face Mask in ETSY

What do you think? which type of mask and filter pocket do you prefer? Let me know in the comment below. 

Thank you so much for stopping by.

Take care & stay safe!

- Elvira


How to Make Three Layers Slim Face Mask with Video Tutorial

India

How's everyone doing? Lockdown has been relaxed with certain limitations here in my city since yesterday. We're in the green zone as of now, and I hope & pray it will remain that way.
Anyway, in between mask making, I am tidying up my fabric stocks. Since my fabric shop is closed temporarily due to lockdown, might as well do some care and love for them :D.
And when I saw these pretty fabrics, I know I wanted to make a face mask but then the fabric is quite lightweight. So I decided to make three layers mask. Super quick and easy. You only need 1 piece of fabric and 2 pieces of binding fabrics. (More about binding later on).


And as I progress making three layers masks, I made a slim pleated mask!! I kinda love how slim this mask turns out that you can literally slip it in your pocket or even wallet. 

Here is what you need : 
1 rectangle fabric 7.5" W x 19.5" H  (6.5" x 16.5"  for kids) - use fun fabric with border if you have. 
2 binding pieces 2" W x 3.5" H

Let's get sewing :

1. Place the fabric right side down. If you're using fabric with a border like I did, fold the border side first by 6.5" like the picture below. 


2. Then fold the other side on top of the first one and you will end up with 7.5" x 6.5" piece. 


3. Clip or pin to secure it and topstitch (on the 7.5" sides) using 1/4" seam allowance (mark with yellow line)


4. Turn the mask inside out on the pieces where the right side is facing. Press the seam and topstitch using 1/8" allowance (yellow line). Then make a marked line 1.75" from the top and bottom edges. (red line). 

5. Fold on the red line  


and then fold it back again to line up with the bottom edge. (I hope  I make sense here).


Repeat with the other side, pin it and sew the short edges with 1/8" seam allowance. 


6. Place the mask with a pleated side down on the right side of the binding.
Wrap the sides and pin as shown in the picture below and sew the binding using 1/4" seam allowance.


7. Open the binding and fold the raw edge.


8. Now wrap it around the raw edge. Topstitch using scant 1/8" seam allowance. Repeat with the other side and you're done. Now insert the elastic and using fabric ties

It's super duper easy, right?
So which one is your fave?
The regular pleats, the box pleats, or this slim pleated one? This slim pleated mask is finished at 2" x 7,5". If you wish yo make broader, you can use 21" x 7.5" fabric panel.


This is how it looks when worn. Basically, it will cover the same way since the face mask is made from a flat fabric panel. If you want a mask that has breathable space, you can try the 3D Face Mask with Filter Pocket or the new TRIO 3D Face Mask which has more specious breathing space.


Now, why three layers? Well, they said the more layer the better. Add another extra layer of cotton fabric still make the mask breathable and comfortable to wear especially during Indian summer. 

I personally prefer using binding to create a casing for the ties or elastic, instead of sewing the elastic or ties on the mask. That way, when the elastic becomes loose, I can always change it. Also if you notice my (mug)  photo above, the elastic can minimize the gap on the cheeks. Which I believe is important. 

I've been making three layers mask in the past few days using Indian fabrics for hubby's staff at the office. Indian soft cotton fabric is very soft and breathable. I used to make to wear it during springtime, but now with COVID-19 Pandemic going on, it's better to have an extra layer.

By the way, I don't add nose wire when I use soft fabric, because the fabric is lightweight, the twist and tie that I am using for nose wire tends to pierce out of the fabric. (I tried :D) 

I hope this tutorial will be helpful to you. I will try to make a Pdf version or a video tutorial next time when I sew. Here's the video tutorial to make this 3 layers face mask.


Thank you for stopping by! 
Stay safe, everyone!

- Elvira- 


Linky Party:
Craftastic Monday

Latest Video