Powered by Blogger.
Showing posts with label DIY cross body bag. Show all posts

Mini Sling Bag Pattern Hack

Hello, how's everyone doing? I've been pretty busy making masks and few custom orders. I really appreciate your supports in the past few months since the pandemic started. It's been very tough for everyone, especially with heartbreaking news everywhere. Let's stay positive,  be kind, and help each other. Do what we can as an individual as well as a community. 

Today I will share how to scale up the mini sling bag the easy way without any computer involved. I know it's frustrating to scale up the pattern on the computer and print it a few times before you get the size that you want. 

This mobile sling bag pattern is very versatile. You can easily adjust the pattern based on 2 things:
  1. Phone model
  2. Whether or not it has a softcover. Softcover makes the phone slightly thicker. 
The basic is if you scale up the height of one part of the pattern do the same with the rest of the pattern pieces too. If you increase the height of the main body panel, increase the height/length of the pocket and flap too. Unless you want a shorter flap. Since the pattern pieces are mostly rectangle it's easy to increase the length or the height.

This basic rule applied if you want to increase the width too. I'd suggest increasing the width especially if you want to add a thicker batting or wadding.  Now, here's how to increase the width of the curvy flap:
  1. Take one piece of paper and fold it in half lengthwise. From the fold, mark how much you want to increase by drawing a straight line e.g 0.5 inches away from the fold. 
  2. Fold the original pattern lengthwise and place the fold on the line you just made and trace the pattern.

  3. Now it will look like picture # 3. Cut along the line you just traced.
  4. Your new wider pattern is done. This will increase the overall width by 1 inch. If you want to increase the overall width by 0.5 inches, draw the line 0.25 inches from the fold.


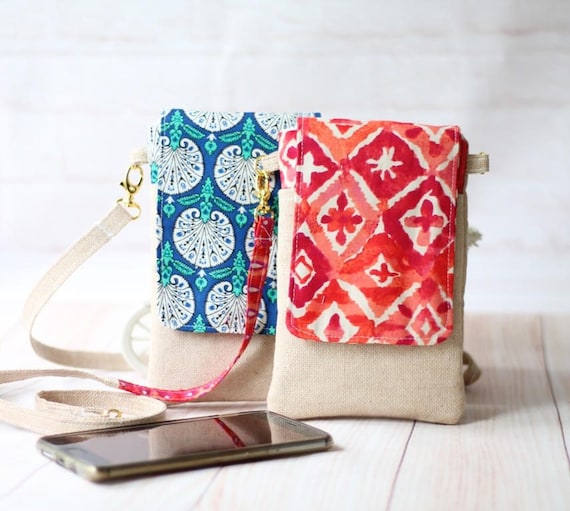
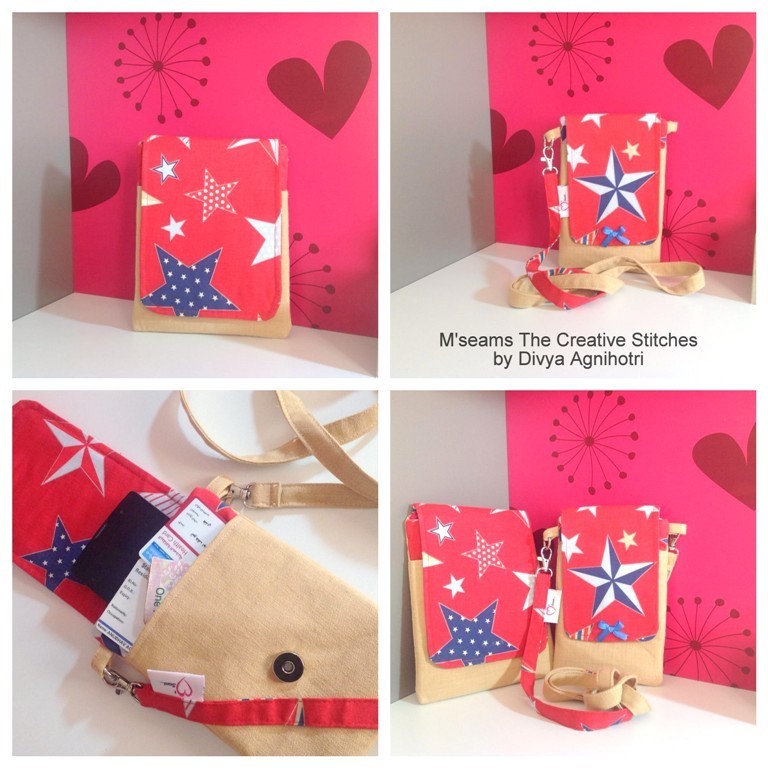
This matryoshka phone sling bag is to fit the new iPhone 11 and the newest android phone. I increase the length and width using the method above. 


If you want to learn how to make this mini sling bag, you can get the pattern on ETSY or my Webshop. 

Here is a supporting video I made a few months ago. I'll make better video when time permits :)


More Pattern Hack/Update

Thank you for stopping by.

Take care & stay safe!

- Elvira- 

TGIFF - How to Make Quilted Sling Bag

Hello and welcome to TGIFF!

This week, I'm sharing a tutorial for foldover sling bag. 
A few weeks ago, hubby's aunt came and she said her morning walk friend wanted a sling bag like the one I made for her. It's a simple foldable sling bag with elastic closure. Very light and handy.

UPDATE : Download the PdF version HERE


So, here is what you need:

- Assorted of fabrics for exterior and lining
- batting (you can use fleece, flannel or cotton)
- Fusible lightweight interfacing (skip this if you are using fusible batting)
- Elastic cord or hair band
- Large Button
- Grosgrain ribbon
- Woven Interfacing Strip
- Swivel hook 0.5"

Measurement and cut

- Exterior Fabric :
   Top Panels  8" W x 3" H - cut 2
   Bottom Panel 8" W x 8.5" H- Cut 2

- Interfacing : 8" W x 22" H - Cut 1
- Lining Fabric : 8" W x 22" H - cut 1
- Batting  : 9" W x 23" H - Cut 1
- 0.5"Wide Ribbon  : 2" Long - cut 2
- Strap Fabric : 2" W x 44" H  - cut 1
- Woven Interfacing Strip 1" x 43 - cut 1

*RST - Right Side Together


Let's sew :

1. Sew the top and bottom panel together  on the 8" side (RST) with 3/8" seam allowance.
2. Sew the bottom of both exterior panel together (RST) using 3/8" seam allowance. You will get a long piece of exterior panel 8" W x 22" H.


3. Fuse the interfacing on the wrong side of the exterior panel and then place the it on the batting Right Side Up  and pin generously. The pins will prevent the fabric from shifting while you quilt it. Quilt as desired. Once you finished with the quilting, trim the excess batting.


I'm not very fond of free motion quilting, so I always use my walking foot. I quilted my bag using organic wavy lines approximately 0.5" apart.  Walking foot is just awesome! It goes through layers effortlessly like this bag and this bag.

4. Fold and attach the ribbons on the longer sides of exterior panel. Place it on the bottom panel part, just under the stitching line between the top and bottom part.


5 . Fold the elastic cord and make a knot. Center it on one of the exterior panel top edge. Top stitch with 1/8" Seam allowance. Run a couple stitch and back stitch to secure it.


6. Put the lining  and exterior  panels RST and sew the short edges (top) together with 3/8" seam allowance. Repeat with the other short edge.


7. Turn the bag inside out , pull the lining away from the exterior. Press the seam towards the exterior side and top stitch with 1/8" Seam Allowance.


It should look like the picture below.


On the wrong side , it should look like the picture below. 
Do not cut the knot.


8. Now pull out the lining and exterior panels separately, so that they are on opposite side. Match the top seam and secure it with wonder clips. 


9. Sew the longer side starting from the exterior panel with 3/8" seam allowance. Repeat with the other long side, but leave a gap around 4" or so for turning. Don't forget to back stitch at the beginning and end .


10. Diagonally cut the corners and turn the bag inside out through the opening, iron it and sew the opening closed.


Make the strap:

1. Center and fuse the interfacing on the wrong side of the strap fabric. You can opt out for the interfacing if using thicker fabric. Since I was using thin linen, I use  1" woven interfacing strip.
2. Fold it lengthwise and press to create a middle crease. Open the fold. (DIAGRAM A)
3. Fold in both short ends by 1/2” and fold both raw edges lengthwise towards the middle crease. (DIAGRAM B)
4.Press and fold it in half lengthwise again. Top stitch on both long edges with 1/8” seam allowance. (DIAGRAM C)


5. Install the swivel hooks on both ends of the straps and stitch the strap to secure it.


6. Sew fancy wooden button on the front of the bag. Fold top of the bag and mark the placement as you desired. And it’s done!! Yay!!


Do tag me on Instagram @chezvies if you make one!

Now, it's your turn to link up and show us your finish this week! Click the blue button below and start sharing~


Happy Sewing

Elvira


{NEW PATTERN} Smart Phone Sleeve & Kindle Cover

Hello,
I'm so excited to announce my new pattern! It's now available on special Price in  ETSY and CHEZVIES 

The phone pouch with a detachable strap is one of the popular items in my shop. I keep getting repeated orders since it's perfect for everyone.


Check out some of my generous Facebook and Instagram friends who's willing to test it for me. Thank you! xo 

Now let's see what these talented ladies have come up with!

Hanie of Arewhana  made this cute Phone Pouch and Kindle Cover. Red and blue never goes wrong. It's one of my fave color combos.


Sudesh Jangra of Stitch a Memory came up with this one too. Aren't they perfect as a gift for him? 


I love these classic Batik version by Hernik from Ninu Handmade  . She used a leather strap which made her pouch stand out more. Batik and Leather always perfect combo. 

Don't you love these cute Mickey Mouse pouch by Mini Nirmal of Totes N' Beyond


Divya from M'seams The Creative Stitches came up with pretty stars and beige combo. She said she takes the phone sleeve when she goes for her morning walk. Well, you can make one too!


Who doesn't love the classic black and white? More so if it has these unique prints! These beauties are from Shruti Pothnis, a dentist behind pretty bags at Miz T  Handmade .


And other unique Indian prints are used by Prabha Mathew of Quiltaholics.


This is a perfect pattern to use all those scraps you've been waiting to use. A great personalized gift to make or make for your next market stall or your Handmade Shop.

Why wait, grab the pattern now while it's still on Special Price. Valid thru This Weekends! No Code is needed.

Happy Sewing

-Elvira-


Latest Video