Powered by Blogger.
Showing posts with label hand sewing tutorial. Show all posts

Heartbeat Kantha Coasters


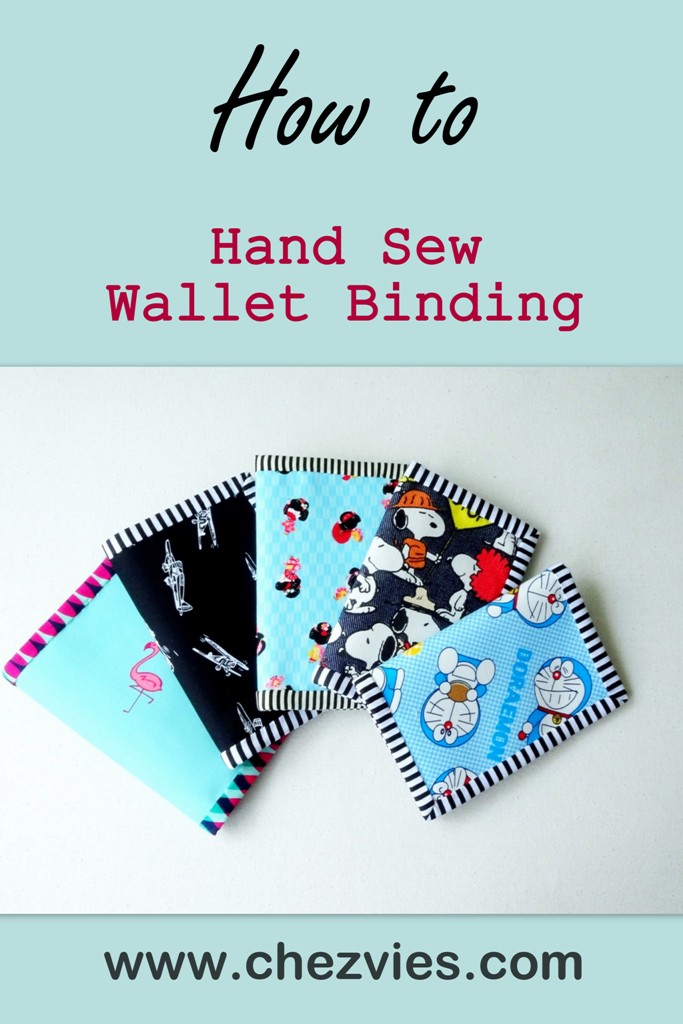
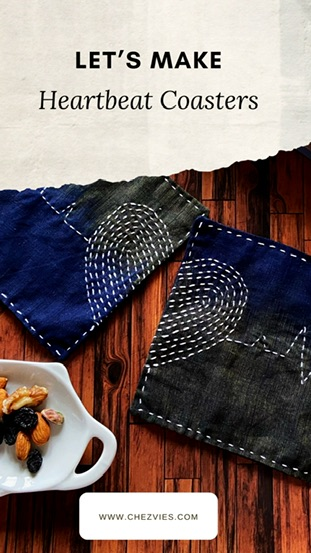
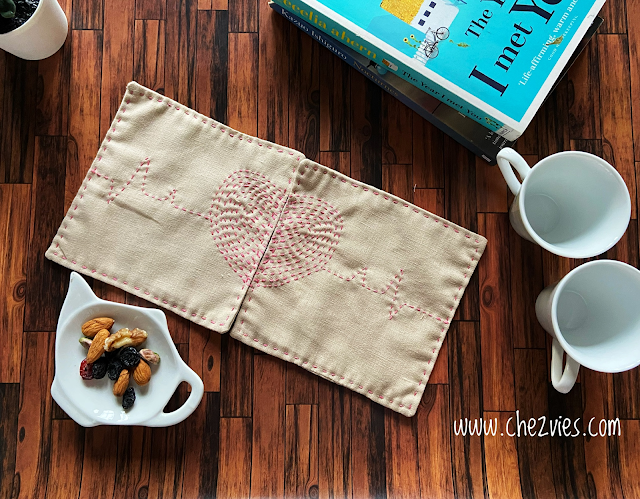
I wanted to make this coaster for a long time. I drafted the pattern and was actually thinking of doing an applique and embroidery combo. But after learning Kantha embroidery, I thought I could just use the kantha stitch and I love how this turned out. 


The materials needed (for 1 coaster) are:

1. 6 x 6 inches cotton fabric - 3 pieces
(I'm using Linen for the beige coasters and handloom ikat for the indigo one)
2. Anchor pearl (Perle) cotton no. 8  or 3 strands of embroidery yarn (I am using this for the linen one). 

This is a super-fast project and very beginner's friendly. All you have to is download the template  HERE and follow the instructions. Next, watch the video below.  (in the video I did freehand drawing using an erasable pen, but I created a template for you :).


Don't worry if your stitches are not even, it's hand-sewn, it's organic. You will get better as you go along. 
The kantha stitch is done on one layer of fabric only. If you want to do it on all through the 3 layers, be my guest! I did it on single layers, because it's easier for me :)
Feel free to experiment! 


I'll be making a few coasters for my small quilt shop. It's one of those projects that you can do while watching your fave shows or drama :)


Linen Coasters


If you're wondering about my photo props, the teapot mini plate I got from The House of Tea in Central Mall Delhi Aerocity a few years ago, and the mini teacups, I got them as a gift from a shop in Uji when we went in 2019. I love buying cute decorative stuff or souvenirs, most of them are useful as photo props :D. My boys always wondering, what I am going to do with all those. 

I better get going now, I have a few more coasters and bags to finish, but very little time to craft nowadays. Thank you for visiting my blog and stay safe!!

Happy Sewing, 

Elvira


Best Five of 2018

I stumbled upon Meadow Mist post where she has a linky party going on for Best of 2018. Blogging wise 2018 has been amazing for me. I wrote and shared more regularly and in the hype of social media sharing, blogging (for me) has been a steady anchor. I realized that managing 4-5 social media accounts with their ever changing algorithm is just impossible for me. 


So, here is my best 5 of 2018: (Click the Title to go  to the original post)


This was part of being TGIFF host! I have the tutorial written on the blog but you can also download the FREE PDF version in HERE.


This is one of my personal fave. This is  when I conquered my own fear of small piecing and making quilted bag. There is always the first time they said.


One of my best sellers in my Etsy shop! You can get the pattern HERE or in Etsy. 


This log cabin sling bag was made for order. Improved a few things from the first one. You can read a few tips on the Blog


This is tutorial for hand sewing wallet binding. As you may already noticed that I always prefer hand sewn binding whenever possible, since it gives a neater finish. 


I'm looking forward to write more post in 2019 and hopefully will share more tutorials! Don't forget to subscribe to get latest updates! 


Thank for reading my blog, I wish you a wonderful year ahead!!


~ Elvira~ 

***********************
Linky Party: 


How To Hand Sew Wallet Binding Tutorial on YouTube

Hello,


Many of you asked if I can make a video tutorial for hand sewn wallet binding. I took the video quite sometimes ago when I make this matryoshka wallet and I just got a new mobile phone tripod which was just perfect. At least it's better than the mini tripod  I had earlier. With this mobile phone tripod I can get a good angle to shooting the video. The video was shot using my One Plus  phone


Lightweight Tripod

Really, there's nothing scary about hand sewing. If anything, it is easier than machine, since you're totally in control!


Do check out the video, like and subscribe! I am hoping to do more video tutorial in the future, Insha Allah.

Happy Sewing,

Elvira


*******
Some of my posts may contain Affiliate links,which mean if you purchase something through the links in my blog, I may get a small commission at no additional cost to you. I only recommend products and/or services that I personally use and believe will add value to my readers. Thank you so much for your support!

Bifold Wallet and binding mini tutorial

Hello,

 Red Wallet


The sons are having their annual exam until next week. Wish us luck!! Since my MIL is away in Delhi, I tried a few baking recipes from youtube which surprisingly turned out well. 

Another great news from my sewing space is I decided to gift myself an industrial machine. I've been thinking for a long time and finally decided to get this one. I will write a review next week, Insha Allah, after it's assembled. 

Meanwhile, servicing my Singer HD, I whipped up 2 bifold wallets. It is slight upgrade from the previous one. I made slightly wider version so that it can double up as a phone wallet or to keep passports while traveling.


This red roses wallet was the second one I made. It was finished with binding, as usual. And frankly, it is my preferred method of finishing a wallet. 

The first one I made was a birthing style. If you're a bag maker, you'd know what it means? ^_^. It means, you sew the wallet panels right side together, leave a gap in certain part unstitched to turn the wallet right side out. 


Though it came out really nice,  my sons and SIL all voted for the binding one.I really love the peachy pink color though!


For this peach wallet, I used only woven interfacing without any padding. In the red roses wallet, I added fleece batting. 


Both wallets are the same size and even after filling it up with cards, phone and passport, it still close up pretty nicely. Love how slim it remained. I wish I could be too (after stuffing myself with homemade cakes and puddings! that too with extra cream! LOL)

Day before yesterday, Shweta from Arnel's mommy asked how to finish the corner of the binding. As with my other wallet patterns, I sewed the binding by machine on one side and hand sew the other side. Why hand sewing? Because I love a neat finish. So, here is a mini tutorial, how to sew when you reach the corner. 
But before cutting the binding strip, make sure that the fabric grains are straight. This is important to get a good finish!


1. When you reach the corner, fold the raw edge and pull out the edge so that you get that straight diagonal line. Finger press it. 

2. Fold it over, so that it covers the previous stitching line and clip in place. Trim the wallet raw edge if necessary. I usually trim as I go along.

3. Now continue slip stitch until you reach the corner intersection. 
  
4. Then slip stitch towards the wallet's corner

5. And stitch back towards the inner corner/intersection. 

6. Continue stitching !
I hope that helps! 
So, that's all for today. Keep experimenting, keep sewing! 


Have a blessed Friday!

Linky Party:
Finish it up Friday

Latest Video