Powered by Blogger.
Showing posts with label bifold long wallet. Show all posts

Wallets, Quilts and Bias Binding Tutorial

India


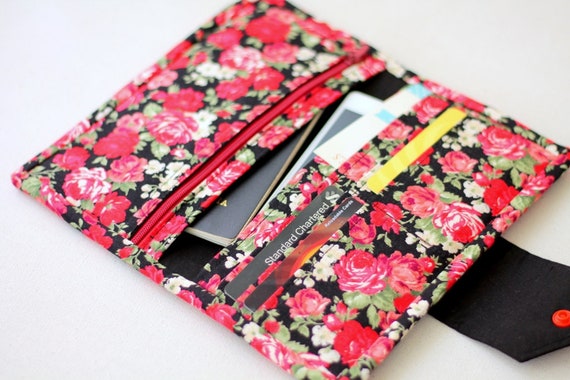
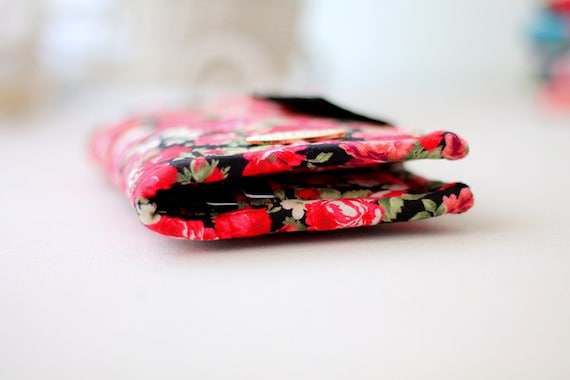
In the past few days, I've been busy making a few wallet and placemats orders. I got a couple of passport wallet orders in the past two months. I think now that travel around the globe is eased, many people started to travel again.

This time, the zip around small passport holder seems quite popular and as usual, whenever I make for an order, I cut one extra to add to my shop. Because I am working solo and nowadays hardly have time to sew, this way I can add a couple of new designs in a month. Also, I will always have projects that are ready to sew. Although sometimes it takes days to finish and sometimes I can finish 2 wallets in a day. Well, as long as I can sew, I am a happy girl! 

Ah, I also recorded the video tutorial for this small passport wallet - which hopefully I can finish editing and put up on YouTube this week. 


small passport wallet


passport wallet for 4


I often got questions regarding bias binding. For beginners or someone who never makes or use bias binding, it can be a daunting task. There are a few ways to make a bias binding but this traditional method is my fave because the binding always turns out perfect. 
In this video, I made DIY bias binding using FAT 8 fabric (9" x 22"). The rule of thumb is, you must make sure the fabric grains (warp and weft) are straight. That way you will get nice and crisp bias tape. 
Please check the video below. I hope the video is clear enough. If you have any questions, you can contact me or leave a comment below. 


Here are more fabric wallets recently done and a couple of them are on their way to the new home. I love making this classic bifold wallet.  My first wallet was this bifold wallet and even after washing it several times, it is still in a good shape. The interfacing and padding did make the wallet sturdy and did not lose its shape. 

bifold fabric wallet


snoopy wallet

snoopy long wallet

GET THE PATTERN HERE


******

And here's the medium scrappy placemats I recently finish and sent out. I hope they will be received well. As a maker and seller, nothing more rewarding than a happy customer! 
I kind of love these medium-size placemats and I have a couple more to finish hand sewing the binding before I put them up in the shop. 

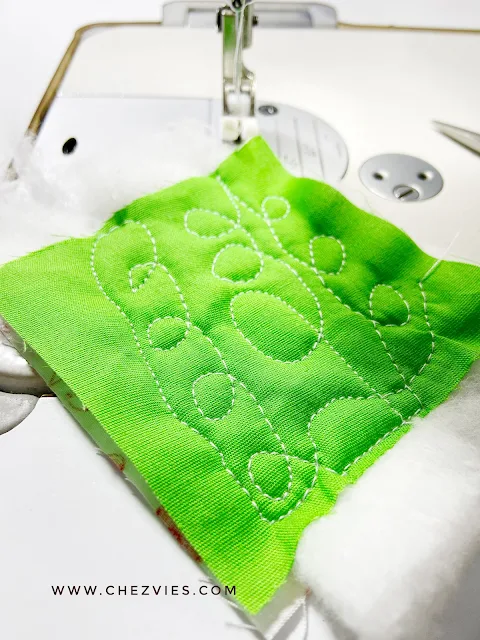
I also experimented with different quilting lines on my Industrial machine. I tried doing FMQ after watching a couple of  YouTube videos where people do freehand machine embroidery using a similar machine as mine. Well, guess what? I worked! I will try in my next project and hopefully can share a few tips with you all. Stay tuned! 

Scrappy medium placemats
Scrappy Placemats


FMQ on Industrial Machine
FMQ Trial 


*****

On the 16th, my SIL and I went to a wedding in a village nearby. It was great fun for both of us. And of course, I love watching how the folks are having a great time at the party. In the village, a wedding party can last a couple of days (2-3 days) from morning to midnight. People from all around the village and nearby village will keep streaming in, sitting and chatting. I love to see the young girls dressing up to the latest Bollywood trend. 

And of course, I enjoyed the ride through different small towns and villages. Since the harvest season is just over, most of the fields are dry now. But it was a  lovely day! 


The bride and the bridesmaids 

Henna -  a must in every wedding! 


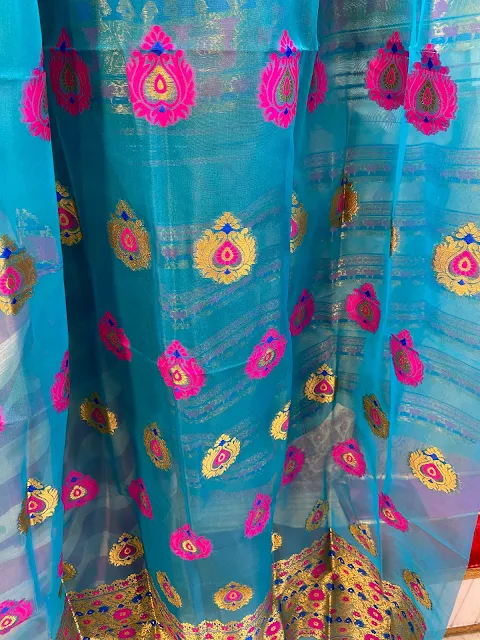
We also went to the market last week. We went saree shopping for one of our helper's daughter's wedding next month. Of course, I wore a double mask even a lot of people are not wearing masks now since the state government announced that all pandemics restrictions are lifted off. 
I really enjoyed looking at those colorful sarees. Even though I don't wear colorful clothes myself, looking at those bright colors, makes me happy! And no, I did not buy for myself, I only went to my regular fabric shop to get denim material. I suppose to go look for Mekhla (Assamese dress) border for my kawandi project but it was getting late, so maybe next time! 


That's all for today. I hope you enjoy reading my blog. Thank you for stopping by and please leave a comment or two.

Until next time,

Elvira


******


Minimalist Wallets

India


It's almost end of April. So many things going on in the last 3 weeks or so. For one, my younger son was hospitalized for typhoid. In the beginning the doctor suspected to be dengue, but Alhamdulillah it was ruled out the next day after the second blood test. And then the LS General election which happened on 18th and 23rd. Of course I don't have a voting rights but still the excitement caught on. I mostly followed the news on twitter. I also followed the Indonesian Election news which was quite "entertaining". I don't usually follow political news, but then nowadays being ignorant is no longer cool, right?! Anyway, I hope you're all made a smart choice and who ever win will fight for the people! 

Floral Handloom Wallet


On creative side, in between completing custom orders, I made a few wallets for the shop. I really this simple slim wallet. I don't carry a lot of cards besides debit card, credit card and ID Card. Most of the shops I frequented usually have the membership record by phone number, so we don't necessarily have to present the cards. I love this system! 

In the above wallet, I combined linen and handloom fabric because it matched nicely! Handloom is one fabric I always love and frequently buy. I love handloom tunics/dress too.


Ellie Bifold Wallet

Next one, I made this super cute ellie wallet! As usual I tidy up my stash from time to time whenever I feel uninspired and I found this print. I thought of combine it with green one but I love the grey star fabric too. 


Maybe next time I can make it with a green combo? What do you think? 
And then I saw this cute snoopy fabric in my stash and of course I had to make another wallet! 

Snoopy Wallet

Now all the wallets are listed in my Etsy shop and they are all Ready to Ship. And all handmades are Free Worldwide Shipping. 


Wallet stats:

Dimension: 4.5" W x 8" H 
6 card slots
2 slip pockets
1 zipper pocket
Fully interfaced and padded
Hand sewn binding for perfect finish
Close with Snap Button

Shop Link : 


Thank you for stopping by. I'd better go and finish a couple more of family passport wallet orders now and I hope you already checked the recent tutorial about installing all around zipper on a wallet! 

Until then,

Happy Sewing

Elvira

Bifold Wallet and binding mini tutorial

Hello,

 Red Wallet


The sons are having their annual exam until next week. Wish us luck!! Since my MIL is away in Delhi, I tried a few baking recipes from youtube which surprisingly turned out well. 

Another great news from my sewing space is I decided to gift myself an industrial machine. I've been thinking for a long time and finally decided to get this one. I will write a review next week, Insha Allah, after it's assembled. 

Meanwhile, servicing my Singer HD, I whipped up 2 bifold wallets. It is slight upgrade from the previous one. I made slightly wider version so that it can double up as a phone wallet or to keep passports while traveling.


This red roses wallet was the second one I made. It was finished with binding, as usual. And frankly, it is my preferred method of finishing a wallet. 

The first one I made was a birthing style. If you're a bag maker, you'd know what it means? ^_^. It means, you sew the wallet panels right side together, leave a gap in certain part unstitched to turn the wallet right side out. 


Though it came out really nice,  my sons and SIL all voted for the binding one.I really love the peachy pink color though!


For this peach wallet, I used only woven interfacing without any padding. In the red roses wallet, I added fleece batting. 


Both wallets are the same size and even after filling it up with cards, phone and passport, it still close up pretty nicely. Love how slim it remained. I wish I could be too (after stuffing myself with homemade cakes and puddings! that too with extra cream! LOL)

Day before yesterday, Shweta from Arnel's mommy asked how to finish the corner of the binding. As with my other wallet patterns, I sewed the binding by machine on one side and hand sew the other side. Why hand sewing? Because I love a neat finish. So, here is a mini tutorial, how to sew when you reach the corner. 
But before cutting the binding strip, make sure that the fabric grains are straight. This is important to get a good finish!


1. When you reach the corner, fold the raw edge and pull out the edge so that you get that straight diagonal line. Finger press it. 

2. Fold it over, so that it covers the previous stitching line and clip in place. Trim the wallet raw edge if necessary. I usually trim as I go along.

3. Now continue slip stitch until you reach the corner intersection. 
  
4. Then slip stitch towards the wallet's corner

5. And stitch back towards the inner corner/intersection. 

6. Continue stitching !
I hope that helps! 
So, that's all for today. Keep experimenting, keep sewing! 


Have a blessed Friday!

Linky Party:
Finish it up Friday

Latest Video