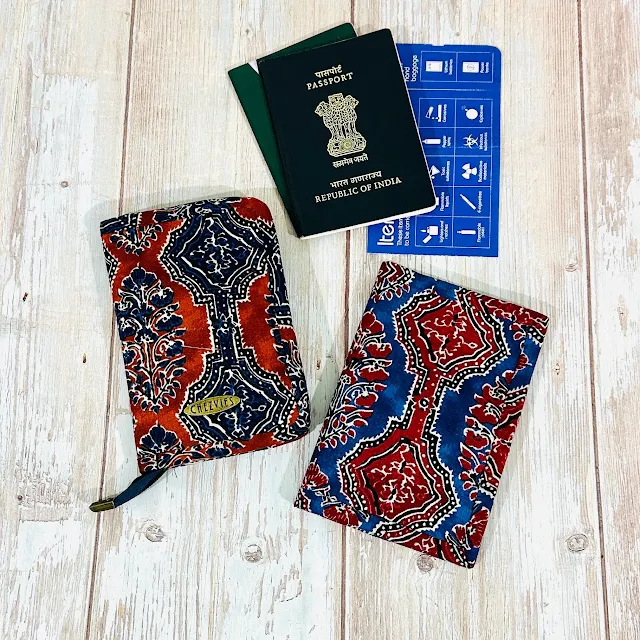
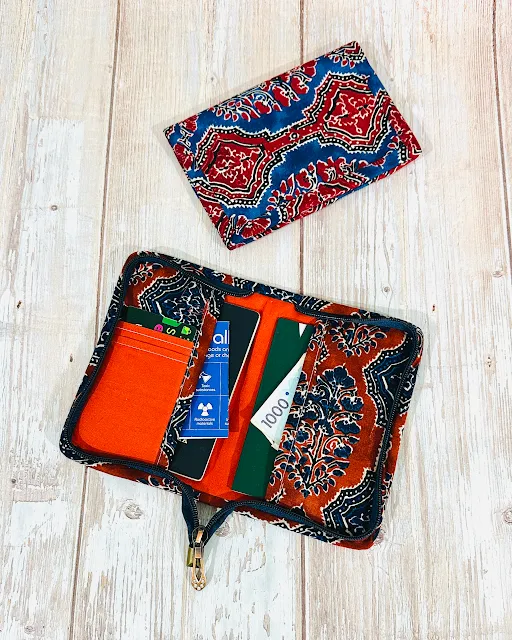
Finally I dig into my Tula Pink fabric stash and decided to make a couple of wallets. I bought the fabrics a couple of years ago and I always waited for the "perfect" project to make. But now I decided to stop waiting. Just took out a couple of fabrics, choosing combos and get on with the project! But choosing fabric combos are always the hardest part. So this time I get Chatgpt involved. And using the suggestion to make the wallet and I LOVE how they turned out!
I must admit, I used a lot of helps from AI (Chatgpt, Copilot and Gemini) to help me writing my Etsy product listing, and some more.
By now I think these AI know my business better than myself! Like when I posted my fabric and asking for combo, it gave me several options depend on what VIBES (!) I want to create and what colors are now popular in Etsy. It's like consulting the Gen Z for free.
I think AI is very good for us, boomers, gen x and millennial generation, who try to make a little bit of side hustle online but are clumsy with words, struggling to understand what SEO, and especially if you do everything on your own from scratch. By the time we sit at the computer after creating products and taking photos, our brain is tired. This is where the AI comes in handy. We just need to write the prompt and they will do it for us, with minimal editing needed. Win-win!
Anyway, here are the details of the wallets. What do you think?
Last month, Etsy sent email stated there was a bug on Etsy that they belatedly found and as a result a lot of my listings were not charged for renewal for the past year. So by April 1st, Etsy deactivated all the affected listings, and I did not realize it until a few days ago when I saw my shop were practically empty! This both affected my fabric shop and my handmade shop! Now I have more than 200 listings to relist and as I am on it, I will rework on the SEO, etc before put them back on the listing. I think it's a blessing in disguise also, as I have been wanted to work on the SEO on some of my listings. But yeah it's a lot of work - I will do it one step at a time!
Anyway, I have been busy making a few passport wallets last week. This time I am using block print fabrics! They have been on my WIP bins for a couple of months and finally I got time (and the mood) to finish them!
I am super happy with how these kalamkari passport wallet turned out. I have made only the rustic indigo color in the past and as I got order for the same, I might as well finish the rest!
For the kalamkari wallets, I offered 2 closure - zip around or snap button in my ETSY SHOP.
And if you love something vibrant and bright, the yellow floral passport wallet is perfect for you. The yellow floral fabric is chanderi cotton fabric and combined it with red tie dye fabric.
I still have the fabric, maybe I will make something else. Let's see!
All the passport wallets I finished and are already available in ETSY and my WEBSITE. What do you think?
So that was quite productive week for me. Batching work really works for me, especially as I am going through perimenopause stage now with all the weird symptoms and swing of energy level! When the mood is good and everything is prepped, I can complete more work in less time.
Recently I love watching these small (sewing) business vlog by many young women (college girls) on YouTube, and I marvel at how they organize their work around the school work, online shop and even doing crafts shows! I do learn many things from them and it's lovely to see how enterprising they are! Very inspiring!
I have so much fun making this set of travel wallet and mini backpack! I have completed 2 sets now and have a few cuts and ready to sew. So stay tuned for more.
This orange crazy patchwork print fabric has been in my stash for a long time. I found it in my stash and I know instantly it's going to be great for Voyage wallet and the Viola mini backpack! Now I am thinking of making a big or medium bag in the same print! Hmm...let's see.
And the second set is this vintage print in black and grey! I made family passport wallet with the same fabric a few weeks ago and after making the small passport holder, I have a small piece leftover which is just enough to make the mini backpack! I did fussy cut for the backpack. I really love how this set turned out! Now I wish I have a trip planned haha!
In case you're looking for bag patterns, The Big Bag Bundle Sale from Sew Modern Bag is still going on till Midnight on the 18th. There are 21 bag, purse and wallet patterns for only $21 - That means only $1 each pattern.*
This is really a great deal if you want to learn making different kind of bags!
I've been quite busy this month and making quite a few wallets. I had some problems with my Jack machine in between and had to use my Singer HD. It takes a little time to sew on a domestic machine again after a long time. I particularly miss the knee lifter. I called up the dealer and he sent the technician after 2 days. It was resolved immediately. Speaking about industrial machines, I am considering getting the compound industrial machine.
Anyway, from my sewing room, I made quite a few wallets. The first two are these Sheep Wallets! The first one is the Trifold Wallet and the second one is the double zippered wallet from Noodlehead pattern. It was a repeat order from a customer who loves black sheep! I made 2 trifold wallets as the customer wanted the sheep fabric on the exterior.
I have not made this double-zipper wallet for quite some time. As I was preparing to make this sheep wallet, I also cut a few more to make. I hope I will have time to complete them soon.
Next, I made these Small Hanami Pochettes. One is for a repeat customer and the other one I made for a stock. Well, actually the customer was asking for a rounded corner flap but I made a rounded flap! Luckily Hanami pochette is quick and easy to put together, so I quickly made another one! It's a blessing in disguise, now I have one pochette ready to ship in the shop!
I also made another Rosie wallet in this lovely blue floral print for a customer. I have the same print in Green and Pink, and now thinking of making the series. I love using Rosie wallet, as I don't carry many cards or cash nowadays. It can fit nicely into my small purse. The additional keychain to handy when I carry a big tote, I can clip it inside the tote bag.
The last one I sent out last week was this world map print safari passport wallet for a friend. It was a bit delayed in completion because I always forgot to send her the fabric choice. I forget a lot nowadays, so when a friend or acquaintance wants to order a wallet, I always suggest they buy from the WEBSITE. That way I can keep track of what I have to do next and when to send it out.
Safari Travel Wallet is versatile for solo or a couple travellers. Or even a small family who always travel together. I gifted to my sons when they go to college to keep their passports and other important documents.
So yeah, it was a pretty busy week for me and now I need to take 2 days break from sewing to tidy up my sewing room! It's pretty messy right now! I have a few more wallet orders for next week, so stay tuned!!
I'm still in the #sewmystash mission. I made a few Voyage Passport Wallets for the shops before Ramadan. They are now available in my ETSY SHOP as well as my WEBSITE.
This time I made curvy edge wallets and love how they turned out. If you don't like making your own bias binding, you can always make the regular Voyage Wallet using cross-cut binding.
Voyage passport wallet is a slim and compact travel wallet. Even though it's small in size (4.5" x 6.5") it can hold up to 4 passports (2 passports on each sleeve) and 2 cardholders. It's just perfect for those who carry 2 passports while travelling.
I made this floral wallet below from block print fabric because I love the print so much! I also got a small blue and white block print fabric on the interior. A bit of contrast but not too much!
The second one is thislavender patchwork print wallet. The fabric is also from my stash and I still have quite a lot of it, I may make bigger passport wallets like Ohana or Safari or another Nuno Wallet. I have matching purple polka dots too.
The third one is this blue wallet made from Marimekko fabric. I remembered I got it at Nomura Tailor. They have small cuts of designer fabrics and I picked up quite a few. The size is a little smaller than the fat 8 fabric. I had fun mix-matching this wallet.
As promised in my previous post, finally the video tutorial for the small passport wallet is up on my YouTube channel now. And as I edited the original pattern to add the link, I also gave a name to the pattern. Well, I am really not good at giving names but then, as I make more patterns, I suppose it's inevitable for me to give a certain name. This time, I go with the simple name Voyage Passport Wallet. I plan to update the original pattern with better photos when I get the time, so please bear with me.
In the video, I cut the pattern pieces slightly bigger than the original one, because I want to use it for Journal Cover like in my previous post
For the zipper version, all the basics remain the same as the original pattern. If you want to make it with zipper closure, here are the additional materials to cut/change:
✓ Cut 2 - Medium or All-purpose interfacing for main exterior and lining
✓ Cut 1 - Fleece Batting - the same size as the main exterior
✓ #5 Zipper – 24” Long (based on the continuous zipper that is cut to size)
If you're new here and wondering about the interfacing I used in my wallets, I wrote my secret guide for interfacing in THIS POST and THIS POST. My suggestion is to keep experimenting until you find the combination that you like the most. In the hydrangea passport wallet above, I used all-purpose interfacing for the main body and using medium interfacing for the sleeves' base. The wallet turned out softer and I can even fit it with more passports - up to 4 passports and it still closed nicely.
I made another Voyage Wallet with Snoopy Print as a custom order. Some of the crafters, DM me on Instagram asking how to do bias binding nicely. As I mentioned in my previous post, before cutting the binding (cross-cut or bias), make sure the fabric grains are straight. This small step is very important to get a good finish. And of course, practice! Practice makes improvement. Sometimes even I had to rip off the already sewn binding because I didn't straighten the grain nicely and resulted in sloppy finish.
Another question is, can I use cross-cut binding instead? Yes, you definitely can. I made a couple of passport wallets with zippers using cross-cut binding. It will be like the usual wallet binding, like in THIS tutorial. When you want to use cross-cut binding for a zipper wallet, do not CURVE the corners. I will make the video next time when I am working on a wallet binding.