Powered by Blogger.
Showing posts with label card wallet. Show all posts

Cute Trifold Wallet - Lockdown Project


Finally this trifold wallet is done! It's a custom order which was finalized at the beginning of lockdown in March. She's a fan of Disney and wanted this specific fabric after she saw the family passport holder with the same print. Luckily I have just wide enough to make the wallet's exterior and a little bit for the wallet's interior. 


(use code FAVE20 to get 20% off)

Another addition she wanted was the ID window. For that, I used the 16 cards template from the pattern and added ID window on the top card slot. 
I personally love how this turned out and I hope she will too :). I just need to add personalization with her name. I'll update you on how I do it. 


Before I made the big trifold wallet, we were discussing color combo option. And just to  see how it works, I made the Midori Mini Wallet - a little version of the big one.  But here I used stripe handloom fabric for binding, which I must say, turned out very cute. 


By the way, I reopen my Handmade shop in Etsy and also my Webshop. The government has announced that domestic flight will resume on the 17th, which at least I hope I can start selling again. 
I know that this pandemic will not go away soon, but we have to cooperate with the government orders and keep maintain physical distancing, wear a mask and wash your hands. Maintain hygienic lifestyle.  

Thank you for stopping by.
Take care and stay safe, everyone!

-Elvira-

*******

SHARE & GET 20% OFF
Trifold Wallet Pattern


*****

Linking up:


Weekends Update


I've been working on this wallet for a few days. It's super easy one but  life happens. First, my crown broke and had to spend my birthday at the dentist. Well at least I am getting something new for the birthday, right? 😄😄 

I'm super tickled when I saw the chicken print. It's too cute!! 

And my next project is all set, Insha Allah will start tomorrow. Stay tuned for new bag pattern from Bagstock!! Yes, I'm testing for Namrata's next pattern! I know you're going to love it. I am so excited to try out this vinyl after I made the origami pouch for fun! 

Sometimes, we really need to make time to learn and try new things right? And guess what? I am subscribing to SimplyPiano app on my phone and teaching my self to play piano 😄😄😄 I will update you with my progress. I am having fun practicing these few days!! 

Speaking about piano, my son's music school is closing it's door after 7 years. The above photo was yesterday, the last day we went to Ace Music! What a journey it was. Thank you everyone at Ace Music for your hard work all these years !! But the good news is he will still continue learning with Ms. Promiti Phukan in her new brand music academy, Cadenza  from April, after he finishes his board exam. Cheers to new journey! 
That's all my little update. Do not hesitate to pursue your passion. When there's a will, there's a way
Now, I'm going to hand sew my wallet and watching Notting Hill on Prime Video! 
If you're asking, yes..I am working on the wallet pattern.  Stay tuned!

Much love & have a nice day!

- Elvira - 

Alternative Card slot on Matryoshka Travel Wallet

Hello,

It's June already and I'm always looking forward for my summer break to Indonesia!
Did I mention that I am working on the pattern of this passport cover? It's now on the testing stage and I'm so grateful for my amazing testers who not only they're giving me their honest feedbacks and suggestions, but also they're also working hard making beautiful wallets,which I am sure will make you inspired!! I will be sharing their posts once the pattern is released next week! so stay tuned or subscribe to my blog so you won't miss the date!

In the meantime, I finished this matryoshka travel wallet. 


I tried a different flap this time and happy with the result. I also tried using a different combination for the card slot. If you already purchase the pattern, here what you can do: 

From the main card slot pattern, reduce the height (or the length) by 3". Then cut an exterior or contrast fabric 8"W x 4" H and sew it to the main Card slot panel with 1/4" seam allowance.

Once they are sewn together, mark the lines from the bottom to the top referring to the diagram given on the pattern. The first mark line should be on the stitching line (see diagram  above). 
Once done, continues as per the pattern's instructions and here how it will look like! 


Let me know what do you think in the comment below or your can join the discussion on my Facebook Pattern Group


I hope you like the tutorial. And if there's any tutorial you'd like to see in my blog, feel free to comment or email me :). 


Develop a passion for learning. If you do, you will never cease to grow. Anthony J. D'Angelo


Thank you for stopping by ~ Have a nice day!

Bifold Wallet and binding mini tutorial

Hello,

 Red Wallet


The sons are having their annual exam until next week. Wish us luck!! Since my MIL is away in Delhi, I tried a few baking recipes from youtube which surprisingly turned out well. 

Another great news from my sewing space is I decided to gift myself an industrial machine. I've been thinking for a long time and finally decided to get this one. I will write a review next week, Insha Allah, after it's assembled. 

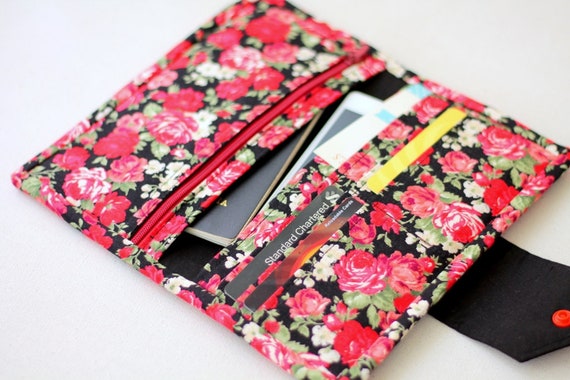
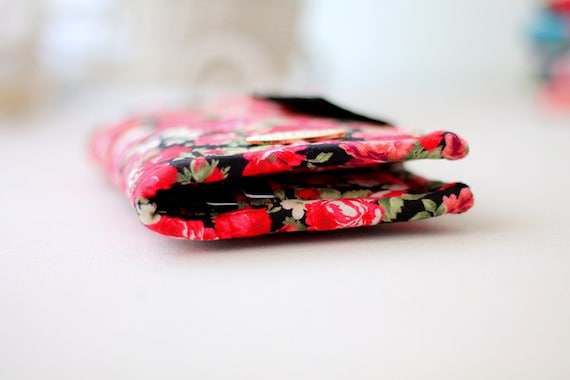
Meanwhile, servicing my Singer HD, I whipped up 2 bifold wallets. It is slight upgrade from the previous one. I made slightly wider version so that it can double up as a phone wallet or to keep passports while traveling.


This red roses wallet was the second one I made. It was finished with binding, as usual. And frankly, it is my preferred method of finishing a wallet. 

The first one I made was a birthing style. If you're a bag maker, you'd know what it means? ^_^. It means, you sew the wallet panels right side together, leave a gap in certain part unstitched to turn the wallet right side out. 


Though it came out really nice,  my sons and SIL all voted for the binding one.I really love the peachy pink color though!


For this peach wallet, I used only woven interfacing without any padding. In the red roses wallet, I added fleece batting. 


Both wallets are the same size and even after filling it up with cards, phone and passport, it still close up pretty nicely. Love how slim it remained. I wish I could be too (after stuffing myself with homemade cakes and puddings! that too with extra cream! LOL)

Day before yesterday, Shweta from Arnel's mommy asked how to finish the corner of the binding. As with my other wallet patterns, I sewed the binding by machine on one side and hand sew the other side. Why hand sewing? Because I love a neat finish. So, here is a mini tutorial, how to sew when you reach the corner. 
But before cutting the binding strip, make sure that the fabric grains are straight. This is important to get a good finish!


1. When you reach the corner, fold the raw edge and pull out the edge so that you get that straight diagonal line. Finger press it. 

2. Fold it over, so that it covers the previous stitching line and clip in place. Trim the wallet raw edge if necessary. I usually trim as I go along.

3. Now continue slip stitch until you reach the corner intersection. 
  
4. Then slip stitch towards the wallet's corner

5. And stitch back towards the inner corner/intersection. 

6. Continue stitching !
I hope that helps! 
So, that's all for today. Keep experimenting, keep sewing! 


Have a blessed Friday!

Linky Party:
Finish it up Friday

Latest Video