Powered by Blogger.

Improvisation Part Deux - Family Passport Holder for 4

Hello again,

Weather is still pleasant in the Northeast of India. We got plenty of rain (and storm) this year and I hope the summer will not be too hot. 


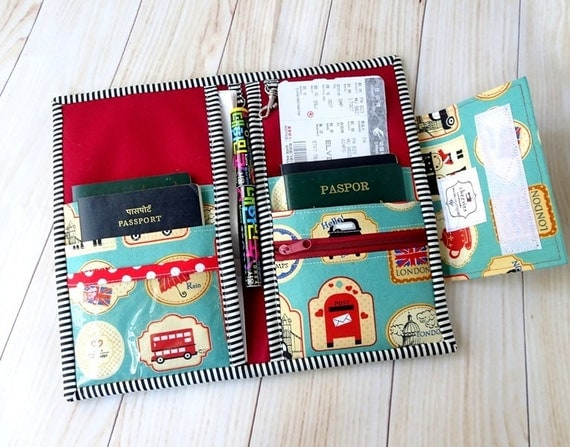
Since I posted my family passport holder with 4 slots in Facebook , many has message me. Many people need a smaller version of the wallet. 
If you already bought the pattern (if you have not, links available at the end of this post), here's simple things you can do.

To make 4 slots passport holder :

1. Cut only the top and bottom card slots (Exterior Fabric, Lining and Interfacing).  And proceed as per pattern instructions.

2. Adjust the main body piece (Exterior, Lining, batting) by reducing the HEIGHT by 1 inch. The width should remain the same. 

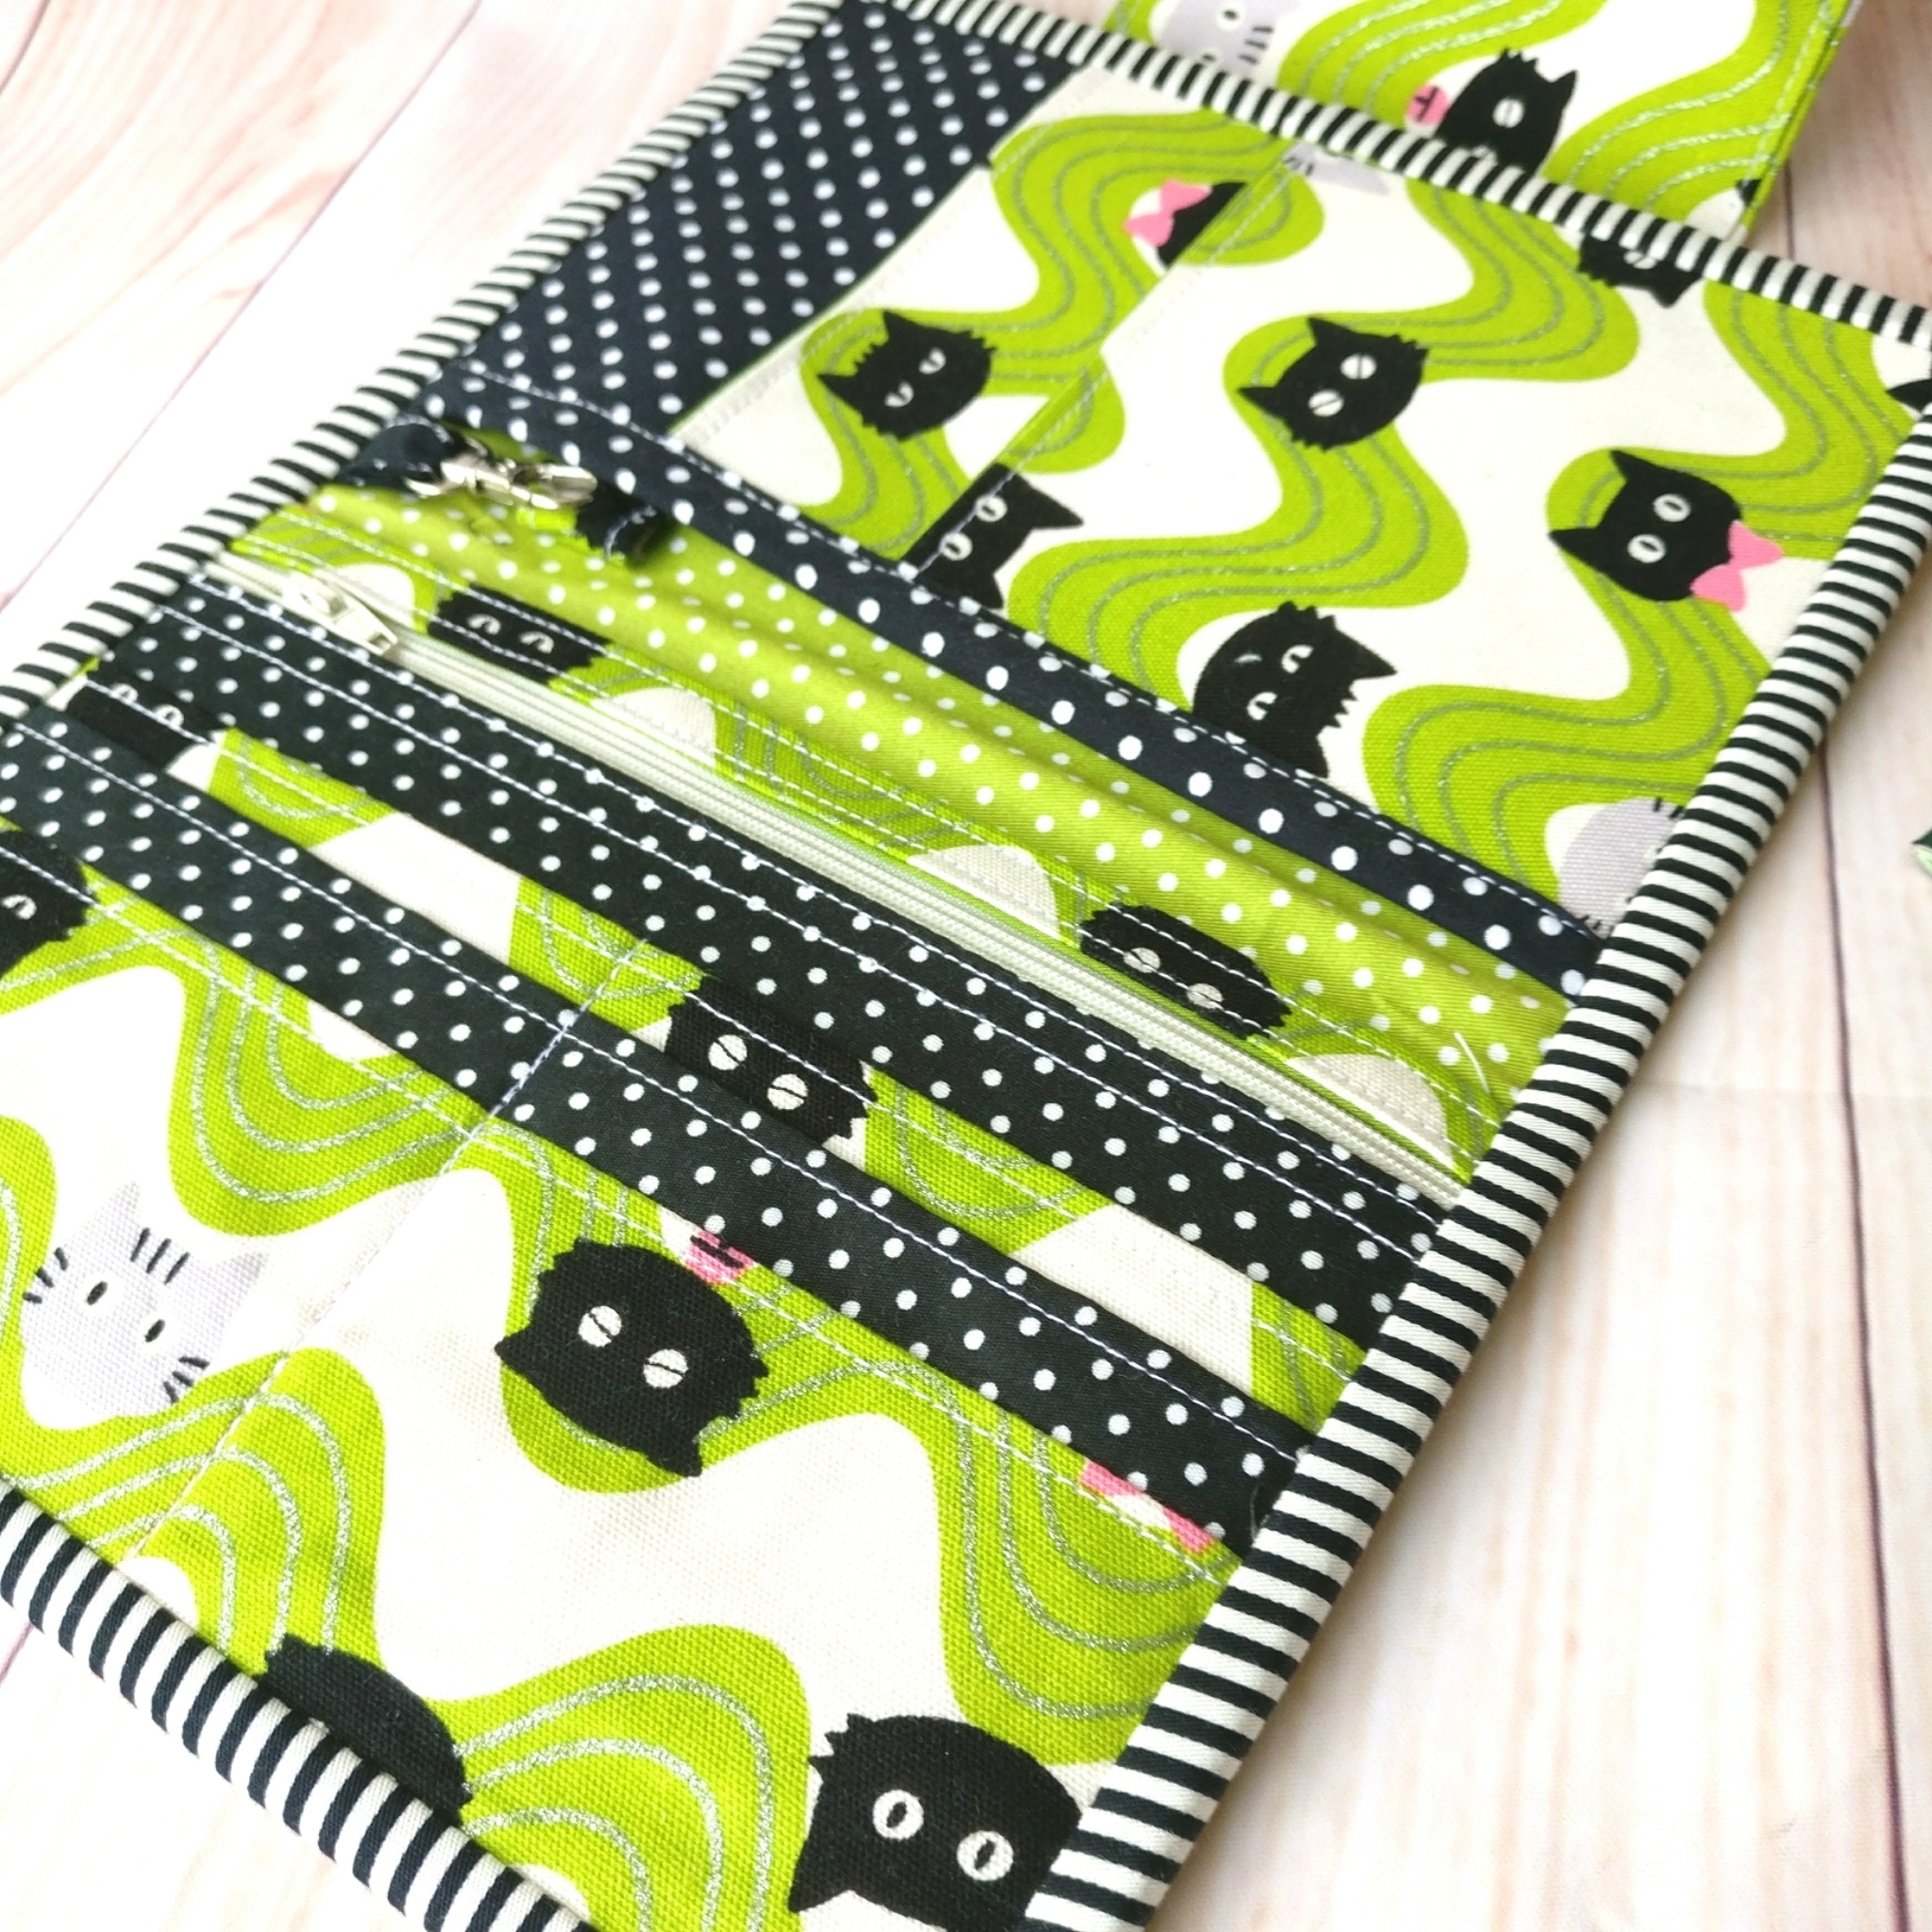
3. (Optional) Reduce the WIDTH of the flap exterior and the interfacing piece by 1 Inch. The length of the flap piece should remain the same. Or else you don't have to change the flap pattern if you want a wider flap, just like  these fun and beautiful wallets by Kausalya of The Turquoise Paisley


 Now,  don't you love her wallets? They are super cute and fun. Check The Turquoise Paisley Facebook page to see more of fun handmade passport wallets and other fun stuff she made from Indian Fabrics


Who wants a boring black faux leather Travel Wallet if you can get a fun,  cute and one of a kind Handmade Wallet

The Family Passport Holder pdf pattern is available  here:


(Printed Pattern & Kits available in ChezVies - Price in INR)

if you already got one and have any questions, you can always email me. 


Until then,

Happy Sewing


Improvisation on the family passport holder

Hello,

I got an email from a customer asking if the passport wallet I listed in Etsy will be able to hold 12 passports as they are dual passport holder. So, yes I can make it happen (I feel like a magician ^^ )

So, after carefully thinking I made a couple of changes in term of material that I used or listed in the PdF Pattern.


For you who already bought the pattern, this tips may come out handy if you need to make one too.

1.  The interfacing. In this Map Family Passport holder I used Medium Heavy interfacing on the exterior only. In the main body lining fabric, I used woven interfacing. I also used woven interfacing for the passport slots. Since I need them to be less rigid. This way, 2 passports can easily fit in one slot.


2. I omitted the mini zip and ID slot and added exterior zipper instead. 


3. I also made the flap  longer by 0.5 inch to accommodate the bulk.

This family passport wallet is already on it's way to its new home. I will be offering this options in my shops. 

This is the best part of custom order. Sometimes a request from a customer can lead  you to new ideas. 

Thank you for all of you who've been supporting my small business all these years. 


Until next time, 

Happy Sewing


Links :


Smaller passport holder with card wallet is back in the shop

Hello,

It's already Saturday. I hope you had a great week.  My sons started the new session with excitement. The elder one was happy because there was not so much of shuffling, which mean he has the same classmates as when he was in grade 7. The younger was a bit upset, because his besties - 5 of them- are all in a different section. But my younger son is a friendly one, so I don't worry. 

most popular wallet in the shop now

Meanwhile, now my custom order is back on track. I managed to finished a couple of overdue orders and sent them out. 

Paris theme Passport Holder

Card Wallet Organizer & Phone Sleeve

Meanwhile, I decided to put this smaller passport card holder back in the shop. I got several orders for the same style and will make a couple for stock.

Cute Black Cat Passport Holder
This wallet can hold up to 2 passport. The slot can also hold boarding passes since I made the pocket quite deep. 

Details of the passport wallet interior

It has 6 card slots, with one long zipper pocket and 2 slip pockets. Pen loop and swivel hook are also added. 

Perfect Size Passport Cover  to fit inside your Purse

And of course I love my new metal label, don't you?

Handsewn binding 

I always finished the wallet binding by hand. I love the neat finish of hand sewing. It gives the look of "handmade". 

And most of customers really love it. For one wallet normally I can finish the binding within 30 minutes. 

So, what are you working on next week? I'll be working on another family passport holder, another card wallet organizer orders  and also more phone sleeve orders. 

Until then,

Happy Sewing


{HOW TO} - How to Edit Instagram Photos that Sells - Simple Guide

Hello again, 

Everyone is on instagram nowadays. It's the best social network to share your photos, videos and now even life event. People love instagram more because we want to SEE. Yes visual is very important, especially if you are a  mompreneur  and running an online shop or selling via instagram but don't have time to edit photos from editing apps. You want your product to stand out, to be drool worthy. 

Most of us mompreneurs don't have time to go back and forth from editing apps to Instagram. And we are not quite happy with the stock filters too.  

Here's what I usually do before sending out my product photos to the world. 

1. Open your instagram and click your profile, and click that + sign at the bottom of the screen. 


2. Instead of using photos from the gallery, choose PHOTO.  Position your mobile camera in the angle that you you like best. This way, your photo is just perfect size for Instagram. Cropping your stock photos will (more often than not) make your photos size look odd for Instagram frame. 


3. I know there are so many apps out there offering various of filters including instagram. Don't use that. Instead, click EDIT where you can adjust the photos to look bright and natural. 


4. What I am using most is  BRIGHTNESS. Adjust it so that it looks natural. If you set your phone brightness to Auto, change it. That way you know how the photos will look in reality. 


5. My next step usually CONTRAST. Especially if the object is dark or bright colors. Adjust it to look like the real color as much as possible. 


 6. Next is SHADOWS. Use this if your source of light is not evenly distributed. 


 You can see the difference here. 


7. I  use TILF SIFT if I want to focus on one part of the photos. It's perfect for highlighting your speciality, your new label, your perfect stichetes, etc. 


 8. You can experiment with the rest of the Editing taps. Now, you're ready to post your photos. Don't forget to add those #hastags. Use suggested popular hashtag. 


It's super easy right? I know many mompreneurs out there who don't have time to sit and edit every single photos before posting it. I hope this simple guide will help you improve your Instagram photos. Write your comment if you want more simple guide.

I will talk about #hashtag your post in my next post. Subscribe for my post at the top of this blog to get updates. 

Until then,

Happy Posting


{TUTORIAL} Quilted Passport Sleeve

Hello,

What do you plan to sew this weekends? I've been making few small projects and learning new things. I want to share with you how to make this quick quilted project. This will perfect gift to make or to sell in your weekends market. 
Ok, let's start

What you need:
Fabric scraps  at least 8" wide - Fat Eighth would be great
Coordinated or contrast lining fabric
 Fleece/Batting
Thread

First, you can download the templates from HERE 

Print the templates at ACTUAL of 100%  

Cutting Instructions:
Cut the interfacing and fabrics according to the instructions written on the templates. 
Seam allowance already included in the templates. 

Now the fun part: 

Place the sleeve pockets on each short side of the  Main Body A (RIGHT SIDE TOGETHER) and sew with 3/8 seam allowance. 


Cut the  batting slightly bigger than the templates. Place the  exterior on the batting Right Side Down. (if using fusible fleece, here's HOW)


Start Quilting using your fave quilting lines. I love this decorative stitches in my HV machine. Once done, trim the excess batting.


I love the look of serpentine stitch. Alway!

Fuse the lightweight interfacing on the wrong side of lining fabric and place it together with the exterior piece, right side together. 


Sew the short edges with 3/8" seam allowance, turn the right side out, press the seam and top stitch with 1/8" seam allowance.
(you may find the lining is a bit longer, DO NOT TRIM)


 Now fold in one  short side towards the lining (to create sleeve). 


and pin the folded sleeve with the lining piece, like the picture below.


then turn the wrong side out again. 


it should look like the picture below. 


Now pin them all together


There should be separate fold of lining and exterior (see picture below). I hope I make sense here ^^

Now sew one of the longer seam with 3/8" seam allowance. 
Backstitch at the beginning and end.  


Mark the other long edge and stop 1.75" from the end. Flip the lining fold and draw mark line on the wrong side of the batting.  Sew along the mark line on the lining and back stitch as you stop at the end of the line. 


Flip the fold of the lining backward and  sew the exterior close along the line you made earlier. Backstitch at the beginning and the end. 


trim all the stitched corners. 


Turn the passport cover right side out through the small opening. It's a bit difficult but doable ^^. 


Take out your chopstick and start pushing those corners.


Pull the opening out, you can sew the opening by hand or machine. 

Now spray your passport cover with diluted starch water and and give it a good press. 

Voila, your weekends project is done!! 


Shibori Tie Dye Passport Cover


Show me what you make by tagging me in INSTAGRAM.

As usual don't forget to sign up for blog updates by subscribe through email. 

Until then,

Happy Sewing


Linky party to Show Off  Saturday


Latest Fabrics

Latest Video