Powered by Blogger.

Mini Tutorial - DIY Templates for Hummingbird / Periwinkle Block


I posted the coaster I made using the hummingbird pattern in my Instagram  and I love how cute it is. Now, I love foundation paper piecing but I don't like wasting the paper or the fabric. If I'm going to make them into bag or pouch, I usually use lightweight fusible interfacing as foundation paper, which is very practical. I wrote HERE about it .


This is totally inspired by the Japanese quilt books. I've learnt that many of them tracing the paper pattern on to the fabric or they cut the fabric according to the pattern shape and draw the seam allowance. That way, no paper and fabric waste but it's a bit slow process for an impatience people like yours truly ^_^.  And no, I don't want to collect more acrylic template ruler because 1) it's expensive 2) Amazon will take forever to deliver and by the time it arrives, my mood will be gone LOL. 

So, here's my jugaad (hack): I use lamination sheet!! 
I cut the pattern  pieces (without the seam allowance) and laminated it. Ehm, I ironed it using silk setting. Then mark 1/4 inch around the perimeter and cut on the mark. 


Now your DIY templates are ready and you can trace the fabrics using erasable pen or carefully cut using rotary cutter (I do this :D ) 

Stack your fabrics and you're ready for chain piecing. 


I need to arrange my pieces according to the pattern (I'm more of visual learner) to make sense to my brain.


Put together the center piece (C2) and  the right  piece (C1) right side together like the picture above and sew with 1/4" seam allowance. Repeat the process with the left piece (C3). Don't forget to press the seam towards the background piece. 


chain piecing done! Yay! 


Once done, straighten the triangle blocks and arrange them like shown in the above picture. Sew 2 triangles together using 1/4" seam allowance to make Half Square Triangle (HST). If you're a beginner, this 1/4" seam allowance is our lifeline LOL. It seems daunting but with practice it will come. Don't worry!! 


Now, sew the HST together with 1/4" seam allowance and your block is done! 


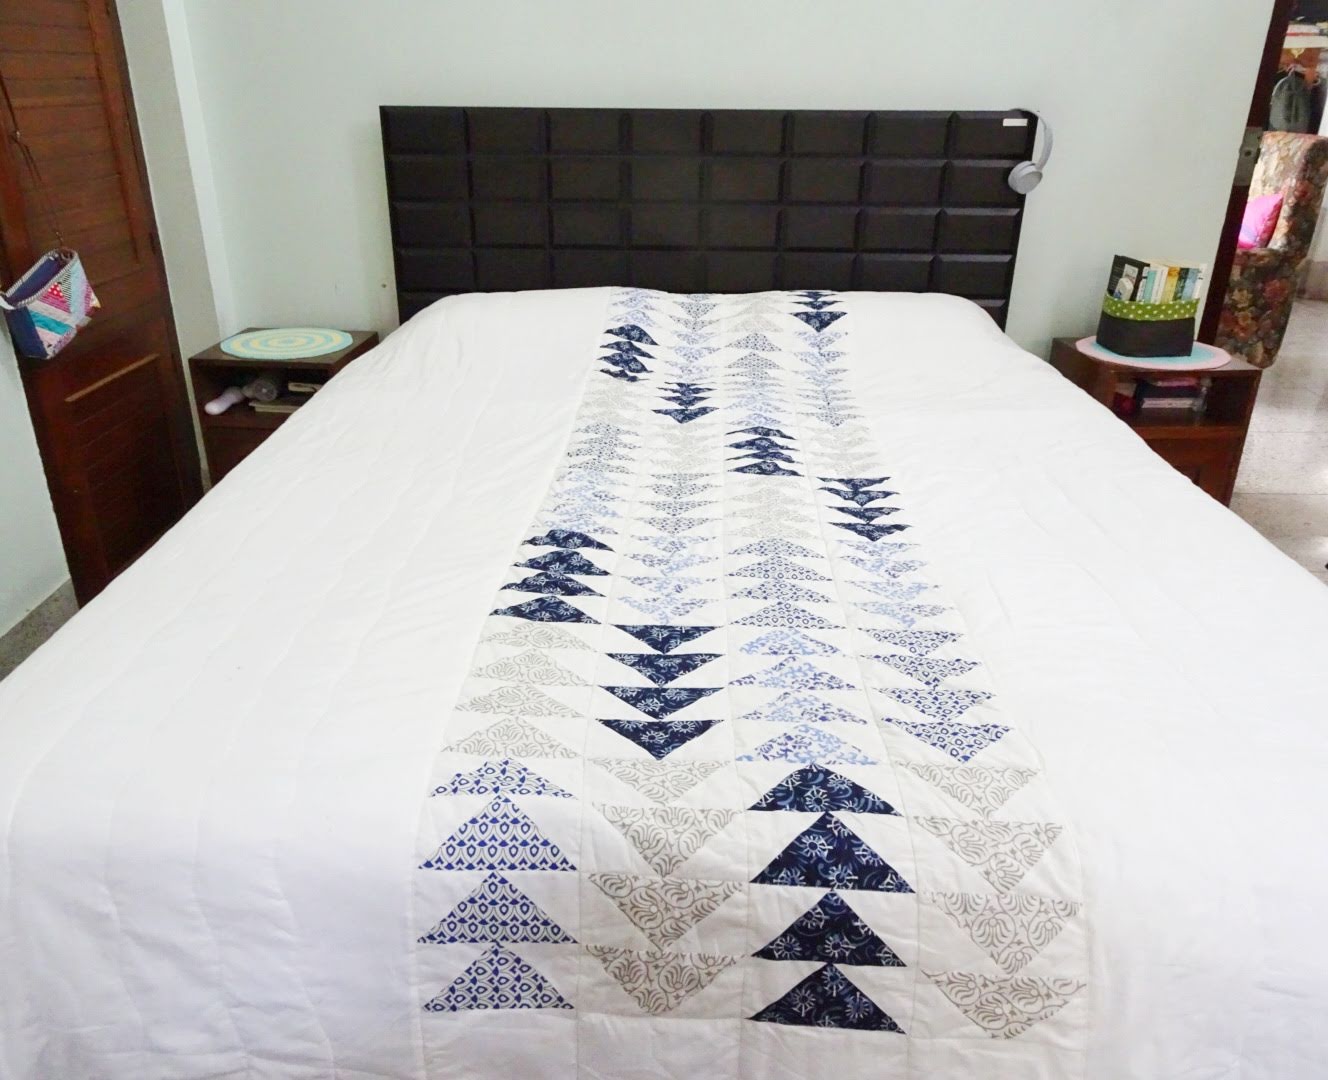
I am using cotton cambric for the background fabric here and it stretched a little with every ironing process, so I need to keep trimming to straighten it. According to the original pattern, the block should finish at 5 inch square, but mine is finished at 4.75 inch. But I'm happy, cos I waste less paper and fabric ^^. Now I am going to make few more. Maybe scrappy blocks? 

I hope you enjoy this mini tutorial and if you do, please share on your social media account so that many people can benefit from it. 

Happy Weekends!

Elvira

****

Linky Party
TGIFF - Madame Tailor

Bite More Than One Could Chew - A Finish Quilt

"Yes, there were times
I'm sure you knew
When I bit off more than I could chew
But through it all when there was doubt
I ate it up and spit it out
I faced it all
And I stood tall
And did it my way "
(My Way ~ Frank Sinatra)


Yes, that's exactly how I feel when I was working on this quilt in the past few days. This flying geese originally was a commissioned quilt. She gave me the idea from Pinterest and we discussed in details about everything. I even did a little research on how to finish it on a domestic machine without breaking my shoulder LOL, because it's huge quilt! 

Doing the geese panel was all fun and I love HST! Until I tried the partial quilting thingy! I wish I was wiser! From the tutorial it looked doable, well, it was if it was a smaller quilt but not when you are doing king size on domestic machine!! Lesson learnt : Be wise and leave it to the expert (a.k.a longarmer)


So, few days ago, when the house was quiet, I took out the quilt which has been sitting in the corner of my room for 4 years -__- and decided to get it done! After spreading  the crumpled UFO quilt on the bed, I put on a cheerful playlist on my Play Music, and ironing it. Cleared the center table and started pinning. All 3 panels were already quilted separately and I already sewed the backing of the middle and one side panel. Now I only have to pin and sew the front panel together. Well, it feels easier now that I put it in writing hahahaha. Really, it took several bloody moments (from pricking my fingers) and by evening, one side panel is attached! Pheew.


I continued working the next day to attach the other side and realized yesterday's one was all wonky at the back and I had to unpick. Duh!! OK, actually I battled whether to leave it as is, but the nagging feeling won! 


I cut 4" wide binding and if you have not downloaded Robert Kaufman Quilt Calculator Apps, maybe you should! It really helped!! By the way, I used my dependable Jack Machine! I love because it has sturdy wide table that I could manage the quilt easily on it. 


Don't you love the butterfly backing? I do :)

 It's far from perfect but it's done and I love it. Just in time for winter here in Northeast India!  
                          

view from my kitchen window


So, if you have unfinished projects, don't give up on it! Just  work at your own pace ^_^. Now, I can reward myself with few episodes of C-Drama! Yay!


from Kdrama "On the Way to Airport"


Thank you for stopping by!
Have a nice day,
Elvira


****
Linking up to :

A Little Recap


I came across this quote in Pinterest and I simply have to share it! It reminds me of my early years of learning sewing. Then, there was no Facebook, YouTube or Instagram. There was Crafter though and also Blog was a new thing. I learned so much from many people around the world and I'm very grateful for those who generously shared their sewing knowledge. Yes, I am a firm believer of sharing is caring! When you teach, you learn more. 

******


I got pretty calendar from my dear friend Manisha featuring her original painting print. You must check her Instagram to see the beautiful flowers she painted. They are the prettiest!! 
*****

Finally I framed these postcards I got from my trip to Hida No Sato (Hida Folk Village), Takayama two years ago! I found a lightweight frames from Amazon and they are just perfect! I love collecting postcards from places I visited, besides the usual fridge magnet. These postcards came in a pack. The painting is so cute that I simply had to buy it! What's your fave souvenirs to buy?


Throwback - Hida no Sato January 2017

*****


This is a sneak peak of my next pattern which Insha Allah will be available on 28th November. It still on testing stage now! I learned one thing while writing the pattern, that you don't need fancy software to write and draw a good pattern. I'm inspired by the Michael Angelo of Microsoft Excel on YouTube.


 Let me know what do you think after watching the video!

Thank you for stopping by!

Have a nice day!

Elvira

Video Tutorial - Mini Zipper Pouches

Hello,

The past few weeks I've been working on my website. The progress is a slow but I guess it's getting better. I added Video Category, where I attached some of product reviews and short tutorials from my YouTube channel. The idea is to help shoppers by giving them visual references, before they decided to make the purchase. 


Anyway, while I was cutting my scraps into usable squares, I got this idea to make mini zipper pouches. I had this plan in my mind for a long time and finally the opportunity present itself. I love to take many photos and sometimes videos when I am working on a project. Then I decided why not filming the making of this cute pouch! So here's the tutorial, I hope you enjoy it!


and this is the product review of the mini pouches 


The pouch is so cute and very useful. You can use it practically to store any small stuff that you want to keep it secure or organizing your purse without being bulky, like earphone, chapstick, lipstick, transport card and money, etc.


I can say, taking video is alright but editing etc need a good mood and patience :D but I enjoy the process, so hopefully, I can share more useful easy video tutorial with you. 

Thank you for stopping by,

Happy Sewing
-Elvira - 

Resources :

Scrappy Patchwork Zipper Bag

Hello,

Patchwork Zipper Pouch


Autumn is here, though we don't have the colorful leaves but the weather is very pleasant. I made few stuff last week, aside from few custom orders. Well, sometimes we have to make time for fun sewing, right?


One was this quilted zipper pouch which I made from scraps. I bought the scraps from Indonesia and the scraps are quite small, around 6" x 18" and some of them are uneven cuts. I cut few of them into 2.5" squares (my fave size) and choosing few dark, medium and light value from the squares. 

Work in Progress

I really love working with small scraps of fabrics and I promised myself that I will make more scrappy projects for myself and also to share with the world :D
I used fun apple print cotton fabric for the lining. It really brighten up the pouch. 


I was going to do the regular zipper top closure, but I want something to zest it up a bit. I have many bias binding from making passport wallets, zipper with binding is the obvious choice! There are 2 ways of attaching the binding that I did. The one like in THIS pouch or THIS one where I attach the binding strip to the main fabric before attaching the zipper.  On this pouch though,  I sewed the zipper first then attach the binding with machine on one side and then finish it with hand sewing. Insha Allah I will make a tutorial when I am working on the next one. 


I did simple diagonal quilting here with the help of  washi tape! Well, I usually just eyeball it though :D. On the other side, I used floral print and quilt it in the same manner. And if you're wondering about the tag which I attached on the side, it was not intentional. The fact is I forgot to attach D ring and had to make an improvisation here. 


 Please let me know what you think in the comment below. Thank you for spending time reading my post, I hope I can inspire you in a small way ^_^.

Happy Sewing,
Elvira


Latest Fabrics

Latest Video