Powered by Blogger.

Last Week of April

Hello,

The past week, I was pretty busy. I started the Newsletter and really really happy I am able to share few things, like a free pattern! If you want it too, you can SIGN UP today.

On Friday night, there was a big storm and we ended up with no electricity until Saturday Night.
Few of our trees fell down and my younger son was really sad about it. He's fierce boy but very soft at heart. He loves animals and always goes to pat our newborn calf and feed the cows with his leftover tiffin whenever he comes back from school.


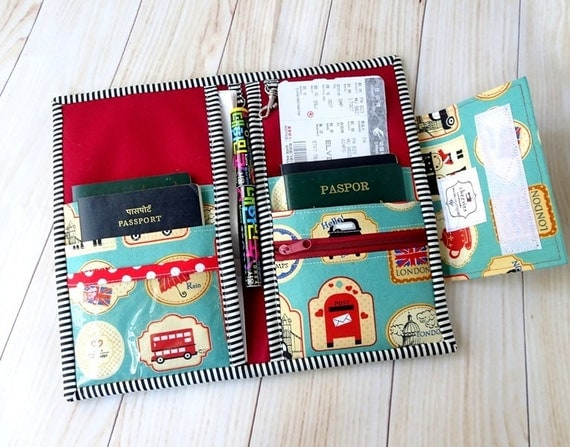
So on  Saturday afternoon, I spent my time cutting out interfacings for my Passport Holder  and mini crossbody bag orders. The shop wa quite busy the past few weeks, so I better get organized. Luckily I came across this post about batching from Jules of Sew Me Something. It's very inspiring!

(Batching is a form of time management that allows a person to maximize concentration and decrease distraction

I'm glad I did it, so today I can quickly make this Frozen Mini Crossbody bag for my friend, Wulan's daughter - Anisha. I hope she will like it. They will go to Indonesia for summer break next week. I hope it will reach them on time.

No automatic alt text available.
Frozen Mini Crossbody Bag
If you want to make the mini sling bag, the pattern is available at the end of this post or just go to the Pattern category in my blog.


I added the back zipper too. While deciding which fabric combo to use, I ask my elder son. He has a good taste and I often consult him whenever I am stuck with a color choice. Though he's only 13 years old :D. We initially agreed with the off-white linen but since Anisha is still small, I decided to go for more girly color.


No automatic alt text available.

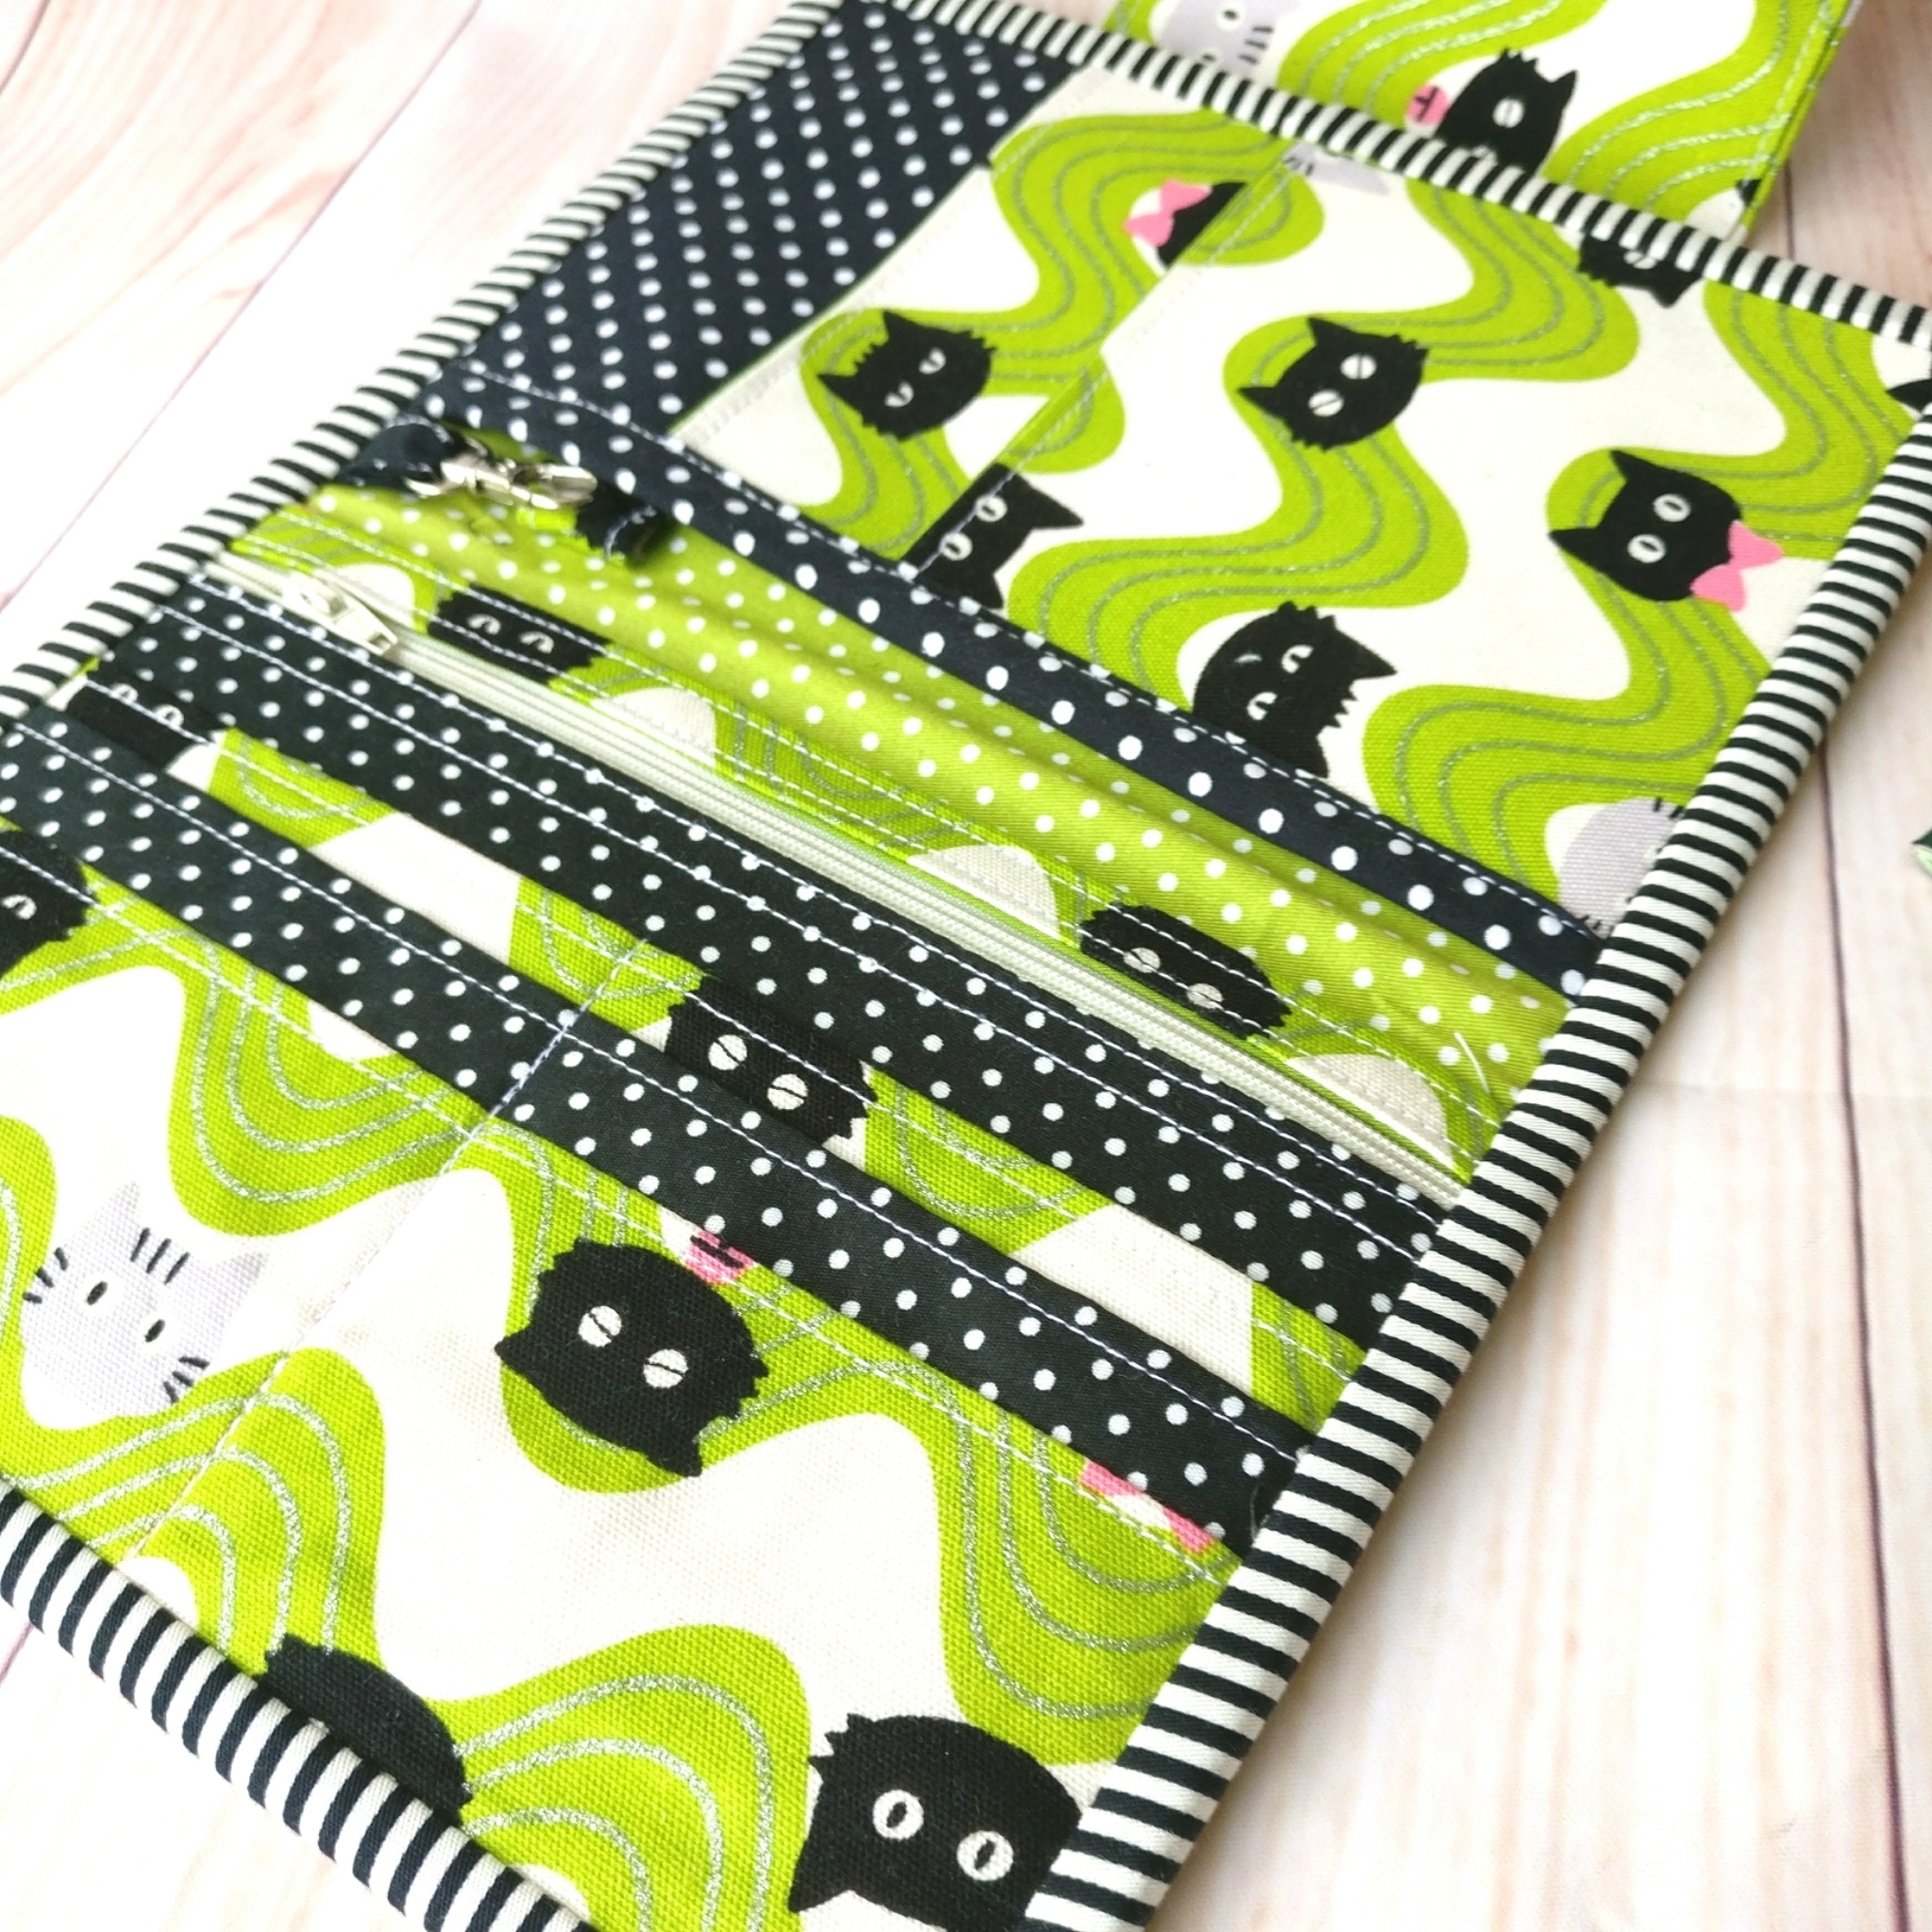
Another one I completed (besides my passport wallet orders) is this cute reversible drawstring pouch. I followed a tutorial on YouTube. There was no measurement written on it so I just make my own. I am using 2 Fat Eight (9" x 18") and love the result. Yes, just 2 pieces of fabric. No interfacing! Isn't cool? I used quilting weight cotton from my stash and the green stripe cotton mix fabric.

No automatic alt text available.

Yes, sometimes you don't need interfacing. Depends on what is the purpose of the bag, like a foldable shopping bag, it's better off without interfacing because we can just roll  and put it inside the purse.

No automatic alt text available.

This will be a great quick pattern to make for a gift.

So, what are you working on this week?

Thank you for dropping by. Don't be shy to leave a comment or two ^^

Until Then,


Happy Sewing


Pattern Link : 


==========================

Frozen Elsa Crossbody Bag


If you like to receive more tips on handmade tutorials and handmade business tips, sign up for Chezvies Weekly Newsletter by writing your email address in the form below.


Interfacing Guide for Handmade Bag in India

Hello,

Today I want to share about interfacing. Not the famous brand interfacing because we don't have those branded interfacings here in India. I often receive a message asking what interfacing I used in my bags, pouches, and wallets.

Many of you probably already read interfacing guide by Sew Sweetness but since we - in India - don't have all those brands, we are back to square one, right?

I have been experimenting with many kinds and quality of interfacings. Which interfacing to use depends on what kind of project and what look that I want. Floppy, firm, sturdy, quilted, etc.

I recently purchased a roll of heavy woven interfacing and I am happy that I finally found it. It took me several trips to the wholesaler. He was kind enough to let me check through all kinds of interfacings without asking  "what are you making, ma'am?" which is pretty much the habit of an Indian (male) shopkeeper/salesperson. And it always pisses me off, cos what I am making is none of his business ^^.

Anyway, I found what works best for my projects.


I use this very frequently to make small projects like small pouches or pencil pouch, and also bags.  This will make cotton fabric feel like home decor weight fabric. Not as thick as canvas though. I used this to make the Phone Pouch and Kindle Cover, pencil pouch, and Tote bag.  With this interlining, adding batting to the pouch won't be a problem.


Result: Soft /floppy and wrinkle-free, which means you can smoothen it with a warm iron.


I discovered this recently. It's thicker than all-purpose interlining. It gives a good shape to the bag and pouches.

You can see the fabric print more prominent on the all purpose interlining
Medium = MCL 3001 Madura Coats India

I use this for a  pouch or any purse that I don't need to be padded or add batting, but more sturdy without being too stiff.  Sometimes I use this interfacing for wallet or passport wallet too, combined it with Heavy Interfacing.


Heidi Mini Foldover Bag


This is also woven but heavier. This will make your fabric feels like canvas.

MCL 1616 (Madura Coats India)

I use this for my family passport wallets and women's wallets. The result is a firm/sturdy but soft wallet. Since it's a cotton base, it makes the hand sewing less painful.

Quilting Family Passport  wallet, large passport holder, passport case, family travel wallet, family passport cover, 6 passport organizer

4. Buckram 

This is my alternative if I could not get the heavy interfacing for my wallet. This is the one with a papery feeling and it makes the fabric very stiff. I only use this for wallets. Since I don't have to do "birthing", it works out fine. You can read HERE to learn more about Buckram.


I remember I made a tote bag with buckram and it wrinkled beyond repair LOL. I used it for a shopping bag. (Update: I stopped using buckram for my bag and wallet projects) 

All the above are iron-on or fusible. Which means one side is glue coated. I normally spray the fabric with water and place the glue side on the wrong side of the fabric, and iron it on a cotton setting. For lighter interlining use a setting in between wool and cotton.

5. Lightweight Non-Woven Interfacing.

This transparent fusible interfacing is called "pasting" in India. I use this a lot for my wallet card slots, quilted pouches, and also applique. 


It's good to give just enough thickness especially for card slots, or the inner pocket of a bag. But you have to be extra careful because it will shrink and wrinkled if the iron is too hot. I use a wool setting while ironing this interfacing. If you're careful, you will get a nice and smooth result. 


Card slot from Trifold Women's Wallet


I always use this interfacing to make a quilted purse. With this interfacing, the quilted bag or purse will be soft but sturdy, even after washing 

I also use this for quilted pouches and bags, especially when I work with Indian Fabric.

You can easily buy this interfacing in a "button shop" in India. Sometimes, they sell it meterage, but I always buy in a full package. It's around INR 150 for a pack of 10 meters.


Quilted Zipper Pouch
Quilted Zipper Pouch 


UPDATE: There are many brands of interfacing in India, what I wrote here is the one I am using and that works best for me. 

Where to buy it?
I bought my interfacings from a local dealer in the market. You can get them online on Amazon India or other websites, but make sure to contact the seller first. Because there is no clear description in the listing that I saw in Amazon India, and the seller will casually write interfacing or interlining as buckram. 

That's all for today. Don't be scared to experiment. Make the best of what you can find locally. I hope this simple guide will be useful for you. 

Thank you for stopping by and read my blog. Don't hesitate to leave a comment or two.

Until then,

Elvira


Introducing Weekly Newsletter

Hello,

Yes you heard it right! I will start delivering Newsletter this coming Wednesday. 

Newsletter has been in my bucket list for quite sometime. Even though I already have subscription via feedburner provided by google, I feel I need more platform to share. There are so many things that sometimes one blog post is not enough. Hence the Newsletter.

You can sign up RIGHT HERE 

I started doing some reading and research and came across Abby's Blog - While She Naps  where she wrote about how to create powerful newsletter.

I was waiting for my sons in their music classes when I came across the blog and decided to buy the e-book. It's fantastic book! If you're a mompreneur and have no idea how to start your first email list, this is the book you must have. Abby even replied to my questions promptly! Thank you so much, Abby!!

Last weekends I was writing notes from the book and started working on my mailchimp and sending out test message to my friends ( thank you Namrata, Agnes, Vonney!! - group hugs to you all - xo). And now it's ready for the First Issue on Wednesday. 

Image result for newsletter

While I was writing the content, I realized how much I enjoyed it. It reminded me of the era before the internet. I always like writing diaries and letters to old and new friends. That habit continued after email was widely used and that was how I met my DH ! (ha, now that little secret is out! *blushing*) 


If you want to get all the handmade news sent weekly directly to your inbox and read it while you're having a cup of chai, you can sign up at the end of this post

Image result for newsletter icon

I hope to see you on board! Thanks for dropping by and if you think there's someone who might love this newsletter, do forward to and share this blog post with them. TiA!


Until then,


P.S. For you who already signed up (thank you!!), I included a surprise gift inside the Newsletter


{TUTORIAL} Adding Zipper Pocket

Hello,

The last two days was euphoria for me. It's the first time I got published in an online media and that too on Ecwid Blog! I was contacted by them by email early this month and was so excited about it. You can read my Behind the Scene Story in Ecwid Blog. I hope I can inspire more mothers who decided to left 9 to 5 job and pursue her dreams.

adding zipper pocket tutorial

Now let's get down to the fun stuff. I got email from Patti, asking about how to add zipper pocket on the Phone Pouch. Thank you so much Patti!!
Adding zipper pouch is very easy. If you already got the pattern  here is what you have to do. (if you haven't,  you can get it at the end of this post)


After you cut all your Exterior, Lining and Interfacing pieces as per pattern instructions, cut 2 extra lining pieces of Main Panel.


1. Fuse the interfacing on to the wrong side of the back exterior piece. Mark 1.5" down on one of the short end and cut.

Mark down 1.5" 

Do the same with one of the lining piece.


2. Put the lining and exterior pieces right side together (see picture below) and sew with 1/4" seam allowance. Once done turn right side out and press the seams.

sew with 1/4" seam allowance

3. Take 8" zipper and place the lined exterior pieces you just made on both sides of the zipper. Refer to the picture for placement.


4. Top stitch close to the seam and repeat with another line of stitching, approximately 1/4" apart.


I used a leftover zipper and added a contrast color zipper pull. So fun!!

I hope you can see the double line stitching there. 
5. Now, take one piece of lining and place the zippered exterior panel on the lining. All right side up.


6.  Pull the zipper head to the middle and baste stitch all around. I love doing baste stitching instead of using pin or wonder clip. It's totally personal preference.


7. Trim the excess zipper and now your Main Exterior with Zipper pocket is ready.  


Once this part is done, you can proceed as per the pattern instructions. 

It's easy, isn't it? 

You might ask whether you should cut the main exterior piece - that you want to add zipper pocket - bigger? It's not necessary. The zipper will make up for the seam. But if you're not sure about the 1/4" seam allowance, you can cut the exterior piece and 1 lining slightly bigger. Maybe 1 inch bigger to be on the safe side. You can always trim it later.


While making this pouch, I also made the flap slightly rounder. YOu can do that too by drawing  a curvy lines like in the picture below. Use a bottle cap or  plate to draw the curve.

You can use this technique to add zipper pocket in any pouch or bag.


I hope you enjoy the tutorial. Let me know what you think about it and don't forget to share so others can learn too. Sharing is caring ^^.

Thank you for stopping by


Until then,

Happy Sewing

Like this tutorial? Subscribe to get more updates !


Improvisation Part Deux - Family Passport Holder for 4

Hello again,

Weather is still pleasant in the Northeast of India. We got plenty of rain (and storm) this year and I hope the summer will not be too hot. 


Since I posted my family passport holder with 4 slots in Facebook , many has message me. Many people need a smaller version of the wallet. 
If you already bought the pattern (if you have not, links available at the end of this post), here's simple things you can do.

To make 4 slots passport holder :

1. Cut only the top and bottom card slots (Exterior Fabric, Lining and Interfacing).  And proceed as per pattern instructions.

2. Adjust the main body piece (Exterior, Lining, batting) by reducing the HEIGHT by 1 inch. The width should remain the same. 

3. (Optional) Reduce the WIDTH of the flap exterior and the interfacing piece by 1 Inch. The length of the flap piece should remain the same. Or else you don't have to change the flap pattern if you want a wider flap, just like  these fun and beautiful wallets by Kausalya of The Turquoise Paisley


 Now,  don't you love her wallets? They are super cute and fun. Check The Turquoise Paisley Facebook page to see more of fun handmade passport wallets and other fun stuff she made from Indian Fabrics


Who wants a boring black faux leather Travel Wallet if you can get a fun,  cute and one of a kind Handmade Wallet

The Family Passport Holder pdf pattern is available  here:


(Printed Pattern & Kits available in ChezVies - Price in INR)

if you already got one and have any questions, you can always email me. 


Until then,

Happy Sewing


Improvisation on the family passport holder

Hello,

I got an email from a customer asking if the passport wallet I listed in Etsy will be able to hold 12 passports as they are dual passport holder. So, yes I can make it happen (I feel like a magician ^^ )

So, after carefully thinking I made a couple of changes in term of material that I used or listed in the PdF Pattern.


For you who already bought the pattern, this tips may come out handy if you need to make one too.

1.  The interfacing. In this Map Family Passport holder I used Medium Heavy interfacing on the exterior only. In the main body lining fabric, I used woven interfacing. I also used woven interfacing for the passport slots. Since I need them to be less rigid. This way, 2 passports can easily fit in one slot.


2. I omitted the mini zip and ID slot and added exterior zipper instead. 


3. I also made the flap  longer by 0.5 inch to accommodate the bulk.

This family passport wallet is already on it's way to its new home. I will be offering this options in my shops. 

This is the best part of custom order. Sometimes a request from a customer can lead  you to new ideas. 

Thank you for all of you who've been supporting my small business all these years. 


Until next time, 

Happy Sewing


Links :


Smaller passport holder with card wallet is back in the shop

Hello,

It's already Saturday. I hope you had a great week.  My sons started the new session with excitement. The elder one was happy because there was not so much of shuffling, which mean he has the same classmates as when he was in grade 7. The younger was a bit upset, because his besties - 5 of them- are all in a different section. But my younger son is a friendly one, so I don't worry. 

most popular wallet in the shop now

Meanwhile, now my custom order is back on track. I managed to finished a couple of overdue orders and sent them out. 

Paris theme Passport Holder

Card Wallet Organizer & Phone Sleeve

Meanwhile, I decided to put this smaller passport card holder back in the shop. I got several orders for the same style and will make a couple for stock.

Cute Black Cat Passport Holder
This wallet can hold up to 2 passport. The slot can also hold boarding passes since I made the pocket quite deep. 

Details of the passport wallet interior

It has 6 card slots, with one long zipper pocket and 2 slip pockets. Pen loop and swivel hook are also added. 

Perfect Size Passport Cover  to fit inside your Purse

And of course I love my new metal label, don't you?

Handsewn binding 

I always finished the wallet binding by hand. I love the neat finish of hand sewing. It gives the look of "handmade". 

And most of customers really love it. For one wallet normally I can finish the binding within 30 minutes. 

So, what are you working on next week? I'll be working on another family passport holder, another card wallet organizer orders  and also more phone sleeve orders. 

Until then,

Happy Sewing


Latest Video