Powered by Blogger.
Showing posts with label 2020 Quilting. Show all posts

TUTORIAL Granny Square Quilted Pillow

India

I've collected quite a lot of scraps from sewing masks in the past 2 months. I can't wait to cut them out into usable pieces. My fave is 2.5" and 2" squares. 
Few days ago I sorted out the purple scraps and I so wanted to make something scrappy. I mean after days of making masks I feel like doing something else just for fun. 

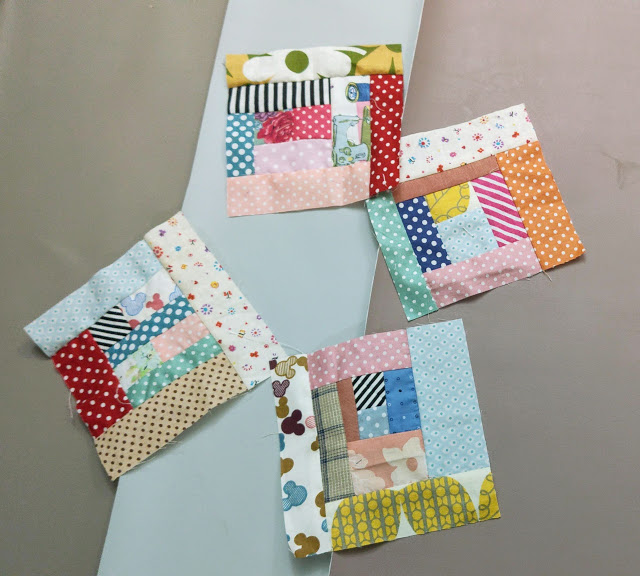
I started granny square projects few months ago and I cant wait to go back to working on it. Sometimes I just want to make something simple project that I can finish quickly. So I decided to make this scrappy granny square pillow cover.

In case you want to learn to make one, here's my step by step making granny square pillow cover.
What you need :
13 squares 2.5" x 2.5"  - scrappy color (purple)
12 squares 2.5" x 2.5" - background fabric (white)
2 border fabrics 4" x 9" 
2 border fabrics 4 "x 16" 
1 backing fabric 16" x 13"
1 backing fabric 16" x 4" 
1 batting 18" x 18"
16" all purpose zipper (I used 18" )
Cross cut single fold binding 2.5" x 65" 

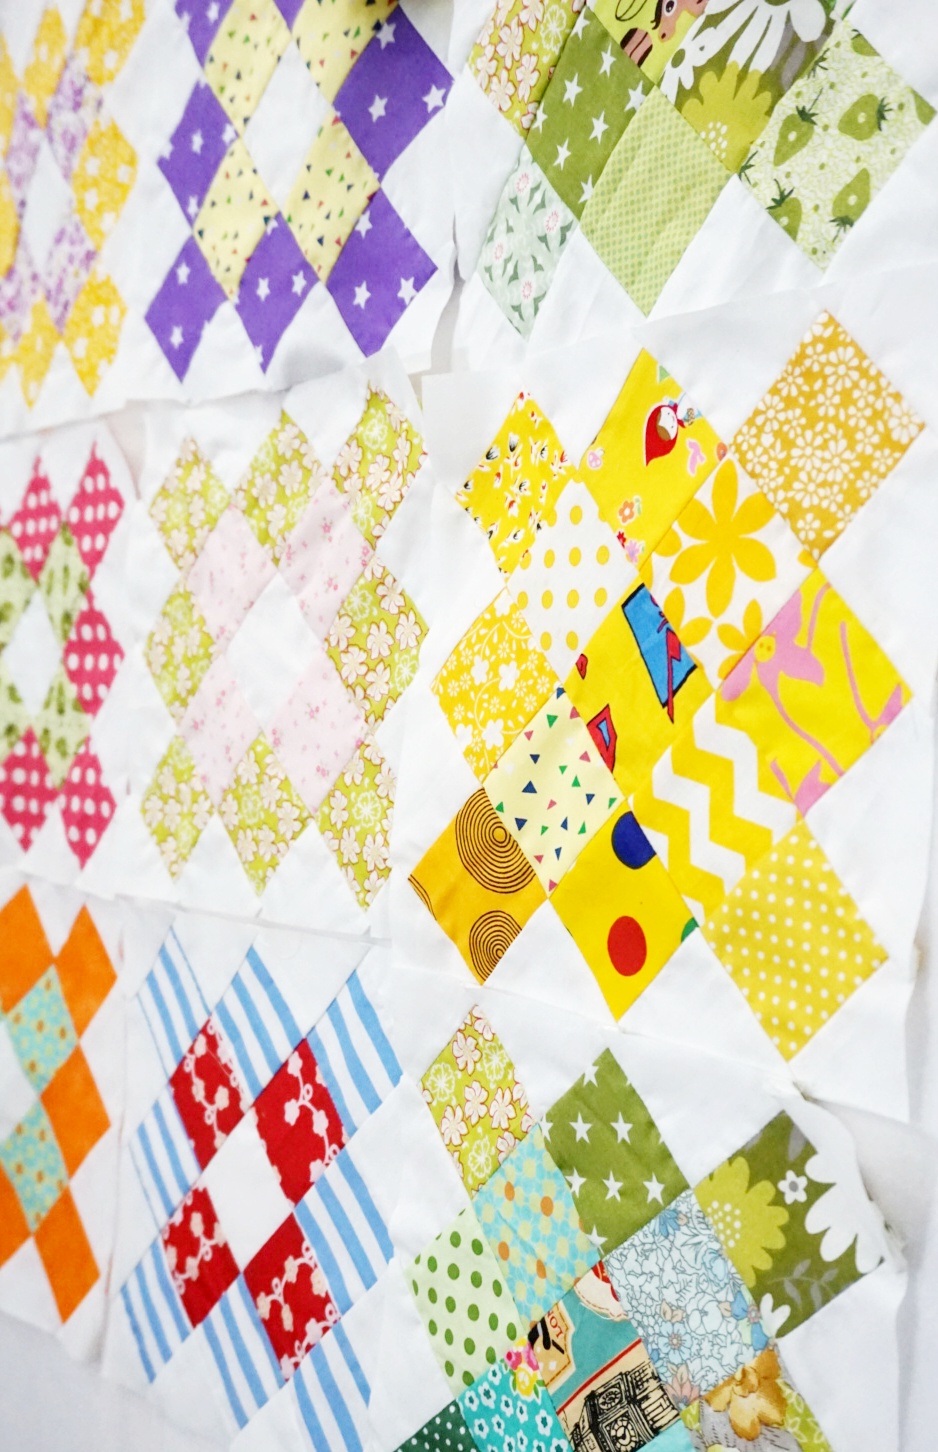
1. Arrange the scrappy color fabrics like in the picture below. Make sure to alternate dark and light color value. This is important later on ;) 


2. Next, add the white pieces all around the outer border. 


3. Now we're going to start sewing them together from the second row using 1/4" seam allowance. 
Once you're done, press the seam to the dark side, like in the picture below. Repeat with the subsequent rows.


4. Now we'll sew the rows together. Remember, we're still using 1/4" seam allowance here :). Once you're done sewing up all the rows, irom the block flat. I usually press the seam on the wrong side first to set it and then turn it to the right side and press it again. 


5.  Now, we will trim the pointy side leaving 1/4" seam allowance. The block should finish at around 9" x 9" 


the block is ready and now we're ready to turn it into pillow cover!

6. Add the border fabric 4" x 9" on both sides of the granny square block. Sew using 1/4" seam allowance. Press the seam towards the border side and  trim the excess if necessary.


7. Now add the 16"  border fabrics on the top and bottom. I cut longer border fabric here because my fabric stretch a little.  Sew using 1/4" seam allowance and press the seam towards the border fabrics. Trim pillow top piece to measure 16" x 16" square. 


8. Place the pillow top piece on top of the batting, baste and quilted as desired. Trim the excess batting and keep the quilted pillow top aside as we will prepare the backing.  


9. Now let's prepare the backing. With the bigger piece of backing fabric right side up, line the zipper tape on top of it, right side down and sew with 1/4" seam allowance.


10. Flip the zipper up, finger press the seam and top stitch using 1/8" seam allowance.


11. Place the smaller piece of backing fabric (right side down) and line it up with the unsewn zipper tape. Sew with 1/8" seam allowance.  Then draw a line (yellow line) 0.75" from the top. Fold the fabric up on the yellow line and pin in place. 

12. From the wrong side, sew down the zipper again 1/4" away from the zipper teeth. 

13. Now it should look like this. I sewed the fold with 1/8" allowance. It's optional though. I did it because the fabric I used is a little lightweight. Trim the pillow backing to measure 16" x 16" square.


14. Put the pillow backing and the quilted pillow top WRONG SIDE together and sew around the perimeter using 1/4" seam allowance. 


15. Attach the binding. Place the binding on the back of the pillow and pin or clip in place. Leaving approx. 2" from the top of the binding, start sewing using 1/4" seam allowance. Stop approx 0.25" from the edge, turn the pillow 45 degree angle and sew to the corner. 


16. Flip the working binding outward and bring it down again to line up with the next straight edge, creating a crease at the top.  


17. With the crease pressed down, sew binding using 1/4" seam allowance. 


18. As you reach the end of the binding, overlap the binding approximately 1" and cut the excess. Insert the end of the binding in between the fold like in the picture below and  finish sewing the binding. 


Turn the binding to the front side of the pillow and finish it by hand or machine. I prefer to use machine for pillows because I have 2 teenage boys ^^. 


I have 3 more blocks which I plan to make pillows. But first, I need to finish a couple of scrub hats and 3D Masks. 


I hope you enjoy the tutorial! If you do, don't forget to subscribe or follow me by email. 

Thank you for stopping by,

- Elvira - 

********
Linking up to these wonderful BLOGS

Scrappy Patchwork Pouch


Another scrappy patchwork but this time it's a flat pouch!! I made few quilt as you go pouch few weeks ago from the scrap bag I keep near my sewing machine. The bag is overflowing with my recent scraps now and waiting to be sorted out. 


I took out a bunch and started playing with it for fun. I made 4 scrappy blocks and each is around 5" squares. And since I got new faux leather sheets, I decided to try to combine it. 


I use cotton batting, a scrap batting from my flying geese quilt and quilt it around 1/4" apart. I really love the effect of dense quilting on the pouch. I used high grade faux leather here. The color is almost salmon pink, a bit darker.


I added small slip pocket inside. I love the cute bear print lining. I found it in my stash! So glad to finally use it. 


I added this pretty pouch in the SHOP in case you want it ^^. The pouch dimension is 8.5" W x 5.5" H.

Working with patchwork is really fun, especially scrappy one. If you have orphan block lying around and want to try your hand on making patchwork bag, you might want to try THIS PATTERN.

Thank you for stopping by!

Happy Sewing,

- Elvira - 

****


Granny Squares Quilt Progress

Hello,

Just a quick update on my Granny Squares. I added 4  blocks yesterday. Yay! It feels so good to see all those blocks together. I don't have a design wall, so I made a makeshift wall by hanging a piece of batting on my curtain rod . Sometimes I just leave it there for days that my MIL thought I have a new curtain. Well, that's not a bad idea! 


The picture above was from last week after I added the blue and orange blocks. I kinda like  the blue stripes one. I have same stripe in red and yellow. Maybe I will make another blocks with those 2 colors. 


My scraps are not all of the same weight, mostly local fabrics that I bought more than a decade ago when I started sewing and making dresses. They bring back memories when I used to passionately try different kind of sewing craft, sewing technique, getting to know different kind of cotton fabrics, etc. All these fabrics are part of my sewing journey and I am glad I don't throw them away because they will be part of the quilt that I'm making. Some of them I bought from a small shop in the market before the market was gutted by fire few years ago. Now I wonder if the old man still have the shop! 

So, anyone else doing scrap buster this year? Leave your comment and link below, I'd love to see your projects!

Until next time,
Happy Sewing

- Elvira- 

*********

Linking up to:

Design Wall Monday

First Quilt of the Decade Ground Cover Quilt Top


Hello everyone, 
I hope your new decade started with a bang! Well, though political situation still pretty tense, but the show must go on, right. The school was forcefully shut for 3 weeks in December here in my city,which made all plan went awry. The elder son pre board exam was postpone to January (just finished yesterday). Besides, he will participate in the Cadenza concert again, Insha Allah on 19th January. So these few days I've been busy taking him to his practice. Wish us luck!


On sewing front, I'm taking a break for custom order until maybe March and will slow down a bit to rethink and re focus! 


I started the new year with a bang tho. I finish a  quilt top!! woohoo!. After watching this Ground Cover quilt tutorial from MSQC on Youtube, I know I must make it. The fabrics are leftover from my wallet and bag making. I used to cut several set of fabrics for passport wallet and it turned out I always make wallet from different fabrics. Lesson learnt!
It took me 2 days just to make the layer cake! But once everything is cut, sewing them doesn't take much time. 


I also started to sort out my overwhelming scraps! well, it takes a LOT of TIME to iron them and them cut them into usable sizes but it's so worth it when you see them neatly in the box! I went to Fancy Bazaar especially to get the boxes, they are around INR 250 each! 


I am cutting by colors, since I already sorted them out in colors, it's easier just to pick up one bucket and start ironing them. I already started another quilt project, and Insha Allah I will write the progress in my next blog post!

My sewing room is in a big mess right now but I'm happy that my fabric scraps are turning into something! I will send the top to be quilted as soon as I found a matching backing fabric which I like. 

Well, we can say that's my resolution this year! Let see!

Thank you for visiting & reading my blog! 

Until next time,

Happy Sewing!!

~ Elvira~

*******

Linking up to these awesome blogs
Handmade Monday
Craftastic Monday
TGIFF - Simply Crafting

Latest Video