Powered by Blogger.
Showing posts with label scrap projects idea. Show all posts

Coasters from Leftover Scrap Fabrics (Video Tutorial)

 Hello,

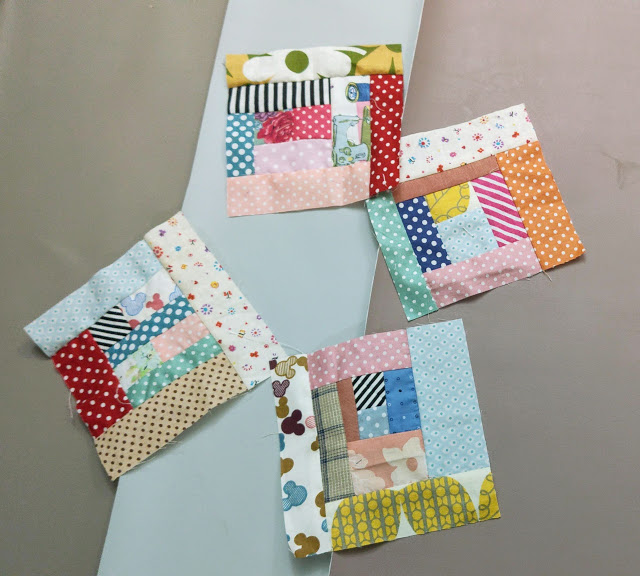
I wanted to share with you what I recently made - a couple of coasters as gifts. I didn't really feel like sewing, but I needed to make something quick. So, I grabbed the scrap bag under my cutting table and started picking out a few fabrics. I decided to keep it simple and use just one set of colors for the coasters. They turned out pretty nice, and I hope my friend loved them!


These coasters are really easy and quick to make. It takes around 10-15 minutes only. Well, I spent more time picking up the fabrics. I mean, rummaging through scrap bins is really fun, right? I just made some coasters and they were so easy and quick to make! It only took me around 10-15 minutes to finish them. Although, I must admit that I spent more time picking out the fabrics. Going through scrap bins is just so much fun, don't you think?
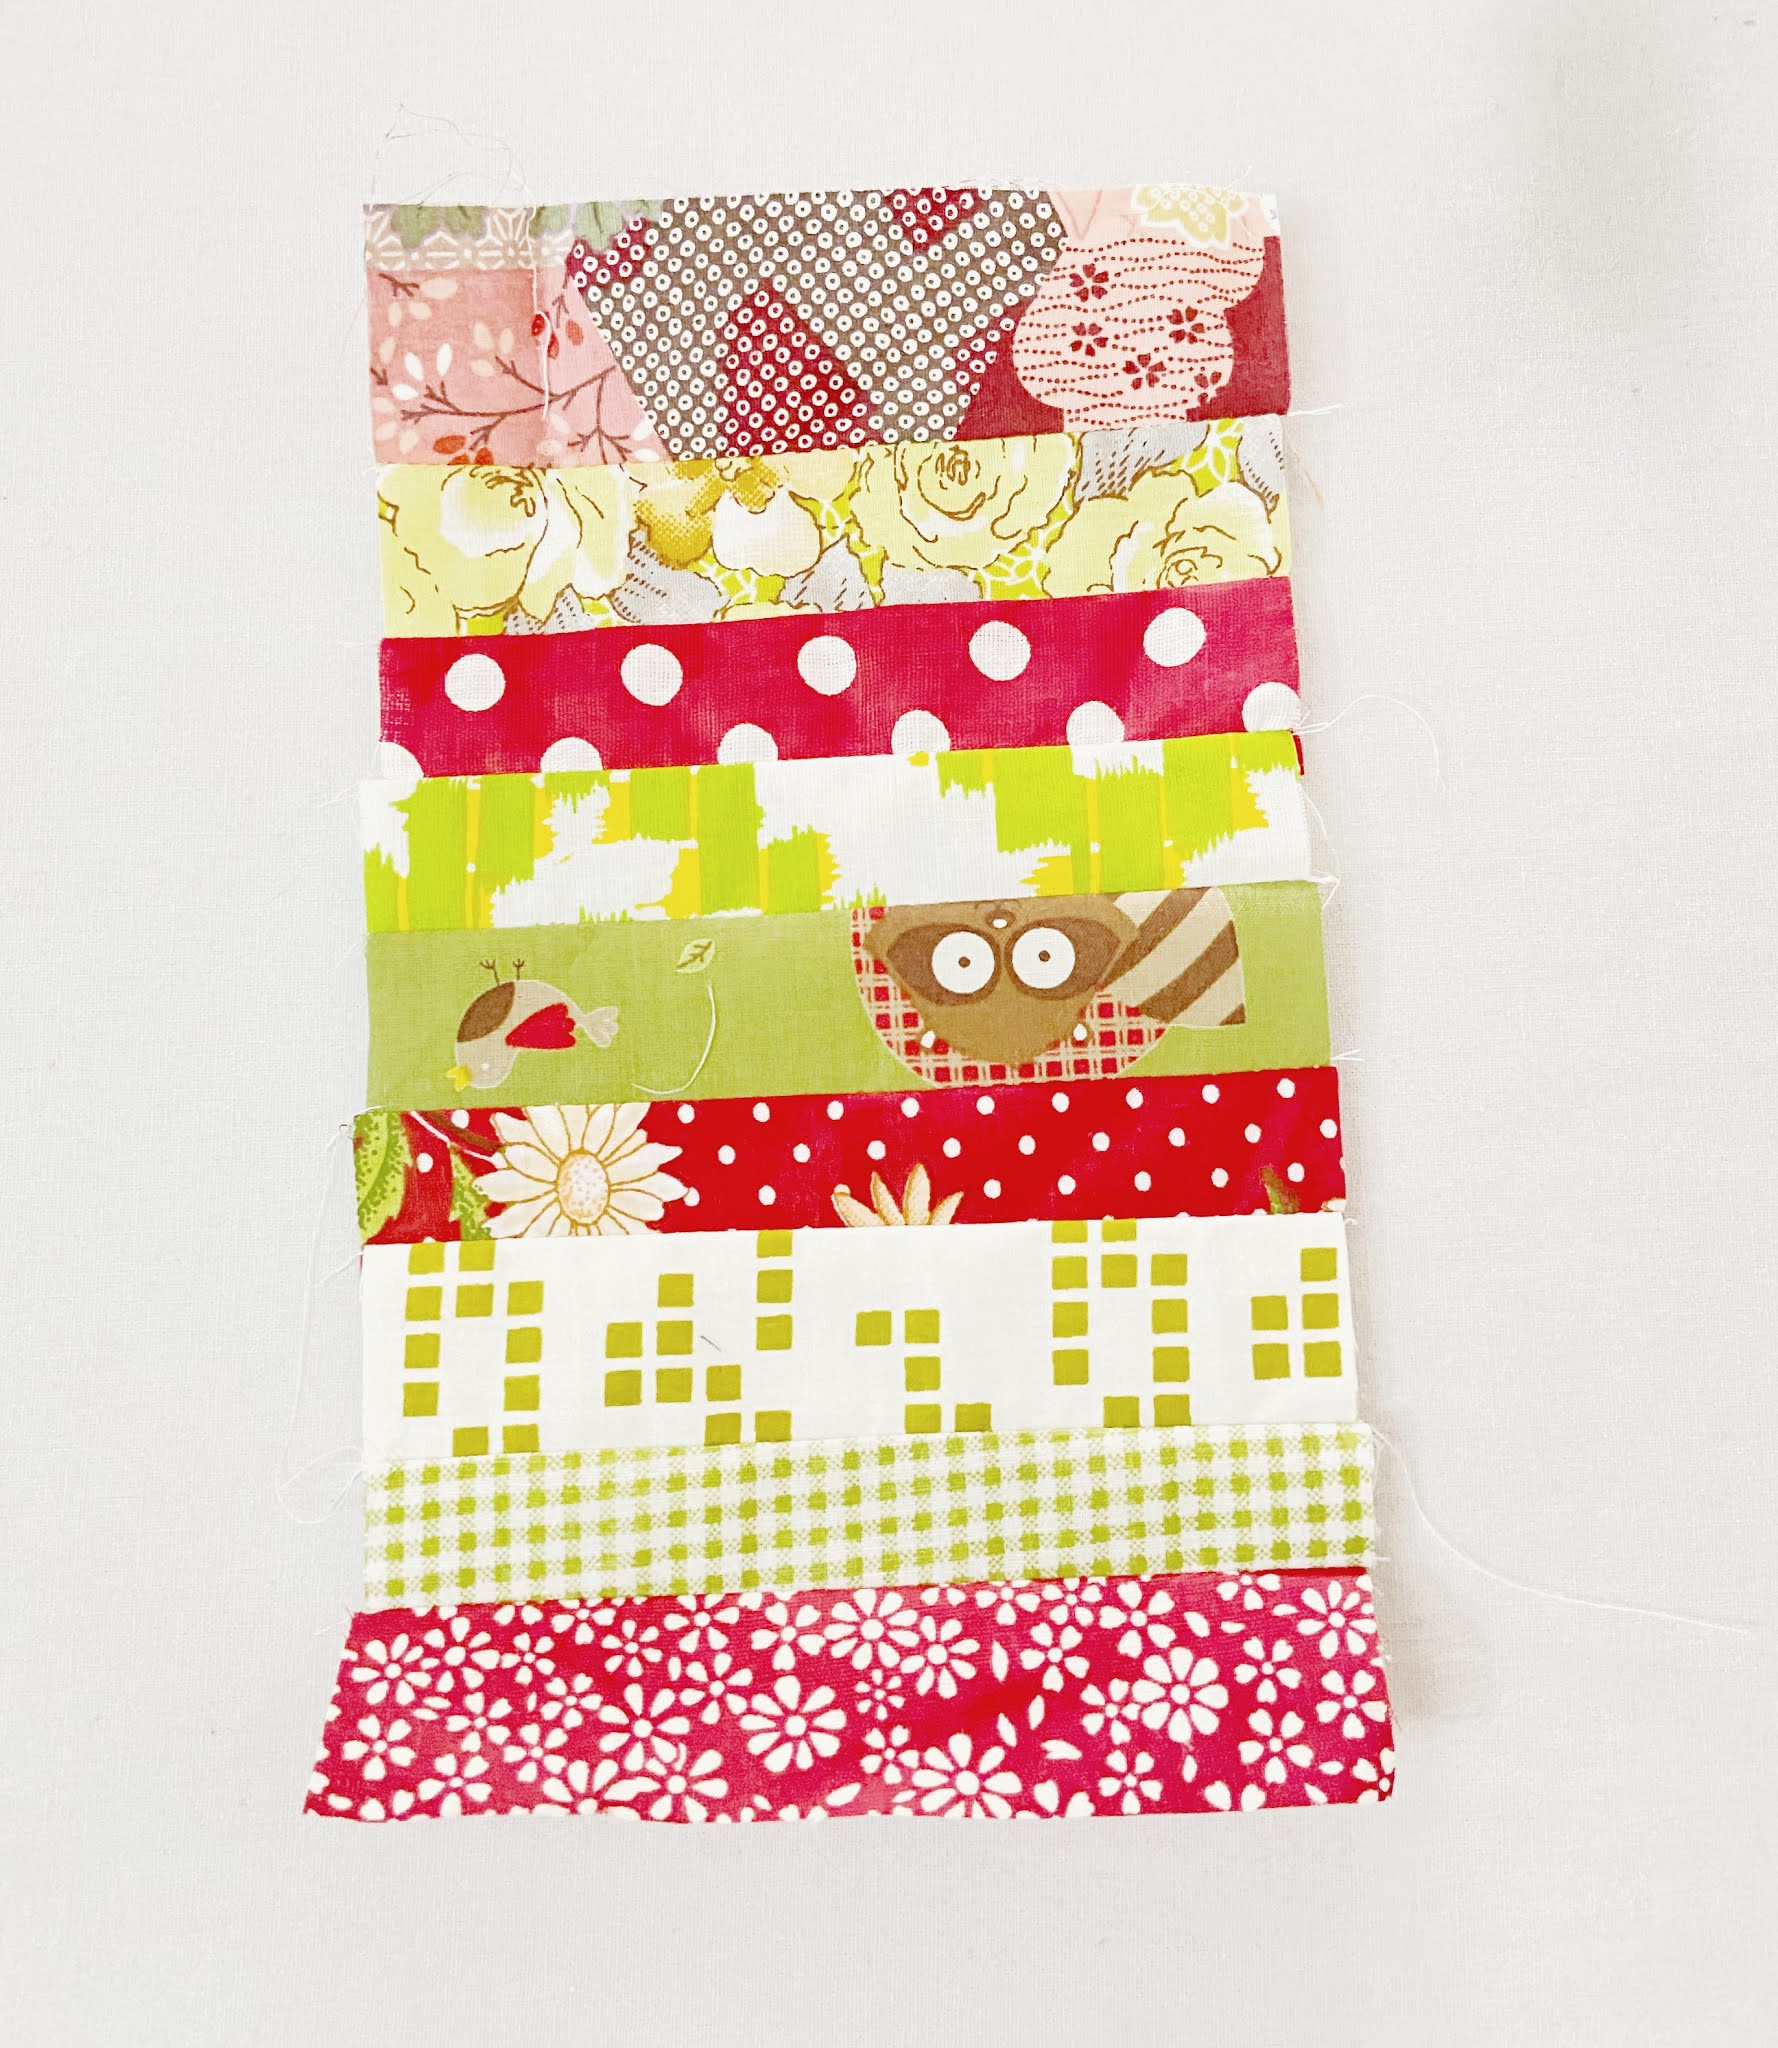


Materials I used:

Leftover strips of fabrics 5 1/2 x 5 1/2 inches lightweight non-woven interfacing (optional) 5 x 5 inches fabric for backing

As I love making videos, here's the video tutorial to make the coasters!


When it comes to fabric choices, I like to use cotton batting for my larger projects, but for smaller ones, I'll use whatever is available. Recently, I made a pink-green coaster using poly batting, but it turned out a bit flat, even though I didn't quilt it too densely. On the other hand, the blue coasters I made with cotton batting and only quilted along the seams turned out great. In the video, I used block print scrap fabrics, which have different shades of every color. To give my final product more structure, I always use nonwoven lightweight interfacing, but you can skip it if you prefer a different finish.


I have a few more unfinished projects in progress. Follow me on YouTube where I share almost daily updates on my work.


Thank you for stopping by,

Happy Sewing!

Elvira


Scrappy Patchwork Mug Rug - Scrap Buster Project


Making patchwork mug rug is my fave scrap buster project. This time I made this super easy one using strips of fabrics from my scrap bin. It's fun and quick to make plus it's a perfect project to make if you're looking for a quick last-minute gift.

Without further ado, here's what you need: Assorted fabric 5" long fabric strips 1" to 1.5" wide Contrast or solid fabric 6" W x 8" H Backing Fabric 12" W x 10" H Batting 12" W x 10" H

Binding 1.5" Wide x Wof (40")

Let's get sewing!

1. I used narrow strips, less than 1.5" wide. They should be enough to make 8" long patchwork panel. Don't be afraid to mix and match. The narrower the better, IMO :).


2. Sew the strips together using 1/4" seam allowance. You can use those selvages scraps too. My panel here finished at 5" W x 9" H. Iron the patchwork panel flat. 


3. Now sew the patchwork panel and the solid panel right side together using 1/4" seam allowance. Now your top panel is almost ready.


4. Iron the top panel flat and trim it into 10" W x 8" H. The patchwork panel is about 4" wide after trimming.


5. Now sandwich the batting in between backing and top panel and quilt it as desired. This time I did a diagonal gridline quilting which you can watch in the video tutorial at the end of this post. 


6. Once the quilting is done, trim the quilt top into 10" W x 8" H and now it's ready for binding. Watch the video below on how to sew the binding. I cut the binding 1.5" wide for small quilts, so it won't be too bulky. 


If you want to finish the binding by machine, attach the binding on the backing first. I attached the binding on the front first because I prefer to finish the binding by hand for small quilts.


Now your scrappy mug rug is ready to use. Make a few for your family and friends! 

I hope you find the tutorial helpful! Don't forget to subscribe to my blog or YouTube channel for more tutorials. 


Thank you for stopping by, 

Take care & Happy Holidays

Elvira


Linking up to these wonderful BLOGS


Scrappy Quilted Mouse Pad


Hello, I hope everyone is safe and well!

My scrap bag is growing rapidly with every single day from making face masks. I keep them in a laundry bag which now already overflowing. One day I was watching Darlene Video on Youtube about how she turned her skinny strip of fabrics into interesting panels and I just had to try it! 

I have a lot of scrap interfacing and batting. I found one that is around 6" x 8" all-purpose interfacing from making the phone sling bag and I thought it was just perfect. I pulled out a bunch of scraps and start arranging them randomly. 


This is liberating. you just arrange them the way you like it on the glue side of the interfacing and press them nicely. No rule here just covers the interfacing with fabrics!!


After ironing, I put the panel on a scrap batting and start quilting it pretty densely. The quilting really gave character to the panel, right? And once you're passed this stage the possibility of interesting projects will start popping in. I thought I'll make a mobile sling bag, this will make an interesting flap, right?  
But I decided to make a small mouse pad because I need one :D. It turned out just perfect. 


Did you recognize some of the scraps? It's a fun project and a small reminder of this ongoing pandemic. I'm still making masks and also working other projects Finished a couple of wallet orders, but yesterday the state government suddenly announced that we're going into strict lockdown again next week. Hopefully, after a week, there will be relaxation so that I can sending out your orders. Ah, one good news, from now I'll be sending all orders via DHL e-com or FedEx depends on your total orders! Remember my post about the shipping problem we're facing as an Etsy Seller in India? Well, Alhamdulillah more or less they are solved. A few orders have successfully delivered via FedEx. Thank you to all delivery men out there! May the Almighty always keep you safe & well! 

So, don't throw away your scraps, make something from them. Check out Darlene's video below to see her tutorial and her collection of scraps!! Now I feel less guilty of having 10 buckets of scraps LOL


What is your fave scrap project? leave your comment and link in the box below, I'd love to see them!!

Thank you for stopping by!

Stay creative & stay well!

- Elvira -

TUTORIAL Granny Square Quilted Pillow

India

I've collected quite a lot of scraps from sewing masks in the past 2 months. I can't wait to cut them out into usable pieces. My fave is 2.5" and 2" squares. 
Few days ago I sorted out the purple scraps and I so wanted to make something scrappy. I mean after days of making masks I feel like doing something else just for fun. 

I started granny square projects few months ago and I cant wait to go back to working on it. Sometimes I just want to make something simple project that I can finish quickly. So I decided to make this scrappy granny square pillow cover.

In case you want to learn to make one, here's my step by step making granny square pillow cover.
What you need :
13 squares 2.5" x 2.5"  - scrappy color (purple)
12 squares 2.5" x 2.5" - background fabric (white)
2 border fabrics 4" x 9" 
2 border fabrics 4 "x 16" 
1 backing fabric 16" x 13"
1 backing fabric 16" x 4" 
1 batting 18" x 18"
16" all purpose zipper (I used 18" )
Cross cut single fold binding 2.5" x 65" 

1. Arrange the scrappy color fabrics like in the picture below. Make sure to alternate dark and light color value. This is important later on ;) 


2. Next, add the white pieces all around the outer border. 


3. Now we're going to start sewing them together from the second row using 1/4" seam allowance. 
Once you're done, press the seam to the dark side, like in the picture below. Repeat with the subsequent rows.


4. Now we'll sew the rows together. Remember, we're still using 1/4" seam allowance here :). Once you're done sewing up all the rows, irom the block flat. I usually press the seam on the wrong side first to set it and then turn it to the right side and press it again. 


5.  Now, we will trim the pointy side leaving 1/4" seam allowance. The block should finish at around 9" x 9" 


the block is ready and now we're ready to turn it into pillow cover!

6. Add the border fabric 4" x 9" on both sides of the granny square block. Sew using 1/4" seam allowance. Press the seam towards the border side and  trim the excess if necessary.


7. Now add the 16"  border fabrics on the top and bottom. I cut longer border fabric here because my fabric stretch a little.  Sew using 1/4" seam allowance and press the seam towards the border fabrics. Trim pillow top piece to measure 16" x 16" square. 


8. Place the pillow top piece on top of the batting, baste and quilted as desired. Trim the excess batting and keep the quilted pillow top aside as we will prepare the backing.  


9. Now let's prepare the backing. With the bigger piece of backing fabric right side up, line the zipper tape on top of it, right side down and sew with 1/4" seam allowance.


10. Flip the zipper up, finger press the seam and top stitch using 1/8" seam allowance.


11. Place the smaller piece of backing fabric (right side down) and line it up with the unsewn zipper tape. Sew with 1/8" seam allowance.  Then draw a line (yellow line) 0.75" from the top. Fold the fabric up on the yellow line and pin in place. 

12. From the wrong side, sew down the zipper again 1/4" away from the zipper teeth. 

13. Now it should look like this. I sewed the fold with 1/8" allowance. It's optional though. I did it because the fabric I used is a little lightweight. Trim the pillow backing to measure 16" x 16" square.


14. Put the pillow backing and the quilted pillow top WRONG SIDE together and sew around the perimeter using 1/4" seam allowance. 


15. Attach the binding. Place the binding on the back of the pillow and pin or clip in place. Leaving approx. 2" from the top of the binding, start sewing using 1/4" seam allowance. Stop approx 0.25" from the edge, turn the pillow 45 degree angle and sew to the corner. 


16. Flip the working binding outward and bring it down again to line up with the next straight edge, creating a crease at the top.  


17. With the crease pressed down, sew binding using 1/4" seam allowance. 


18. As you reach the end of the binding, overlap the binding approximately 1" and cut the excess. Insert the end of the binding in between the fold like in the picture below and  finish sewing the binding. 


Turn the binding to the front side of the pillow and finish it by hand or machine. I prefer to use machine for pillows because I have 2 teenage boys ^^. 


I have 3 more blocks which I plan to make pillows. But first, I need to finish a couple of scrub hats and 3D Masks. 


I hope you enjoy the tutorial! If you do, don't forget to subscribe or follow me by email. 

Thank you for stopping by,

- Elvira - 

********
Linking up to these wonderful BLOGS

5 Quick Sew for The Kitchen

I need to make few stuff to freshen up my kitchen and I'm looking for ideas from pinterest. Something that is easy and quick to sew. Here are my list:

I think it will be good as a host gift or housewarming gift, right? 


I always need cloth napkins to send with my sons lunch boxes. They are handy and of course one of a kind. Make it in your children's fave print. I 

Make Cloth Napkins for Your Child's School Lunches~ Buggy and Buddy


I think this will be good for bathroom hand towel too. You know when you have kids, they just throw the towel around after using :((


I don't find a tutorial specially for this, but I guess you can use this bag handle cover tutorial. It's basically the same. 


This is one thing I need to make. The pattern is actually for gardening, but I've seen in Kdramas, they wear this sleeve while cooking which I think very good especially if you have to do a lot of frying in summer :D. 

Protect your arms while working in the garden ~ Threading My Way

What do you think? Do you make stuff for the kitchen too? What is your fave?

Thank you for stopping by!

Much love & Have a nice day!

- Elvira

*** 
Linky Party :
Create With Joy
Hearth and Soul

Scrappy Patchwork Pouch


Another scrappy patchwork but this time it's a flat pouch!! I made few quilt as you go pouch few weeks ago from the scrap bag I keep near my sewing machine. The bag is overflowing with my recent scraps now and waiting to be sorted out. 


I took out a bunch and started playing with it for fun. I made 4 scrappy blocks and each is around 5" squares. And since I got new faux leather sheets, I decided to try to combine it. 


I use cotton batting, a scrap batting from my flying geese quilt and quilt it around 1/4" apart. I really love the effect of dense quilting on the pouch. I used high grade faux leather here. The color is almost salmon pink, a bit darker.


I added small slip pocket inside. I love the cute bear print lining. I found it in my stash! So glad to finally use it. 


I added this pretty pouch in the SHOP in case you want it ^^. The pouch dimension is 8.5" W x 5.5" H.

Working with patchwork is really fun, especially scrappy one. If you have orphan block lying around and want to try your hand on making patchwork bag, you might want to try THIS PATTERN.

Thank you for stopping by!

Happy Sewing,

- Elvira - 

****


Latest Video