Powered by Blogger.
Showing posts with label small quilt gifts. Show all posts

Facing Binding for Quilts

Table Topper


For the past 2 weeks, I've been having trouble accessing my business emails which I purchased from Google Workspace. It was started when I created another email in Godaddy for the newsletter. After back and fro chat with Godaddy's agent and doing some reading, finally, I understand that we cannot create different emails from the different email providers. I wish I knew!

I apologize to those who tried to reply to the newsletter or email me regarding your orders and bounce back. If you like please resend your email.  I also added a backup email so that I won't miss any important emails. Hopefully, now the emails will all be back to normal and I can focus more on the work at hand. 


Source: Pinterest


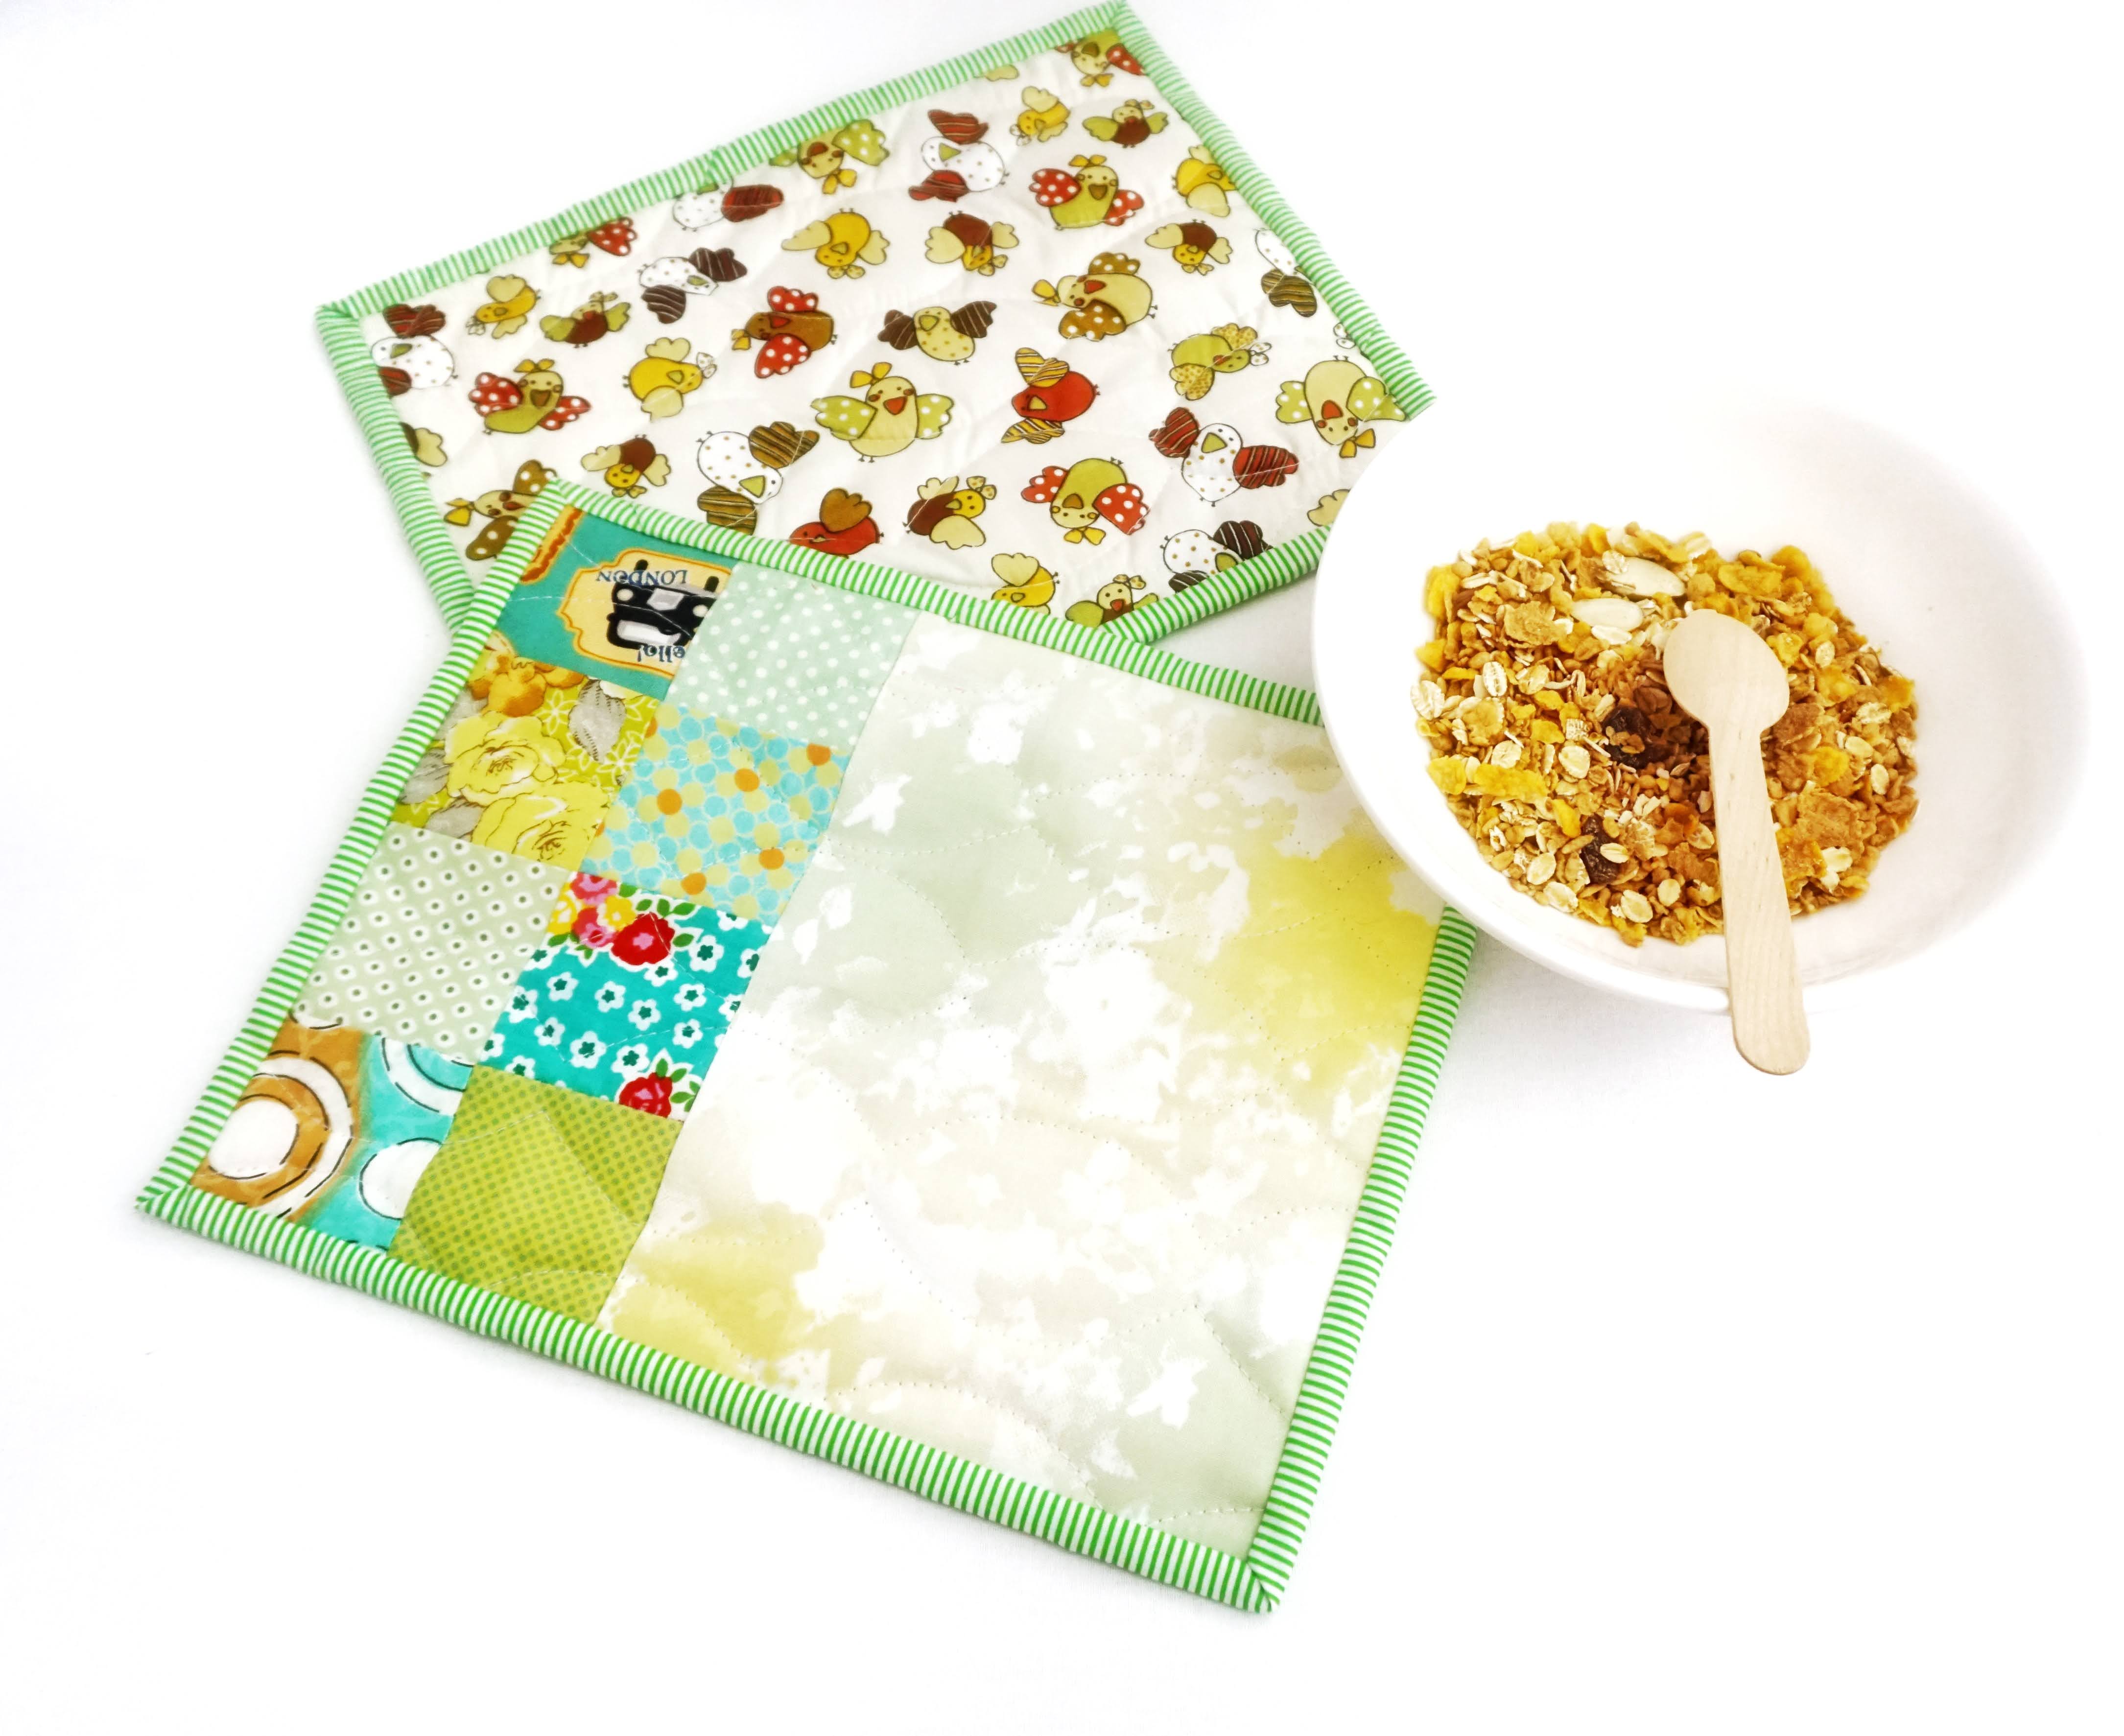
This week, I'm able to finish 2 table-toppers still in my fave pattern - the one from Suzuko Koseki's book  (I call it moonshine and valentine). I've made and sold a few in different sizes in my Etsy shop. This time, I decided to use a red poinsettia print and a green cotton handloom combo. Added a mustard yellow stripe in the center. 

Also, instead of hand quilting, I decided to do serpentine quilting on my Husqvarna Viking machine using the golden thread I got from the swap last time.  

Another new thing I tried this time is instead of the usual binding, I did facing binding! 

What is facing binding? 

A facing is similar to a binding on a quilt, except that it's turned completely to the back so there is no visual line around the edge of a quilt. (source: We All Sew)

I love the clean look of these table toppers. Binding is great to finish a quilt but sometimes I don't want to spoil the look especially when the quilt has a different color on the outer border. 


I used a 1.5" wide binding strip and also tried a 2" wide binding. The end result? I prefer a 1.5" wide binding as it gives a narrow binding on the back. 


facing binding quilts
Serpentine quilting with golden thread


facing binding quilt
facing binding


I have a few more small quilts in the same pattern in the WIP stage that I plan to hand quilt. Now that I have 3 C-dramas to catch up on, I should be able to finish the quilting before the end of the year. 


Even though it's been a pretty stressful week regarding the email things, but I'm happy to finish a few on my WIP list. Time blocking really helps! Last week, we went to a wedding party for the first time. My SIL's nephew got married. it was a small occasion but felt good to meet and greet people in person after almost 2 years! 

The boys' board exam also just started and as the weather is getting cooler, the younger one needs a new set of winter clothes, so we went shopping! 

And one more thing, I made a sofa cover! Upcycle from my old Kantha quilt. It's removable and I can easily take it out to wash and put it back again. Now, this corner looks cozier :). I still need to make the sofa's back cushion covers though. I am collecting ideas on Pinterest right now! 


Dotty Purse 


Thank you for stopping by today. I hope you have a great week ahead.

Happy Sewing!

Elvira

******

******


Placemats and New Books


Patchwork Placemats


I made more placemats! Not really make a dent in my mini charms bin but I'm pretty happy with how these placemats turned out. Mini charm is my most fave pre-cut and t is also my mood booster. When I don't feel like sewing anything, I just open the mini charms bins and start piecing. 

As I started piecing, all sorts of ideas come into my mind but I decided to make a couple of placemats.  The placemats finished at approximately 12 x 15 inches each. The pink ones are slightly smaller. 

I thought of making all charms for the top, like this one, but decided to make it differently. So I added borders on both sides. For the mustard yellow placemats, I used Indian block print fabric for the patchwork and handloom cotton for the borders. On the back, I used pretty paisley print glace cotton in a matching color and quilted diagonally. It turned out very soft! 


patchwork placemats
Mustard Yellow Placemats


As for the pink placemats, the fabrics are mostly leftover from wallet and bag projects. I used cotton poplin for the borders and the backing. As usual, black and white striped binding when I could not decide what binding to use. 

I love to use these placemats as a center table mat too or to put in my side tables. My MIL used in her dressing tables. They do make the room brighter and I always love to see the quilts being used. 


patchwork quilt placemats
Pink Patchwork Placemats


Patchwork Quilt Placemats
Patchwork Placemats


OK, let's talk about quilting lines. My fave of course is serpentine but sometimes I am just too lazy to set up my HV machine! I always end up using my Jack machine and doing either grid, diagonal, or organic wavy lines. Hmm, it's time to read WALK - Walking foot quilting book by Jacquie Gering again! 

OK, I admit the downside of the digital era is even if you have the books, you  I still first go to Pinterest or Google. 


Recently I bought 2 books! First is Raina Gillman's Create Your Own Improv Quilt which I bought after watching her video on Youtube.  And I am glad I bought it cos there are a lot of basic things to learn from the book. 

The second one is Kaffe Fassett and Liza Prior Lucy's  Shot and Stripes. Well, the book is packed with knowledge. I decided to buy it because I love working with shot cotton fabrics (even though not the Kaffe Fassett brand).


 Sometimes, we see the preview on Amazon and the quilt looks simple and then think "I can do that too" but actually there are a lot of small important details (at least to me)  in the book. However, there are many books that have a preview of attractive projects but very little "educational" information, and some even do not have "proper" tutorials. I feel like this kind of book is only for visual pleasure, which we can freely get from Pinterest or Instagram. What do you think? 

But I still love buying books, especially Japanese Craft or Quilt Books. They have detailed diagrams (which I personally prefer), full-scale patterns, and also additional step-by-step photos. And of course the visuals!

What about you? Do you love buying craft books? Let me know in the comment below! 


Thank you for stopping by!

Happy Sewing

Elvira


*******

Linking up to this wonderful BLOGS

More scrappy placemats

Scrappy Quilted Placemats
Small Table Mats


Last week I finished a few small placemats using scraps from my wallet and face mask making. It's fun to pull up scraps cut them into workable pieces. That totally my mood booster activity. Even though these placemats don't really make a dent into my ever-growing scraps, but I am happy to make them into something. I mean, we don't want to waste those pretty prints, right? 

For these medium-size placemats, I cut the patchwork pieces into 3.5" square. My fave is 2.5" but I kinda love this size too. I have a bunch of 3.5" squares cut and will make another set of placemats when  I have time. 


Scrappy Patchwork Mats


I'm using this yellow dot with golden print cotton fabric on the back and you can easily make these placemats a reversible one, right?  Hand sewn binding is always my personal favorite. For smaller quilts, I like to cut the binding at 1.5" wide, because I found 2.25" wide is too heavy for small quilts. Each placemats measures about 9.5" H x 12" W.


Handsewn quilt binding


Another set I made was this green small placemat. I am still using the Camo Blenders fabric I got from the Squareinch last time. I posted the pink version of these placemats in my previous post.  On the back, I use a cute chicken print cotton fabric. Making small quilts like these are addictive. So stay tuned for more :)


Small Quilted Placemats
Green Small Placemats


These small mats size is 8" H x 10" H (20cm x 23 cm) and it's just a perfect size to place a bowl of ramyeon while watching my drama. Or for my son's cereal while he's on zoom class. 

I used my scallop ruler to draw the quilting lines and quilt them on my Jack machine. For the small quilts, this hack works well and I like the result. 
 

Quilted Mugrug


Small Quilted Placemats


Scrappy placemats
Scrappy Medium Placemats


Scrappy drawstring bag
Scrappy Drawstring Bag


I have a few scrappy tops done and waiting to be made into something. As you know, I love making simple things, something useful and giftable, just like the drawstring bag above. It's my fave bag to keep essentials like an extra facemask, wet tissue, and hand sanitizer while going out.

I hope I will have time to play with my scraps next week. What about you? What are your fave scrap projects to make?


Until next time,

have a nice day!

Elvira

*****


Mini Quilts with Camo Blenders


Mini Table Topper

When I got the Camo Blenders bundle from The Square Inch, I was so excited to start making something, but could not decide what to make. The colors are so pretty that I have several ideas in my head. After a few days of contemplating I decided to make a few mini quilts. You know I love making mini quilts. 


Camo Blenders by TSI


I decided on this block I saw in one of my Japan Quilt magazines (according to google translate the magazine is Patchwork Class - 2018 Edition)  and I scaled down the size a little bit. Since the weather is getting warmer, I thought I'll mix cool and warm colors. Don't they blend beautifully? 


The block is pretty simple and quick to do. I used 1.5" wide strips in here. The fabric is quilting weight cotton and it's super easy to work with. I used poplin solid for the combination. 
Deciding how to quilt is always tough for me and the best way when you're confused is to use simple quilting lines. 


And since I am in the mood, I went ahead and made these 2 mug rugs. This is one of my go-to quilt projects to make when I have a lot of things going on in life. I made the mug rugs based on this tutorial


Camo Blenders in 10 Color Ways


I have a few more sets to make with the Camo Blenders! It's just a perfect blender fabric when you need something that can add zest to your projects! Camo Blenders have 10 colors and come in Yardage, Layer Cakes, Jelly Rolls, and Fat Quarters at The Square Inch


Now, I better go and finished a few more mug rugs! Thank you so much for stopping by!

Stay safe & Happy Sewing!

- Elvira-


Patchwork Drawstring Bags


What do you do when you're not in the mood to sew? Well, I took out my 2.5" container and admiring my neatly stacked 2.5" squares, and started piecing idly. I did not have any specific plan, but as I went on chain piecing a few ideas pop up in my head. I even have an ambitious dream of a scrappy quilt. Ha! 


But then I decided to do a humble small project as a mood booster and this cute small drawstring bag is born. It's made up of 64 pieces of 2.5" squares. Padded and quilted by machine. 

Each bag measured approximately 7.5" x 7.5" and it's fully lined. I used contrast stripes for the string/cord casing. I used a macrame cotton cord from Amazon India here and I kinda like the look of it. But next time I'll get a thinner one. For the stopper, I used Chandan wood (sandalwood) beads. 


Patchwork Drawstring Bag


I was really inspired by Sensei Shizuko Kuroha's post on Instagram the other day. Well, I don't know how to read Japanese but from the translation, she more or less said "make everyday stuff that is small and useful". What she said really stuck in my head. I keep thinking, that often we make something that ends up piling up in the cupboard without being used (Like this quilt or this pillow). For me sometimes just for a sentimental reason :).  Although I also used my makes every day from bags, wallets, pillows, table runners, etc there are a few stuff that I still don't have the heart to use or give away. I guess I must learn to be more generous :D.


And when you're having fun, you cannot just make one bag, right? 


Another great news is the Kawandi QAL is officially started on Facebook Group. I'm so excited but still could not make up my mind what size I'm going to make. Most probably I will do a lap size quilt, cos  I plan to use my dupatta (Indian stoles) for the backing layers. Brinda ma'am explained in Facebook live session last Sunday how to go about it. Now all sorts of ideas running around in my head, so I'll just think about it slowly. I hope I can share with you soon about my progress. 

Thank you for stopping by,

Happy Sewing!

 Elvira

Linking Up to these Wonderful Blogs


Scrappy Patchwork Mug Rug - Scrap Buster Project


Making patchwork mug rug is my fave scrap buster project. This time I made this super easy one using strips of fabrics from my scrap bin. It's fun and quick to make plus it's a perfect project to make if you're looking for a quick last-minute gift.

Without further ado, here's what you need: Assorted fabric 5" long fabric strips 1" to 1.5" wide Contrast or solid fabric 6" W x 8" H Backing Fabric 12" W x 10" H Batting 12" W x 10" H

Binding 1.5" Wide x Wof (40")

Let's get sewing!

1. I used narrow strips, less than 1.5" wide. They should be enough to make 8" long patchwork panel. Don't be afraid to mix and match. The narrower the better, IMO :).


2. Sew the strips together using 1/4" seam allowance. You can use those selvages scraps too. My panel here finished at 5" W x 9" H. Iron the patchwork panel flat. 


3. Now sew the patchwork panel and the solid panel right side together using 1/4" seam allowance. Now your top panel is almost ready.


4. Iron the top panel flat and trim it into 10" W x 8" H. The patchwork panel is about 4" wide after trimming.


5. Now sandwich the batting in between backing and top panel and quilt it as desired. This time I did a diagonal gridline quilting which you can watch in the video tutorial at the end of this post. 


6. Once the quilting is done, trim the quilt top into 10" W x 8" H and now it's ready for binding. Watch the video below on how to sew the binding. I cut the binding 1.5" wide for small quilts, so it won't be too bulky. 


If you want to finish the binding by machine, attach the binding on the backing first. I attached the binding on the front first because I prefer to finish the binding by hand for small quilts.


Now your scrappy mug rug is ready to use. Make a few for your family and friends! 

I hope you find the tutorial helpful! Don't forget to subscribe to my blog or YouTube channel for more tutorials. 


Thank you for stopping by, 

Take care & Happy Holidays

Elvira


Linking up to these wonderful BLOGS


Latest Video