Powered by Blogger.

Zip Around Wallet with Binding Tutorial


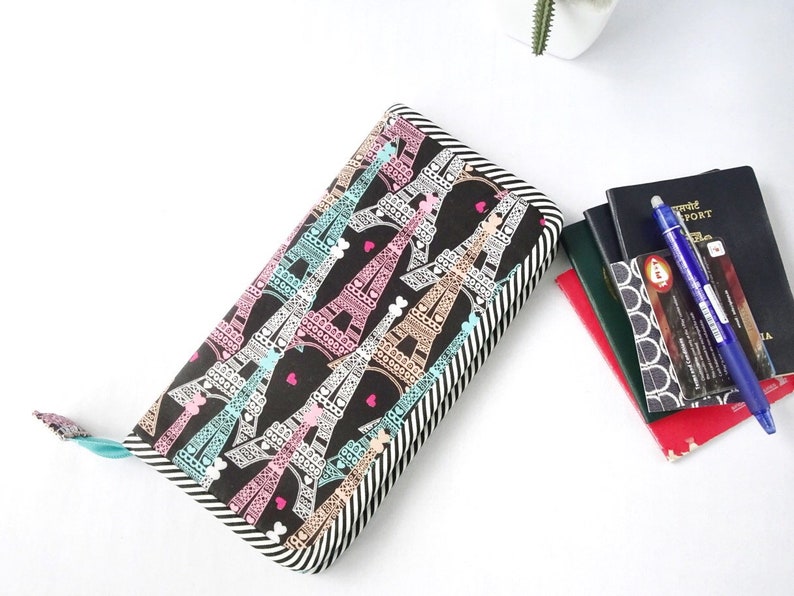
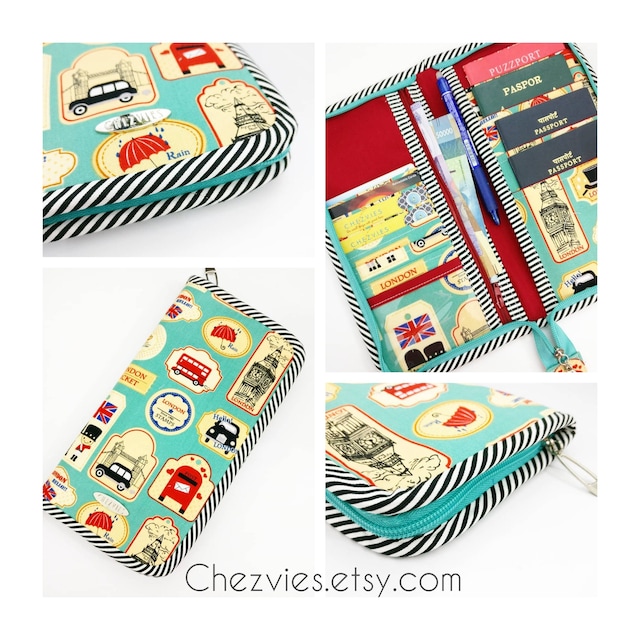
As promised here is the tutorial for the zip around wallet. This method is finished with binding. We are going to use bias binding here and you can check how to make bias binding in this Post

What you need:

- Bias binding 1.75" wide 
- #5 zipper - 24" long
- ZIpper Foot (Optional)

Let's start :

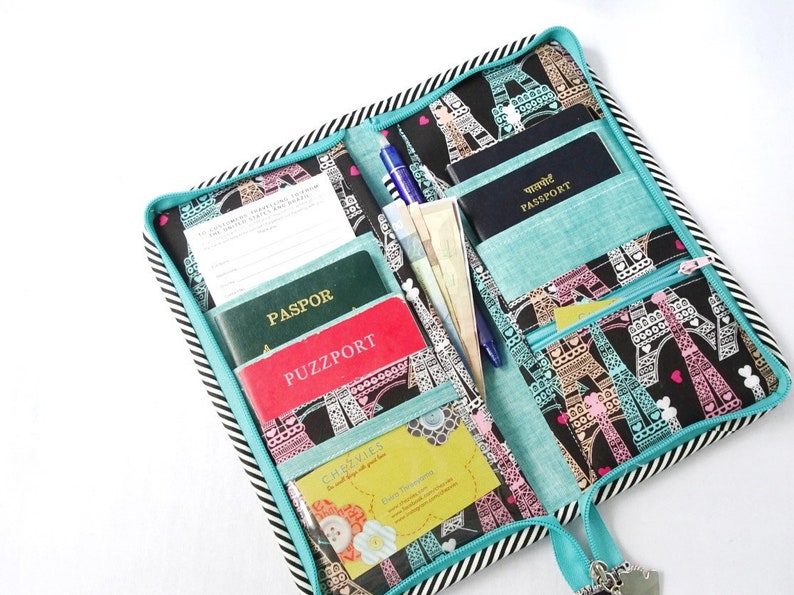
1. Assembled the passport wallet as per the pattern instructions, minus the FLAP making part. Mark the centre top and bottom of the wallet with erasable pen. Then mark approx 3/8" to 1/2" on each side of the centre mark, like shown the in the picture below. 


2. Prepare the zipper : 

On the open end, fold the zipper tape diagonally like the above picture

Then fold it down and hold it with a clip or pin

sew along the edge like the above picture.


Sew across the close end of the zipper to prevent the zip puller from slipping off

3.  Attaching the zipper.

We will attach the zipper from the interior part of the wallet. Open the zipper and start at the top, align one folded end of the zipper , right side up,  on the right side mark. 


 Using wonder clips, clip the zipper tape all around and start sewing from the top with 1/8" seam allowance and stop when you reach the right side mark at the bottom. 


Go slow around the corners. Sew one stitch at a time as you maneuver the wallet. 


Now close the zipper and draw a line on the zipper tape from where the stitch end, like in the picture below. 


Now open the zipper again and place the marked zipper tape  in line with the left side mark at the bottom. Clip all around and start sewing from the marked line all the way to the top of the wallet with 1/8" seam allowance and stop on the left side mark. 


When finished, it will look like the pictures below: 


4. Attaching the binding. 

Fold end of the bias binding  diagonally and place it on one side of the wallet, covering the zipper tape. Sew with scant 1/4" seam allowance. 


Be careful while maneuvering around the corners. Remember to always push the zipper teeth away. Setting the machine speed lower will help. 


when you reach the bottom, just pull the zipper tail inward and continue sewing. 


Before turning the bias binding, slightly cut /round the corners and make small clips on the zipper and binding fabric in the corners.  


Now, put on your fave movie and start hand sew the binding :D


Last step, trim the zipper end by about 2" and encase the end of the zipper tape with a matching fabric. 

et Voila!! Pat yourself on the back for completing your beautiful wallet with all around zipper! 


I hope the tutorial is clear enough. I will try to make a video tutorial when I make my next passport wallet! It was kind of difficult to take photos and video at the same time ^_^ 

here is the wallet in action on my YouTube Channel


Do tag me in Instagram if you make one based on this tutorial. 

Thank you for your patience reading this long post :)

Happy Sewing!

- Elvira -


Zip around Family Passport Wallet

Hello,

Many people asked me on Etsy if I make zip around wallet and finally I now I can give the option. Introducing the new zip around family passport wallet!


image 0

Installing all around zipper is quite tricky, because the wallet is interfaced with heavy interfacing plus batting.  So I made several changes on the interfacing. I used heavy interfacing only on the main lining and using woven interfacing on the main exterior and used the same thin fleece batting for the padding. It worked out beautifully.


I will take photos and maybe videos when I make the next wallet and write a tutorial for it in my next post.  Make sure you subscribe to my blog so you won't miss the post.
This Paris family passport wallet is now available on Etsy You can choose for 4 , 6 or 8 passports. It's very handy and keep everything securely inside.

I also made the above travel wallet ( a custom order) with zip around closure. I will make more of this for stock (and I need to sew up those stash!) . The green London print fabric is finished now but I have the peach one in case you want the same print.

You can buy the Family Passport Wallet Pattern HERE , ETSY or in my WEBSHOP

Thank you for stopping by,
 Have a nice day!

- Elvira-

Tokyo Discovery Day 2

The previous day, we went to Swany and I bought a few half yard cuts mostly suitable for making wallets and bags. The shop has 3 sections in different floor, but since it was almost closing time, we only explored the 2nd floor which mainly section for bag making. And if your purchase is more than certain amount, you could get any bag pattern for free.Yes, the pattern for all those bags that are on display!

Swany Yokohama
 On Day 2, we wanted to visit Country Quilt Market fabric shop. But first, in the morning we visited Inokashira Park near Kichijoji Station. The park is huge with many recreational facilities, a shrine, zoo and pond. The area around the Kichijoji station is really worth checking out. Many antique and vintage shops, cafe shop with interesting design. I think it's called for the second visit and hopefully in different season ;)

Inokashira Park


From Kichijoji station we headed to Country Quilt Market in Nishi Ogikubo.  It's a little fabric heaven! I say, they have my kind of print and colors!! It's a 2 storey shop. On the ground floor, mainly fabrics from pre cut to yardage. On the 1st floor, they have laces, button and liberty fabrics. I had to hold on my wallet extra tight here. LOL

Country Quilt Market


They also have a small room where classes are happening. I can easily spend a day in this shop!
The owners are super nice and they even gave us a free ticket to Tokyo Quilt Show. Opening ceremony tickets! Thank you so much!!!

At Country Quilt Market

I love the Hexies Tile 


We had an appointment to meet mbak Sari from Handcraftku at lunch time, so we had to leave the shop but not without filling out small suitcase with lovely fabrics! 

Indonesian Halal Food!! at Bintang Bali 


Love the Roof at Okubo Station
After lunch, we planned to go to another Patchwork Show which according to the post we saw on Facebook was happening in Tokyo Hilton. We supposed to catch the shuttle bus from Shinjuku station but we got lost in Shinjuku LOL. Who doesn't?? We could not find the Shuttle bus stand!! Anyway, it was not meant to be, but there was an interesting story related to this when we were in Osaka. That will be in my next post!!

Alright, if you're a muslim traveller and looking for a praying room, there was one in Takashimaya Shinjuku. The room is quite spacious and we spent few mins here to read our prayers. 

Since the Hilton plan failed and we were in Shinjuku we decided might as well we go to Okadaya. The best thing about Okadaya is they have everything craft related from Quilting, embroidery, knitting, crochet, etc! and plenty of fabrics!! 


Stay tuned for next post about The Great International Tokyo Quilt Festival. 

Thank you for stopping by!

Have a nice day!

Elvira

Tokyo Discovery Day 1


Hello March!


I know it's been almost 2 months since I've written my last blog post. Life has been a bit hectic after I came back from my Japan trip. Custom orders, the boys exam, etc. Now the boys are on their way to Delhi for the Cricket Exposure trip and I guess it's good time to catch up on the blog posts and sorting out photos. 

 For those who followed me in Instagram, you must have seen a few stories and photos I shared. 
This time, we decided to be an early bird. Everyday we would go out early and explore as much as we can. We went to visit few fabric shops, parks and museum. 

Here's the summary of my Tokyo Visit (click the link under the photo to see more pictures)

Ueno Park 
 That was me and my luisa bag in Ueno Park. We went early to visit Ueno park while waiting for Amuse Boro Museum to open. 

If you're a textile enthusiast, you must visit this Amuse Boro Museum which is just outside the East Gate of Sensoji Temple in Asakusa, Tokyo

We spent more than 2 hours in the museum and it was not a big museum! The history behind each pieces that was displayed and looking at hundred years of quilts was just an amazing experience. Let the photos tell you the story. 

Vintage Boro Quilts
Vintage Boro Cloth

There are theatre showing the history of boro cloth too on the top floor and there was exhibition hall/ shop on the ground floor. We passed through the museum during our last visit, but it just didn't strike us that it was the Boro Museum. I mean, when you see sign "Amuse Museum" you will think of something futuristic, right? And on the ground floor being the shop, we thought it was just souvenir shop! 

the view from the Boro Museum terrace 

From Boro Museum we went to have lunch at Halal Naritaya which actually on the opposite gate (west gate), but somehow the google map take us for a ride and we go around from the Sensoji Temple main gate. If you're in Asakusa and looking for halal ramen, you might want to visit it. 

From Asakusa, we went all the way to Yokohama to check out Swany Fabric Store. I will write another blog about our fabric shopping adventures. So stay tuned!!

Swany Yokohama

Yokohama

That was our Day 1 in Tokyo! 

Stay Tuned for the next day! 

Thank you for stopping by,

Have a nice day!

Elvira


A Kaleidoscope Bag and a Matching Wallet

The best thing about being bag maker is that you can make your dream bag! You can decide every details of the bag, whether you're using your self draft pattern or bought pattern from indie designers. 

In my case, I finally found the bag that is perfect for  me. The Luisa bag pattern from Sotak Handmade. I made the indigo block print bag last week, you can see it HERE and yesterday, I made this Kaleidoscope patchwork version.


I am so in love with this one that I parade it around the house. Today the weather was nice and bright just the perfect time to click few pictures. This patchwork version has different design on each side. 


My BFF Winda gave me the kaleidoscope block kit, I made this pouch earlier and have lots of fabrics left enough to make few more blocks.  


The kaleidoscope pocket is slightly higher than the original pattern but it turned out to be a perfect depth. 


As for the front of the bag, I have this panel fat quarter fabric. I forgot where I got it from but the color is just perfect for it. I must say, this bag is the fastest bag I made, in terms of choosing the fabrics. The grey fabric was also from Winda and the contrast red fabric was a gift from Mbak Tia when she went to Seoul last year. Thank you, girls <3 


And of course I have to make a matching wallet, right? 


A slim and minimalist wallet with 8 card slots and 4 slip pockets. It's based on the Passport Cover Pattern. No zipper pocket though. Now, both are ready for the trip and I better finish my packing! Japan, bring it on!! 

PS: Follow my Instagram for behind the scene stories ;) 

Thank you for stopping by,

Happy Sewing,

~ Elvira~


Linking up to : Show Off Saturday

Pattern Testing - Amara Tote Bag


Last week, I finished testing Namrata of Bagstock Design new pattern, Amara Tote & Handbag. 
The pattern has 2 sizes and I decided to make the Tote size. I have this pretty linen block print and this is just a perfect project for it. I used black ish denim as contrast. 

image 0
Block Print Linen


Making a big bag always makes me nervous. What if I cut it wrong and I don't have the fabric? And sure enough I cut the back panel wrong this time too!! Luckily I have more than enough fabric to cut another one. 


Amara bag is a breeze to make and Namrata's instruction is always clear with lots of pictures. The many pieces of pattern might be a little intimidating at first, but like a puzzle when everything starts fall into place, you'll feel joy of accomplishment!


I used tamil letters print fabric for the interior which I think matched perfectly. As the contrast I used denim instead of leather. There are plenty room for improvisation if you're a seasoned bag maker. 


The Tote size is very generous and it has plenty interior pockets and one big exterior pockets. The size is perfect for office bag, travel tote or even as diapers bag. 

Amara Tote and Handbag features:
An exterior zipper pocket
Two interior slip pockets
Two interior side slip pockets
Two pen slip pockets inside
An interior zipper pocket
A zip top closure to keep the bag's contents secure

You can get the pattern in Bagstock Designs Website or Etsy

Thank you for stopping by!

Happy Sewing


~ Elvira~

Linky Party:
From Bolt to Beauty

Indigo Block Print Denim Bag

Hello, 


Alhamdulillah for a busy January. If you follow me in Instagram, you may noticed that I won't be taking custom orders this month. I like to take a break from custom orders from time to time to give myself a room for new ideas. I have a long list of sewing wishlist and one of them is this Luisa Crossbody bag. A pattern by Sotak Handmade. 


Beautiful Indigo Block Print

I wanted to make with Indigo blue fabrics and took out those three fabrics above. All are just beautiful and it was difficult for me to decide which one to work with first. After asking a few friends, we decided this middle indigo print would be the one and I loved how this turned out. I used dark blue denim as an accent fabric and decided to use ready made PU Leather strap. 

Denim & Block Print Bag

If you've been waiting to make this bag, you really should go ahead. I love the simplicity of Sotak Pattern and as usual it's always thoroughly written. 

Exterior Back Pocket

I made one change with the back exterior. The original pattern, it was two pockets but I found it's too small since I want to keep my phone in it. So I skipped the middle stitch and instead using the snap button to secure the pocket. In the pattern, the rivet was added for decorative purpose only. Now I have spacious exterior pocket for my phone!! Perfect!

Spacious Inside

The interior is very minimalist (which I love!) . The pattern called for interlining, in addition of the interfacing. I used a stiff fleece batting which I mostly used for bags nowadays and the result is sturdy bag that  can stand on its own but the interior is a bit snug. In a way it's good for me since it's quite padded. It's good to carry my camera.  


I think I'm quite organized and minimalist here lol. Those are the things that I usually carry everyday. The Doitrei Zipper Pouch is for my power bank, charging cable and headphone. The Zipper Tissue Pouch is for my tissue, lip balm, hand lotion and medicines (my anti allergy and indigestion tablets). Wet tissue packet, notebook and pen, small wallet and a mobile phone. I also keep small chocolates and sweets in the front pocket lol.

So that's my review of my first Luisa bag. I want to make a few more and trying different combination of interfacing/interlining. So excited!! 


Thank you for dropping by!

~ Elvira ~

Linky Party: 


Latest Fabrics

Latest Video