
Powered by Blogger.

Finish Quilts - Finally!

Guwahati, Assam, India


scrappy quilt


The past few days I've been busy spring cleaning (and it's not done yet!). The weather is pretty peculiar this year. We had chilly weather throughout February and turned pretty dry and hot in March. And it's pretty dusty too. I usually start packing winter clothes and duvet around April, but this time I am doing it early. Yesterday,  all duvet is washed and kept away today. 

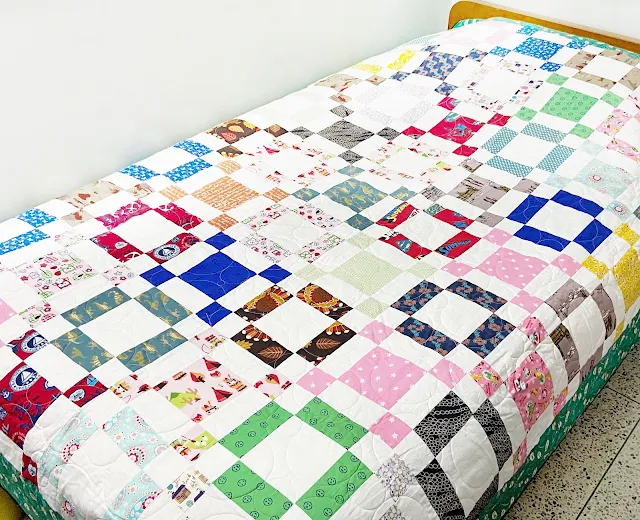
 I have two quilts that came back from Tina at the Square Inch. The first one is the ground cover quilt top that I did 2 years ago. The top was quite big but Tina suggested making it bigger if it's meant for my elder son, who is 6.1' tall. After a few chats over WhatsApp, we agreed on this green border and black and white bear for backing! I used mostly scrap from wallets and bags, and I am glad I did. I still have lots of scraps that I don't have the heart to throw it away. When I look at this quilt, I can't help remembering what stuff I made with those fabrics. 

I really love the emerald green fabric that Tina suggested. It really framed the patchwork well. For the backing, I chose the bear print fabric and love it!! 
scrappy quilt

scrappy quilt


The second quilt is the Jellyroll race quilt in Batik. I think I finished the quilt top back in 2019 when I was doing this quilt. The JR was a gift from my BFF mbak Belly when we first met in Jakarta years ago. At the time, I just started learning about patchwork and quilts. I finally decided to make another Jellyroll race quilt with it. Once I did the top, I was still undecided on what to put for the border and backing. This part usually takes me so long to decide. And when I sent it to SQI and had a discussion with Tina, we decided to use Indian batik for borders and backing. The Square Inch has good collections for Indian Batik. Definitely, 2 heads are better than one, right? 

Jellyroll Batik Quilt


The quilts are washed and now in use. I may need to make another one for my son when he goes to college, but still undecided what pattern to use. I took out one batik JR and also Indian fabrics in the shade of blue. Let's see which one will I finally make first! Just waiting for the idea to strike. 


block print cotton fabric bundle
Blue Fabrics 


What are you planning next? Do let me know in the comment below. 

Thank you for stopping by and Happy Sewing!!

Elvira


********

Linking up to these wonderful blogs


New Video Tutorial - Passport Card Wallet

Guwahati, Assam, India

Passport Wallet Pattern
Voyage Passport Wallet


Hello,

As promised in my previous post, finally the video tutorial for the small passport wallet is up on my YouTube channel now. And as I edited the original pattern to add the link, I also gave a name to the pattern. Well, I am really not good at giving names but then, as I make more patterns, I suppose it's inevitable for me to give a certain name. This time, I go with the simple name Voyage Passport WalletI plan to update the original pattern with better photos when I get the time, so please bear with me.

In the video, I cut the pattern pieces slightly bigger than the original one, because I want to use it for Journal Cover like in my previous post

For the zipper version, all the basics remain the same as the original pattern. If you want to make it with zipper closure, here are the additional materials to cut/change: 

✓ Cut 2 -  Medium or All-purpose interfacing for main exterior and lining

✓ Cut 1 - Fleece Batting  - the same size as the main exterior 

 ✓ #5 Zipper – 24” Long (based on the continuous zipper that is cut to size) 

✓ Bias binding (follow THIS TUTORIAL)

Without further ado, here's the video :


Passport Card Holder

Voyage Passport Wallet


If you're new here and wondering about the interfacing I used in my wallets, I wrote my secret guide for interfacing in THIS POST and THIS POST. My suggestion is to keep experimenting until you find the combination that you like the most. In the hydrangea passport wallet above, I used all-purpose interfacing for the main body and using medium interfacing for the sleeves' base. The wallet turned out softer and I can even fit it with more passports - up to 4 passports and it still closed nicely. 


I made another Voyage Wallet with Snoopy Print as a custom order. Some of the crafters, DM me on Instagram asking how to do bias binding nicely. As I mentioned in my previous post, before cutting the binding (cross-cut or bias), make sure the fabric grains are straight. This small step is very important to get a good finish. And of course, practice! Practice makes improvement. Sometimes even I had to rip off the already sewn binding because I didn't straighten the grain nicely and resulted in sloppy finish. 


Small Passport Wallet
Zip Around Passport Wallet

Passport Journal Cover

Another question is, can I use cross-cut binding instead? Yes, you definitely can. I made a couple of passport wallets with zippers using cross-cut binding. It will be like the usual wallet binding, like in THIS tutorial. When you want to use cross-cut binding for a zipper wallet, do not CURVE the corners. I will make the video next time when I am working on a wallet binding. 

Here is a few Ohana Passport Wallet I did for a custom order. 


Family Passport Wallet

Family Passport Holder
Mitered Corner binding


Family Passport Wallet
Cartoon Print Passport Wallet


I hope the video and a few tips above help your journey in the wallet making. Please let me know if you have any questions. 


Thank you so much for reading my blog. 

Happy Sewing,

Elvira


*****

Linking up to these wonderful BLOGS 


_______________________________


Latest Fabrics

Latest Video