Powered by Blogger.
Showing posts with label Tutorial. Show all posts

{TUTORIAL} Bunny Pencil Case

My elder son told me last week, why don't I start a youtube channel for my tutorials. He suggested after he saw me  making short video tutorial for my friends.


Giving it some thought, and I said "why not"?!. I can make a picture tutorial movie instead of the video tutorial. As it is I have a couple tutorial ready to share in this blog but have not got the time to upload it. 

I have the pictures uploaded in my Google+ Album for my Indonesian friends who want to learn making basic zipper pouch. We did the sew along and it was FUN. 

So I sat down and start adding caption to my photos and make a picture movie in PICASA. I love PICASA its so easy to use!!

So, for you who want to make this cute Bunny Zipper Pouch, check my new Youtube Channel !!

Here's the video tutorial:


I think video tutorial is more effective, since it's easier and more practical. Not everyone have time to read the whole tutorial description. My tutorial always have lots of pictures and in blog, sometimes it takes longer to load the pictures. 


What do you think? 

Until then, 

Happy Sewing


{Tutorial} DIY Printed Fabric Label


There are so many tutorial you find online how to make DIY fabric label. I have one DIY Label tutorial using fabric pen and now I am going to share how I do DIY printed fabric label. 

First of all, here in India I don't get freezer paper, so I used fusible interfacing which is called "pasting" by my local supplies shop. It's a thin woven interfacing which is used as backing for machine embroidery. There is one with glue on one side (hence it's fusible) and there's one without glue. I used the one with glue on one side. 

So what you need is :
~ a piece of fabric --- cut into A4 size 
~ a piece of fusible interfacing --- cut into A 4 size
~ transparent nail polish
~ Computer & printer (I used laser jet by the way) 

#1 - Design your label on your computer. I am not very savvy with computer program, so I use MS word and used a mailing label template to create my label :D 


#2. Fuse your fabric on to the fusible interface. Be careful with the setting. Set the iron on WOOL and press few second on one side before moving it around. Than way you will get a crisp papery fabric. I used linen in here. 


#3. If you're happy with your design, print it out onto the fused fabric. I suggest you run a little print test on paper or at the back of the fabric (the interface side)

and when you're done, cut and dab the edges with a little transparent nail polish to prevent it from fraying. Well, unless you have fray check, which I don't ^_^. 


It's easy, right? You can add your logos or if you have color printer that will be wonderful. 

I made my quilt label the same way and I read somewhere (sorry forgot the blog), if you soak your printed label in white vinegar for 10-15 mins that will prevent the ink from fading. 

This label is for stuff which does not need frequent washing. 

And you can check HERE for more tutorial. 


Until then,

Happy Crafting 


TUTORIAL - Patchwork Zipper Pouch - Lots of pics!


In this tutorial, I use a simple zipper with a tab. There are several methods on how you install zippers in pouched and bags. I will try to post a few mini-tutorial on those methods. 


FAQ :

1. What interfacing do you use?
Interfacing depends on how you want the look that you want. It totally depends on you. I love soft pouches. I normally use fusible interfacing and flannel or fleece batting (that's a substitute for fusible fleece). For a stiffer pouch, I use canvas interfacing.

2. Batting
As I mentioned, I usually use flannel for quilted pouches or bags. Flannel gives a good structure and enough softness. I use fleece or cotton batting for gadget cases.

3. How to reduce the bulk?
Always cut your batting 1/2" smaller than the main and lining fabric. If you use thicker interfacing, cut the interfacing 1/2" less than the main and lining fabric. That will save you lots of headaches struggling with the machine.

4. Ironing

 Ironing is also very important. Iron your interfacing well. I normally set in Cotton and always use the DRY setting. Iron your fabric first then attach the interfacing. If you use anything other than cottons, like silk or cotton mix, do not iron on the fabric. Iron nicely on the interfacing, reduce the heat to (silk/rayon) then iron gently.

That's as far as I can remember. Ask away if you have more questions. 


*** Please refer to the numbering of each photo ***

Let's start 

Supplies :
Fabric scraps
Fusible Interfacing
Batting (fleece, cotton, or flannel)
Zipper {sorry forgot to include it in the photos)
Embellishment (ribbon, lace, buttons)

Zipper Pouch Tutorial


Cut the fabrics according to the pics and sew up the strips accordingly


iron flat and sew the green polka dots
Green polka dots: 3" x 9" 
**ironing is very important to get a crisp look **


Please NOTE that you NEED to frequently straighten your panel


Use DRY setting and COTTON setting to fuse the fusible interfacing
First, iron the fabric and then attach the interfacing. 
This is important, cos it's difficult to smoothen wrinkled-interfaced-fabric. 


here I cut the tab 1" x 2" 
Trim the metal stopper of the zipper and cut 8" (1" smaller than the panel)


Sew the tab to both zipper ends


now, decorate your pouch panel
this is the fun part


I did a little quilting with this decorative stitch in my HV
I love my Viking, it has all fancy decorative stitches 


Now ZIPPER time!
Don't be scared 
it's very easy!

Follow the steps in pic #9 below


remember, ALWAYS use zipper foot! 
you can either baste it first or you can pin and sew


1st zipper is done, now the second part
Open the panels as shown in pic #10
(remember, the position of the zipper should be like pic #9)


Bring the zipper to the main panel. Line up the sides properly
 you can pin the middle panel if you want


Now, fold the lining and line it up on top of the zipper


it should look like pic #13
now pin and sew the zipper


once the zipper is installed
pull out and separate the main and lining as shown in pic #13-1


we're almost done! yay

before pinning your panels, make sure that the laces are matched. You don't want as lopsided pouch, right?


and trim the batting 1/4" all around.
This is to reduce the bulk


match the zipper point
the seam facing the lining and pin


Don't forget to OPEN the zipper halfway!


Now all sides pinned
trim the zipper tab and start sewing
sew with 1/4" or 3/8" on one side
don't forget to back-stitch on both ends

On the other side, leave a 2" opening on the LINING side. 
This will be your turning point
Back-stitch on both ends and also at the opening points.
This is important, cos you don't want your stitch to unravel while you're turning the pouch


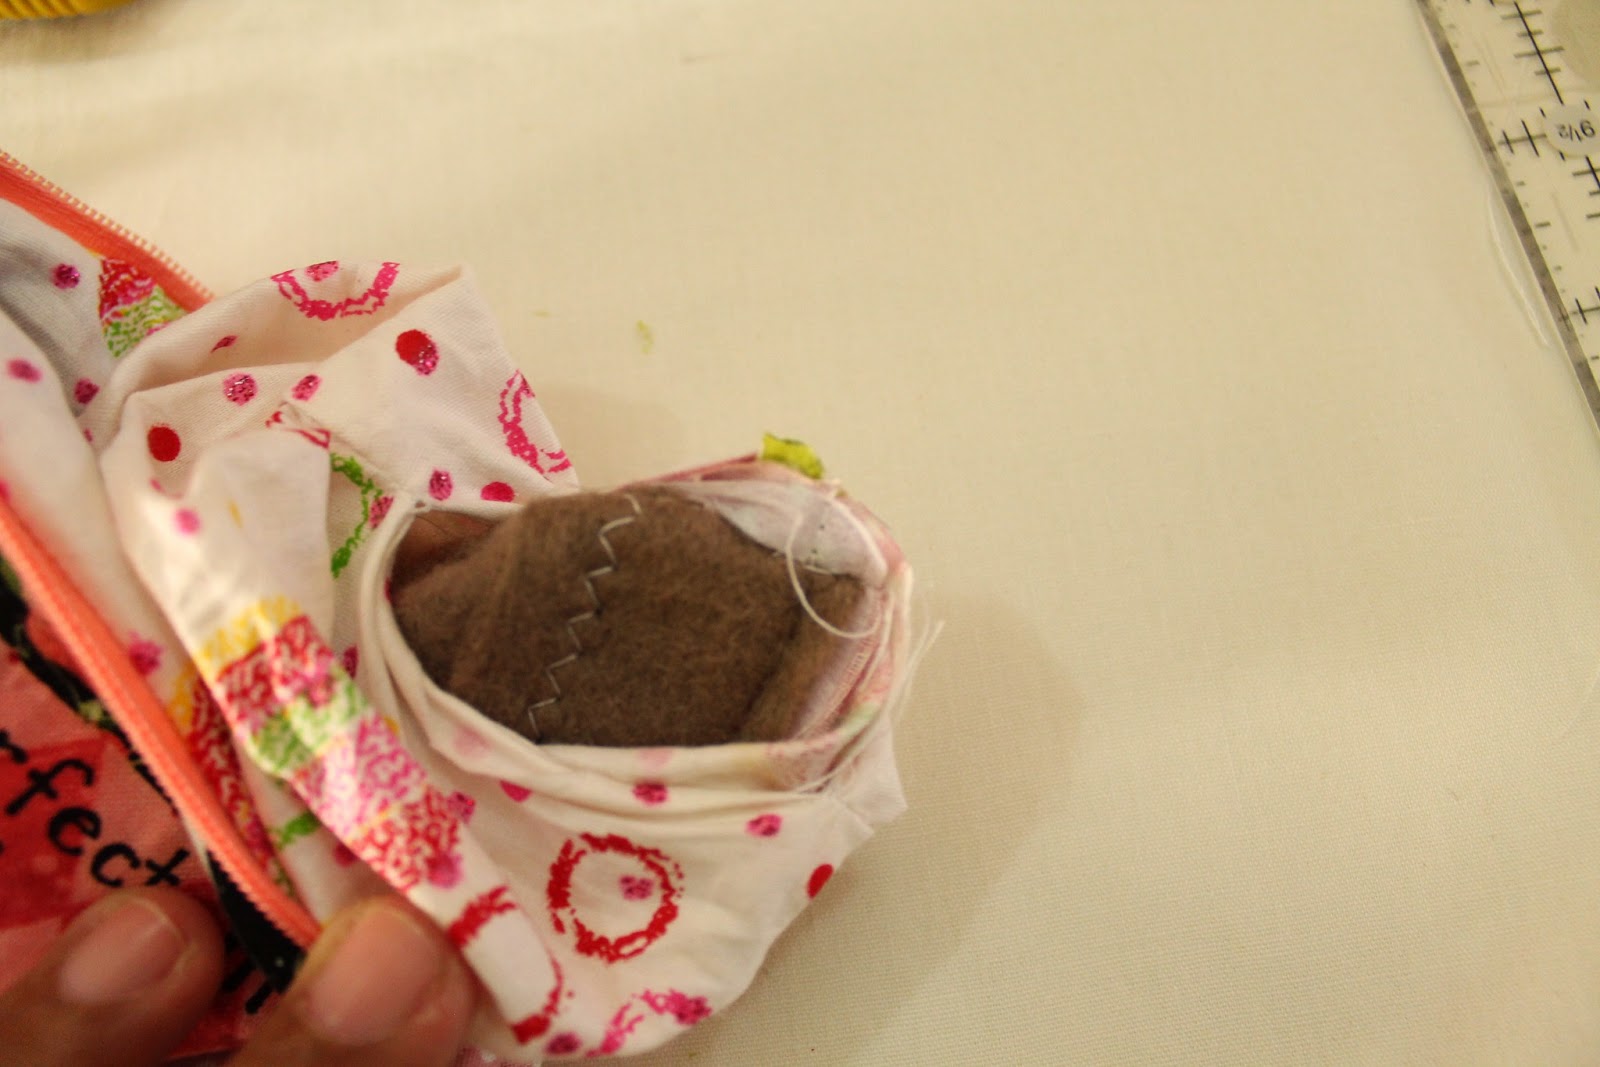
now, let's make the square bottom

Method #1: puff up the corner and pinch evenly and mark 1/2" from the corner


sew the marked line and cut the excess


or you can do 
Method #2
Cut 1/2" square at all corners 


and sew them close.
This is easier cos you tend to get a more even box bottom


So that's done, now turn inside out from the opening
do it gently! I know it's frustrating but it is DOABLE.


Once done, check the corners, if you're happy with the result, iron your pouch (main and lining)and sew the opening, either by hand or machine.


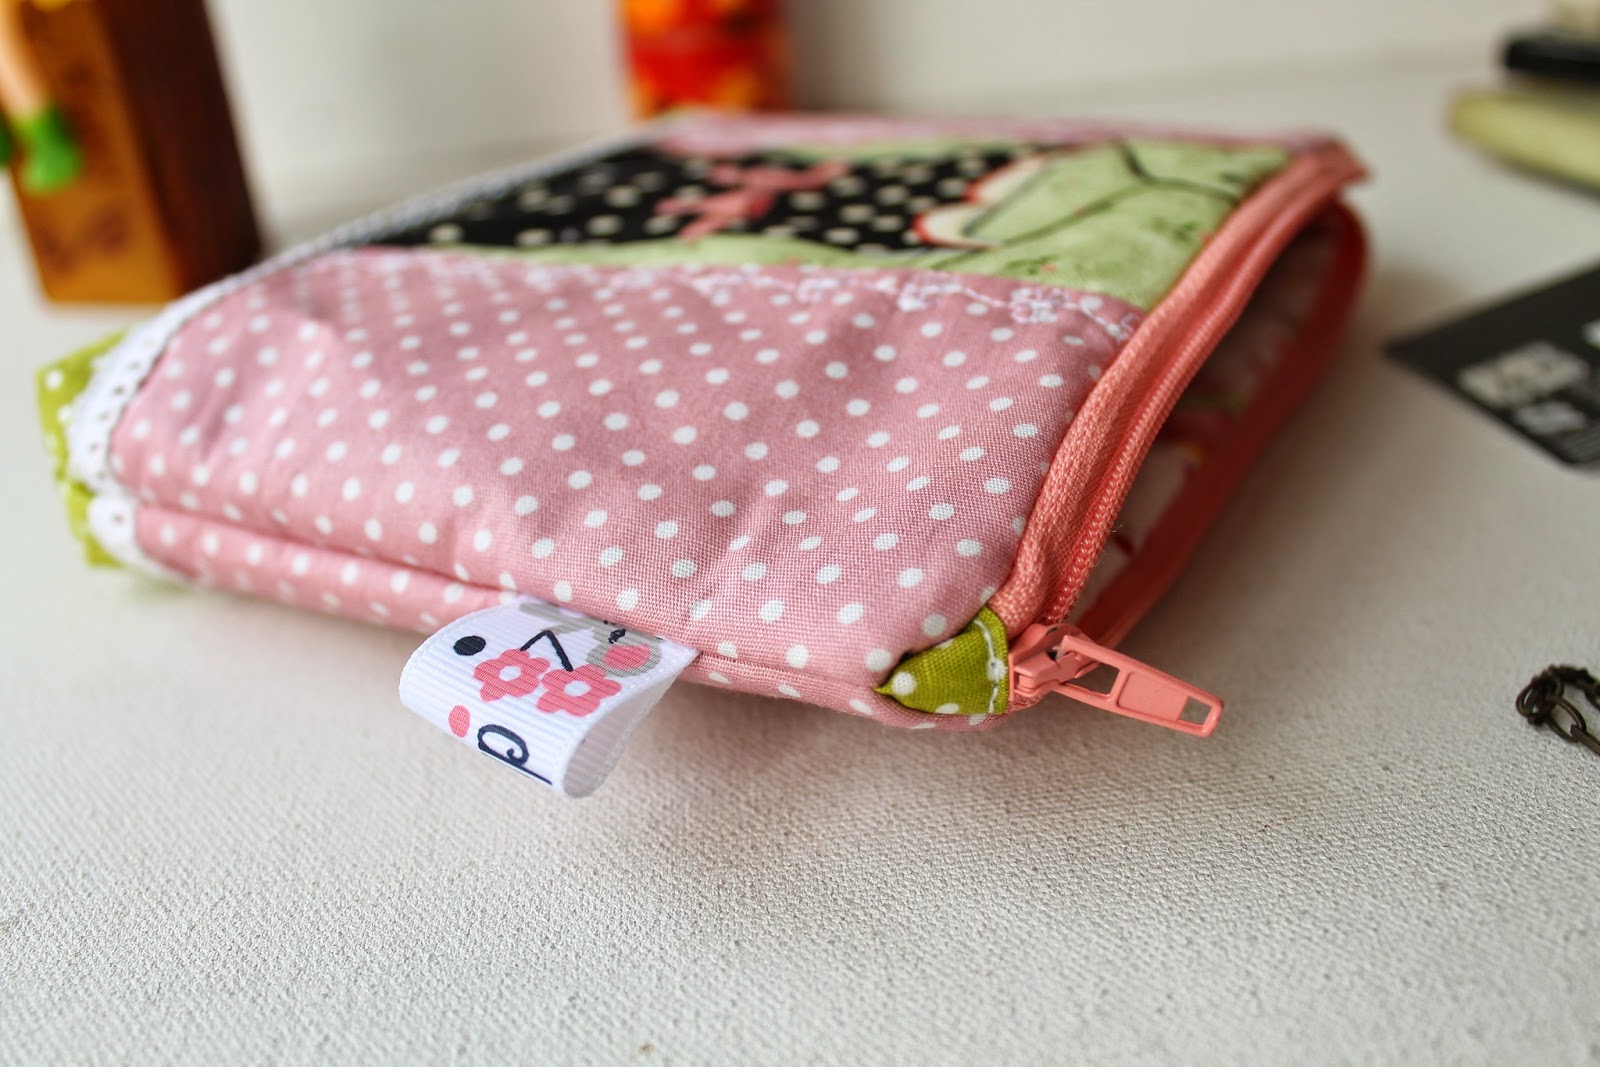
Yay! you got new pretty patchwork pouch you can flaunt to your friends.


and if the sewing machine is not your best friend, you can always visit my SHOP and I'll be glad to make one ESPECIALLY  for you ^^

I hope you enjoy my tutorial

Happy Weekends & Happy Sewing

Elvira

****


{Mini Tutorial} Let the Tape be my guide

I've read about painter's tape used as a quilting guide and got a chance to try it out today. The thing is the painter's tape which available is not of good quality and I don't have a masking tape. I have cello tape. That should do, right?

Now if you use this tape, don't press it so much, as it works only as guide. You don't want any residue sticking across your quilt, right?


Remember the edge of the foot should fall exactly in the edge of the tape
Don't put the foot on the tape
because it's slippery and the foot won't glide. I did that in the beginning 
and had to struggle a bit

So, I finished quilting it quite fast . I am not very good in eye-balling my stitch, so this tape is really my savior.

Now I want to do that wavy curvy stitch for the border
and here's what I do

1. I cut the used tape (it's got batting all over it so it's not sticky => easy to cut) according to what I want to do


2. Change my foot to darning foot {R foot in my Husqvarna Viking machine}


3. Set the machine for Free Motion Floating and I'm good to go


There you can see the wavy curvy line ^_^


here's another idea


What do you think? 

I recently found that standing and quilting is much more comfortable. It's easier to maneuver the quilt and easier on my shoulder too. That way, I can see my stitches better too. Well, I get a bit tired standing but then you can always take a break in between.  


Now the quilt is ready for binding


Oh I love the corner part.

Well, I hope you enjoy my mini tutorial ^_^
Remember, there is no right or wrong in quilting

Until then

Happy Quilting


Simple Guide - taking good photos for your online shop


When you are selling online, a GOOD, professional looking photography is a MUST. I've done a lot of reading {and I still do} on how to take a good product photography.

I follow these few simple guides:

1.Natural Light is the BEST

But not direct light. Which means, take your photos in the room which doesn't get direct sunlight. I have a small balcony adjacent to my room, which is has a good natural light. The balcony is facing North. The best time is before 11 am and around 3-4 pm. And you ask WHY? because indirect natural light will give you the best color of your product.


This is unedited, taken under indirect natural light
My sewing room has natural light most of the time, but it's facing East, so it gets direct light most of the time. When I took photo in my sewing room, the result is either too bright or too dark. 


Never take your photos at night, even with sufficient light

I took this photo at night with a poor background and I had a tough time editing it.


2. NO FLASH

NEVER use flash light. The best picture is the one which doesn't need much of editing. Whether you take with DSLR camera, pocket camera or your mobile camera. Flash will a harsh shadow on your product and you will have a hard time editing it. Especially if you are not expert in it. I don't know how to use photoshop, I love using picasa or photoscape which is easier.

with flash
without flash


3. BACKGROUND


Background is very important. Remember your product is the CENTER of attention. So, to many thing in the background will distract the buyer. Use minimal prop which can enhance your product. If your are not sure what prop you should use, white background always works best.

I'm using this inexpensive canvas board as my background. I put it on top of my trunk, and cover it with tablecloth when I don't need it. Since it's very dusty here I make sure to cover it.


As much as you can, try to convey the uniqueness of your product. Less is always better. I usually like to browse craft magazines and pinterest to get ideas  on how to use the prop.


Make sure the background is less busy or less colorful than your product. The FOCUS is on your product, not the green leaves or the Chrystal vase behind the product. 

Look at this photo, the idea was to show that you can use the mat for the chrystal vase. But the vase is too big that you cannot see the design of the mat


Compare to this one
The simple prop makes the mats pop out


4. Camera Setting 

It's always best to use camera with higher  resolution. At least 8 mega pixel and above for Android Phone. For iPhone 5 mp is sufficient to give an editable and clear picture. Why? because you need to crop your picture.  If you are using lower resolution camera, when you crop it, the picture will not give you a clear image and sometimes it breaks/grainy

The size of an image taken at different resolutions
Photo courtesy Morguefile
You can read more about Digital Camera Resolution HERE

If you have DSLR but not very familiar with it, go with the automatic setting. In my Canon its the P sign. When I am in a hurry, that's what I do. If I am using mobile camera I always turn OFF the flash. 

Always click many photos, try different angles, and different props. For one product I took around 15-20 pics.


Of course DSLR camera gives a better result, especially for close up pictures 


and it also can capture more natural color of the product. Especially for my fabric shop I try to always use my DSLR


But
some photos in my handmade ETSY shop was taken using my mobile camera. If the light is good, sometimes it gives a good natural color which doesn't need much editing.

It's as simple as that. All you need is an extra time and patience. 

I'm not an expert and I'm still learning. If you want to know more
Etsy has a good guide in its blog from Beginner's Guide to Smartphone Photography .You can check Etsy BLOG for complete list.


Happy Clicking


Latest Video