Powered by Blogger.
Showing posts with label chezvies pattern. Show all posts

Handbag and Wallet set - a gift set for Mom

Hello,

When Namrata showed me her (then) new pattern of Rose Handbag, I knew I will make one for my mom. I could not test it at that time because I hurt my pinky and could not do any sewing that needed "birthing".

And a few days ago I finally got down to make one. My mom loves florals, and she loves Blue and Red. So I picked this Japanese linen with Red Rose print. But of course, I have to make a set, with the trifold women's wallet. 


This is my 4th bag from Bagstock Designs and I love how this Rose turned out. For you who started to sew a bag, don't hesitate. Namrata's pattern is always easy to follow with clear photos and instructions.

I used Japanese linen and dark blue denim and my Singer machine worked like a charm going through all the layers. well, except the one with the D-rings for the removable strap. So, I skipped stitching just a few mm from there. 


I have a matching blue egg color polka dots which perfect for the lining and added a red zipper for fun. I know I'm going to make more of this bag! I need one for myself!

And when you have a pretty bag, you need a matching pretty wallet, right?


So I made one!! I thought of using denim and the rose print for the exterior but I changed my mind. Instead, I used denim as the interior base and love how this turned out.


I also tried a new technique for the interior zipper! I will post the tutorial soon! Subscribe to my blog so you won't miss the post!

I made the 12 cards variant. I think my sister will snatch this wallet from Mom. LOL. I hope I have a little time to make more wallet for my sisters before my trip next week! I still have few more wallet and bag to make.


Until then,


Linky Party:


{ NEW PATTERN } - CARD WALLET ORGANIZER & TESTER PHOTOS


Yay! Finally now the pattern is LIVE on Craftsy, Etsy and Chezvies. It will be on SALE until I come back from my trip to Japan by End of January. 


First of all I want to thank all my friends for generously help me testing the pattern and also for their invaluable input/comments which help me in perfecting the pattern ❤❤

The pattern features :
12 or 16 cards slots, 2 flap styles included in the pattern templates, 2 zipper pockets and 2 slip pockets, clear step by step instructions with graphics and photos. 

In my previous post I mentioned about the fabulous tester result by my generous facebook friends. Now you will get to see them and what they think about the pattern. Let's Start! 

Maria of Miacreates  was the first one to post and I love how neat her work is. It's simply perfect. You will love all her shabby chic style creations. Here's her comments about the pattern : Great pattern and love the inside concealed zipper


 Sudha Sekhar from Madras Motifs always come up with something quirky and unique. And sure enough she came up with this cute Elephant print CWO.An elephant wallet with bright contrast card slots inside and she said "All in all its a very simple, straightforward pattern"


Novi is my bestie from college. She converted into the world of sewing few years ago and I love her one-of-a-kind style. Whatever she made, she never made them twice. She came up with this cute Japanese Linen wallet. Using different print for flap really give a unique result.


My BFF Agnes tested the first draft and she's one of my "brainstorming" buddies. She tried the triangle flap and I love how neat it is. This is what she said about the pattern "This CWO pattern is very clear and easy to follow, especially the pictures, they are very helpful". Her hubby thought she bought it! Ha, I guess it's high time to take your sewing hobby to a different level ;)


And here's Susan of SKH51 Teal and Grey Wallet. I really love her fabric choice. This is what she said about the pattern "It's a really super pattern!" Susan's work is alway fantastic. You can follow her works in her instagram and I am sure you will love it too!!


Here's my friend, Hernik of Jemariku from Kuala Lumpur who loves anything shabby chic. I always love her work and how neat it is. Red is another fave color of mine. It's my "cheer-me-up" color. I love how she added a fancy leather strap there. She said she loved the pattern, because she can fit in her phone too!  


Alka of Sew Fab Stories really live up to her brand name. Whatever she does, it's fabulous. I love how the green binding make the orange pop. And look at how neat her work is. She said "Wonderful pattern with clear instructions" 


Sudesh Jangra of Stitch A Memory came up with this bright & beautiful red wallet. She just released her pattern too, so make sure to check out her Instagram to get a look at her popular pattern. 


Poonam of Quiltsiop is another artist that I admire. Her works show how much love and dedication she put into each one of them.  Don't you love this modern look wallet? Perfect binding too. She said "It was my first pattern testing and that's a wallet. I enjoyed making it. Instructions, measurements were clear to understand and follow". 


Prabha Mathew of Quiltaholics did another pretty wallet in spite of her busy schedule. She said  this is the first time she made concealed zipper and she was happy to be able to do it in one go. And it's pretty neat zipper!!  


I'm super happy everyone finds the wallet is easy to do and it's a fast project to sew. Perfect gift to make for your friends and family.

Once again, don't forget to get your copy while it's still on SALE.

Pattern Available here:


until then,

Happy Sewing


Small Family Travel Wallet

I made smaller version of the Family Passport Wallet. Instead of 6 passports, I made the 4 passport slot version. And it turned out really cute. I think I'm going to make more for the shop. 

Many family travels the world together. Our family travel to Indonesia every summer holidays to visit my Mom and sisters. Keeping documents in one place in very necessary when you travels in group. So many documents to keep, from e-ticket print outs, hotel bookings, multiple boarding passes if you change flight multiple times, foreign currencies, etc.

Mini Zipper Pocket & ID card slot included

This travel wallet is perfect to help you organized while traveling. No more searching through numerous envelopes or pockets to get your travel documents. 

Slim & Sturdy even when fully loaded

If you already purchased the pattern, you can modify it  by omitting the middle passport slot and lining pieces. Reduce the main panel length by 1" and reduce the flap width by 1" too. That will give you cute family passport holder perfect for family of 4 . 

Passport Wallet Pattern available in:


{Mini Tutorial} - Passport Wallet Lanyard

I just released my first PdF Pattern in Etsy "The family passport Wallet". I made my first Family Passport Wallet 2013 and it was an instant hit in my Etsy shop. The wallet has been going through a lot of redesign. It's my friend Namrata of Bagstock who encouraged me to write the pattern. 


and yes, I was nervous and excited. I will post here in my blog if there is any changes or updates or what improvisation you can do with the pattern. 

And this first post is about the lanyard. I did not include the lanyard tutorial in my pattern as nowadays many people prefer to use leather strap which is really cute and can give a vintage-y look about your wallet. I did few for my etsy customers and they loved it. 

But personally I still like making fabric lanyard for my handmade wallet. So, here's how : 

What you need {this is Lanyard for Passport Wallet}

2.5" x 16" fabric strip
1.5" x 15" woven interfacing
3/4" swivel hook

Let's get started 

 Iron the woven interfacing on the wrong side of the fabric strip. 


I have this 1.5" woven interfacing strips which I simply LOVE. It's my favorite for making bag handles/strap. There is a 3/4" one too. 


Fold the side seam and iron nicely


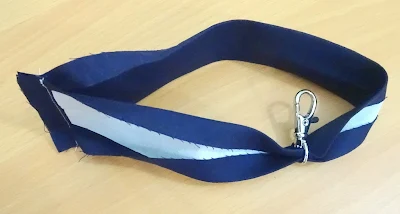
insert the strip into 3/4" swivel hook


now, fold the strip so the short ends meet and sew with 1/2" seam allowance(like in the picture)


make sure you put it correctly / not twisted ^_^  


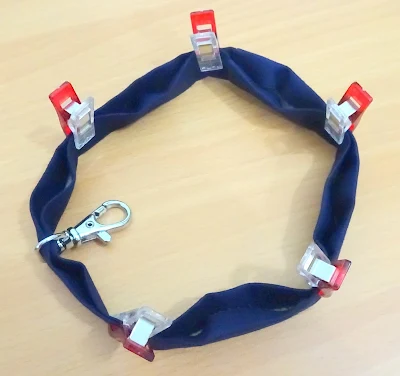
Now, fold and clip and sew along the both edges with 1/8" seam allowance


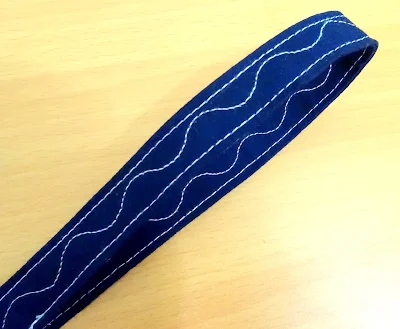
and you can use your decorative stitch too. That will make your strap unique. I love using different kind of decorative stitch but this serpentine is my favorite. 


Now, finish your lanyard by sewing 1/2" under the hook. 


Voila! You have a pretty handmade lanyard to go with your passport wallet.


The Family Passport Wallet Pdf Pattern is available here :


Thank you for stopping by today

Happy Sewing


Latest Video