Powered by Blogger.
Showing posts with label chezvies patterns. Show all posts

Kodomo Kids Wallet Video Tutorial

Kodomo Wallet


Hello,

Today I want to share the new beginner's friendly wallet pattern, KODOMO WALLET, that I recently released on my Webshop as well as in my Etsy shop. Kodomo means child in Japanese and this is what exactly the wallet is about. A simple and functional wallet that is perfect for kids as well as adults.

I have been making this kodomo wallet in my handmade shops and it is popular with my customers. They love the simplicity and functionality of the design, and also the fun print choice we can use. 

If you are a beginner or novice sewist in wallet making, this might be the perfect pattern for you.

The materials needed to make this pattern:
3 Fat eighth (9” x 22”) quilting weight fabrics for exterior, interior, and card slots
1 Fat eighth  lightweight  fusible non-woven interfacing for card slots
 1 – 0.75” diameter cute button
 5” long 1/4” wide elastic
 #3  all purposes zipper – 9” or longer


And of course, video tutorial is also available on my YouTube channel for those of you who are more visual learners. 


I made a couple of wallets for the shop using this kids' print fabric that I have in my stash.  These Alice in Wonderland Wallets are really cute and are popular with my customers. 

Kids Wallet Pattern

More wallets for kids! They are so fun, right? 

Red Riding Hood & Dinosaurs Wallets


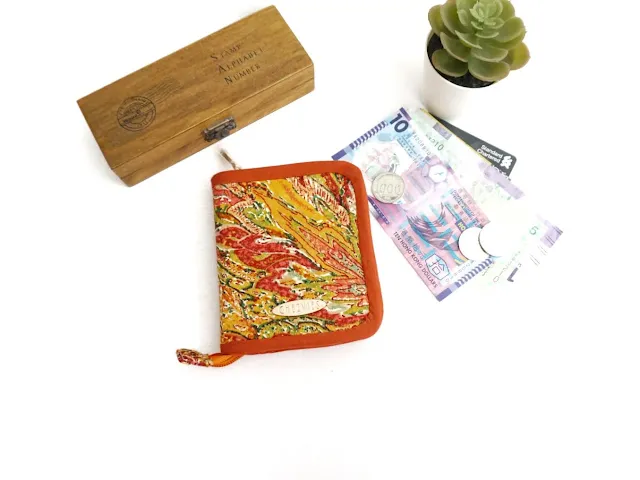
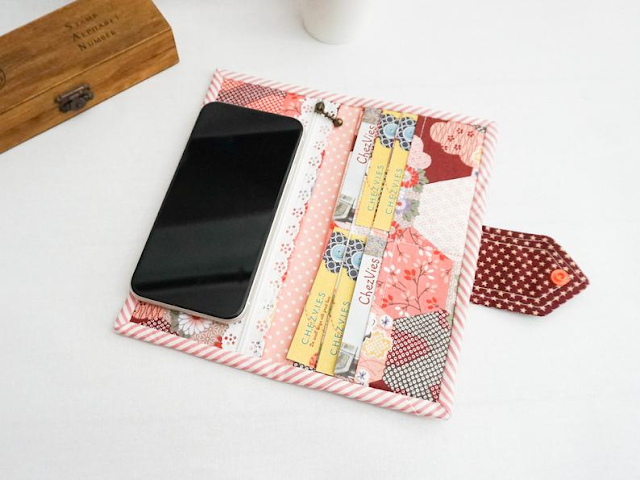
The Kodomo Wallet has 6 card slots, and 1 zippered compartment and is closed with an elastic and cute button. Just perfect to keep cards, cash, and coin. The size is also pretty compact at 4" x4.5" and can easily fit into a pocket or small bag.

The pattern is written in English with step-by-step instructions that are easy to follow and also comes with full-size templates. 


More Alice in Wonderland Wallet

I hope you enjoy making the wallet, and if you have any questions, please leave a comment here or on the Youtube Video. I'll be glad to help you! 

Happy Sewing!

Elvira


******************


*******************

New Video and Pattern Update

 Hello,

MiniMax Crossbody Bag

It's been a long time and I hope you all are doing great. There are a lot of things happening right now at ChezVies, some are sewing related and some are not.

At my sewing corner, recently I updated the Phone & Kindle Pouch pattern after getting a lot of constructive feedback via emails as well as comments on Youtube. Oh, I also name it the MiniMax Crossbody bag. It's a mini bag with maximum utility. Truly giving a name to a pattern is not easy, it took me 3 days to find the name that I feel will match the bag. 


So what's new with this updated pattern?

First, I added one more template to accommodate larger smartphones. I made a tutorial on how to scale up the pattern in my blog so I thought, I will add it to the new updated MiniMax Crossbody Bag pattern.

For the second one, I also added instructions for adding a back zipper pocket, which I also previously shared in my blog.


In the new version, instead of a picture diagram, I used real photos in the tutorial with clear step-by-step instructions. I also added a video tutorial for using faux leather or vinyl.


I hope you enjoy the videos and if you have any questions, feel free to leave a comment or email me with your questions.


Don't forget to check other tutorials on my Youtube Channel.

If you have not purchased the pattern, head to my website and use code CVG20 to get 20% off. The coupon is valid for ALL Patterns.


Thank you for being part of my sewing journey and this creative community! If you shared on social media please use hashtag #chezviespatterns. I would love to see your lovely creations.


Elvira


Linking up to these wonderful BLOGS

NEW Trapeze Zipper Pouch with Video Tutorial

 
Trapeze Zipper Pouch

Hello, I'm so excited to introduce you to my newest pattern Trapeze zipper pouch.  I always love stackable pouches, but I want something different. Well, I love making zipper pouches for myself or for gifts and this Trapeze pouch is just perfect for that. The 4 pouches are simply great for organizing your stuff whether to use them while traveling, for school or office stationaries or going for sewing /quilting gatherings. And when you don’t use them, you can simply nest them together and store them! 

I made it in 2 different versions, faux leather and quilted version. The original idea was just for 3 pouches, but one of our testers, Daryl from Patchouli Moon Studio suggested adding XL size and I thought why not! Thank you, Daryl!!


Faux Leather Pouches

The pattern has 15 pages written in English with detailed photos, diagrams, instructions, and also several templates. 

While I wrote the pattern using the quilted version for the pictures, I also included a video for sewing with faux leather and a couple tips about interfacing.  Yes, I finally get to use the faux leather/leatherette! I've been experimenting for quite some time now and I will write about it in my next post! 


Nest them when not in use

Quilted Zipper Pouch


Here are some trapeze features:

1. 4 sizes to store your stuff. The pattern pieces are designed in a way that you can scale them up or down easily (more of that in my next post!)

2.       Learn to sew in a curve (the easy way)

3.       You only need half a yard of each material to make 4 pouches.

4.       Video tutorials for both quilted and faux leather versions.

5.       Make a great gift for basically everyone!

    I made a couple of trapeze pouches in fabrics and faux leather too. I will share them in my next post when I'm done with the editing parts. 


If you just started learning sewing bag or pouch and want to up your game by sewing on a curve, this Trapeze Zipper Pouch is totally doable for you. 


Get the pattern HERE for SPECIAL PRICE through Wednesday!


I also would like to thank my fantastic tester team, for their feedback and suggestions. Check the photos below and click through the link under each photo to check their other works! 


Last but not least, thank you so much for your support! I can't wait to see your Trapeze Pouches. Please tag me on Instagram or Facebook if you make one. 

Until next time,

Elvira

******

******


VIDEO TUTORIAL - SAFARI TRAVEL WALLET


Travel Wallet DIY
Safari Travel Wallet Video

Hello, 

Finally, the video tutorial for the Safari Travel Wallet is up on my YouTube Channel. I hope the video can help to visualize how to make the wallet from the beginning. I am trying to get a better angle as I recorded the video and also try not to skip the process. The video is sped up  2 to 3 times from the original. If you want to watch it at a slower speed, you can do so by clicking the setting on your YouTube screen.  


The original pattern only has instructions for flap closure which is pretty easy, but as many customers like zip-around closure more, I decided to make the video for the zip-around version. If anyone wants to see the flap closure version, I will record one when I make my next wallet. Do let me know in the comment.


Travel Wallet DIY
Cute Zipper End 


Zip Around Passport Holder
Zip Around Travel Wallet


I really enjoy recording the video and I really hope to share more sewing tutorials in the future. If you heard some funny noise in between the videos, that's because my son was watching a football match, or sometimes, someone came and asked something in the middle of the recording. Maybe I should put a sign like "recording in progress, do not disturb" LOL

I hope you find the video useful and you can understand the process of making the wallet. I'm looking forward to your feedback! 

Thank you for stopping by,

Elvira


Wallet Interfacing Secret Guide


Zip Around Wallets


I've been making a lot of wallets these past few weeks, from family passport wallets to small bifold wallets. The picture above is the most recent ones. As I am sharing my works on Instagram, I'm getting a few messages asking about interfacing. If you're in India and new to bag-making, I know your struggle! You can read about interfacing for bag-making in India in THIS POST.

But I want to share a few things about wallet-making from my experience here.  As I work with different kind of fabrics with different weight, it is important to know which interfacing work best for each fabric. 

For the Orange Small Wallet, the fabric is lightweight Cotton Satin. Depends on the project, I used all-purpose interfacing when I make this mobile phone bag and this pouch. But for the wallet, even though in the pattern I suggested using all-purpose interfacing, but I used medium weight interfacing for the orange wallet. I made one using all-purpose interfacing but it turned out too floppy. 


Small Bifold Wallet
Download the Pattern


Handmade Fabric Wallet


For the Camo Family Passport Wallet, the fabric is twill cotton which is pretty thick. In the Pattern, I suggested using Heavy Weight Interfacing, but since the fabric is already thick, I used all-purpose interfacing for the main wallet and passport slots and using medium weight for the passport base. This will make the wallet sturdy and yet easy to sew on a domestic machine. And although I always prefer to hand-sewn the binding, for this Camo Travel Wallet, I sewed the binding by machine. 


Camo Family Travel Wallet
Download the Pattern


Camouflage Passport Holder
Camo Family Passport Holder


For the Blue Camo Wallet below, I use a combination of medium weight and all-purpose interfacing, to give a crisp look. 

Blue Camo Small Wallet
Blue Camo Wallet


Beside the interfacing combo, in India we also struggle to find the padding we use for our bags or wallet. Even though India is known for manufacturing all kinds of wadding/batting, but they are not available in retail and we don't even have a brand name! 
And living in the Northeast of India means even less access to all those bag-making and quilting luxury supplies :). We got to find an alternative that works best for us. 

Here's my secret sauce for wallet making: 

If I am using heavyweight interfacing, I used either flannel or low loft felt as padding/wadding. Felt and flannel are easier to find in the market or even online. The kind of felt that is used for soft toys will work or a little heavier that is used for car padding. Felt pretty expensive though, in the market here it was around INR 280 per meter (36" Wide), while flannel is much cheaper.

Felt for Wallet Making
Low Loft Felt


If I am using medium or all-purpose interfacing, I use a stiffer felt (170 GSM), like this one on Amazon


Stiff Felt for Wallet Making
Stiff Felt

I made the wallet below using a combination of all-purpose interfacing and stiff felt. I kind of like how the wallet turned out, like my most recent custom bifold wallet below. It's light and crisp. If you want a more padded wallet, you can always double-layer the felt. 


Fabric Bifold Wallet
Hexies Slim Wallet


Long bifold wallet
Download Wallet Pattern


As you keep making and experimenting with different types of fabrics, you will find your best combo and a finish that you like best. I like my wallets to be crisp but not stiff, that way you can fit in more stuff, unlike leather wallets which have limited expandable capacity. 

Resources:


I hope find this post useful. Do share with your bag/wallet maker friends if you do. Let's keep the world sewing :)


Have a lovely day!

Elvira

****** 


Latest Video