I made this patchwork batik wallet a few months ago for my Kawandi guru. She wanted Rosie Wallet after seeing these patchwork wallets. After series of discussion, we decided to use Bali batik. So excited!
She wanted more space for cards, so I added more more slots from the original pattern and increase the height by 1 inch to accommodate it.
The wallet is pretty small, so deciding the patchwork style took longer than I expected. I tried different style of log cabin blocks but decided to settled for this on-point log cabin using 1" wide strips. I really love how the blocks turned out!
I did not use interfacing in this wallet since the fabric is thick enough but I used needle punch polyester batting and hand quilting it all around. The jewelry plyers really helps pulling the needle when hand quilting. I kind of liking it as I can stab a few stitches and pull it without any difficulties! But frankly, I really need to catch up with my weight training workout this year!
Rosie Wallet is beginner's wallet that is easy to put together. I have full step-by-step video tutorial HERE. I really enjoyed the process of making this wallet! Here's more photos of the finished wallet.
The wallet is already received with love :). I'm so grateful for the support of fellow crafters here in India. It's really a great honor for me to make something for other makers!
That's all for today. Thank you so much for stopping by!
Last weekend, I made more Tulip Mini Wallets. These wallets are just so much fun, easy, and quick to put together, especially if you have fun off-cut fabric scraps. This wallet is pretty sleek and compact, you can slip it into your jeans and hook the key ring on your belt loop. It can easily carry 8-10 cards or a few cards and folded notes. Or just clip it in your small purse or tote bag.
The pattern has two versions, vertical and horizontal. The pattern also included instructions on how to finish the seam in two ways. I did the easy one as shown in the video tutorial. If you have a wrist problem (CTS) like me, don't worry, this one is pretty easy on the wrist :).
I mostly used polka dots this time because I have a lot of them. I used it a lot in my other projects, so I have quite a lot of off-cuts that I can use to make this keychain wallet.
If you're looking for easy gifts to sew, this Tulip Mini Wallet is a great project for you. To make this wallet, basically, you need only 1 fat eighth of fabric, all-purpose woven interfacing and lightweight interfacing. This project is great for beginners as well as seasoned sewists.
Last month, I made a few Rosie Wallet orders. This time the customer wanted a flap closure. This is one quick wallet that you can make over the weekends. The original pattern has a hidden button closure.
This year I promise myself I won't buy new fabrics and will only sew from my stash! and these are some of them. Last month I was busy sorting out my fabric stash, organizing my bag-making supplies and organising my WIPs. I found this metal button which matches perfectly for the wallet! Metal buttons, especially the antique color, give out rustic vibes, which I love.
I use handloom or hand-woven cotton fabric from my stash for the fabric combo. I have always been fond of Indian handloom - its multi-hued colour looks very nice for my projects to use as an accent or combo. It's also easy to work with.
The Rosie wallet is small and compact, it's just perfect to carry around every day. I love to carry one when I use a smaller handbag or crossbody bag. Nowadays, with mobile payment becoming more common, I hardly have to carry my credit or debit cards although I can literally fit in 10 cards in this small wallet.
You can check out my latest wallets in my ETSY shop or on my WEBSITE.
And if you want to make your own Rosie Wallet, it's available on my ETSY SHOP and SEW MODERN BAG
This week I am pretty productive. I made a few wallet orders and then went on to finish two Voyage Passport Wallets. Last year I did not shop much for fabrics, instead, I was using what I had in my (huge) stash. Maybe I will let go of a few fabrics from my collection at some point of time this year. I just need some time to get organized. So, stay tuned!
Now back to the two voyage wallets that are made from my stash. The first one was the peach lantern wallet. I think I got the fabric from the Moda shop in Osaka. The lantern design is very cute with the ribbon bows, etc. Not sure why I bought it in the first place though, but I am glad that I did! It reminds me of Chinese New Year.
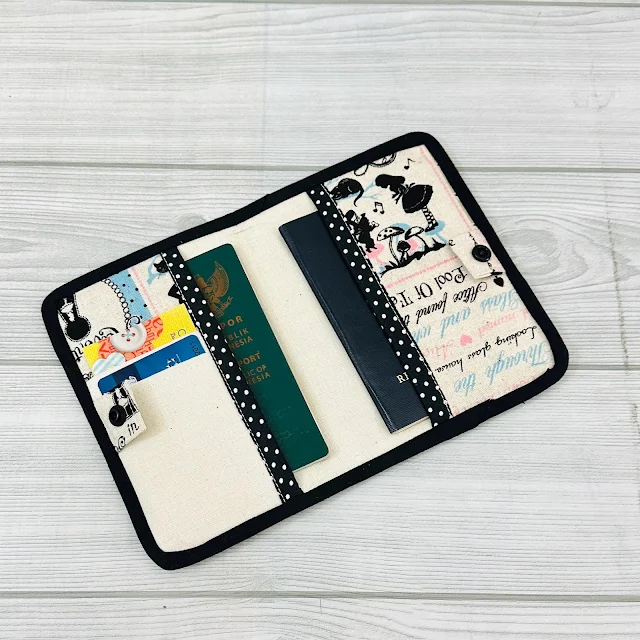
The second one is the Alice in Wonderland Passport wallet. I am so happy I decided to make the wallet from this linen fabric. I was making a kodomo wallet using the same fabric for an order and decided to make a passport wallet with it.
This time I also decided to make a curvy one because I have a bias binding ready. And I love how it turned out. I think I will make a few more with a curvy edge. The wallet closed with a snap button, I am thinking of making another one with a zippered closure. What do you think?
This voyage passport wallet can hold up to 4 passports (2 passports in each sleeve) plus 2 cards. Personally, I love to carry this one when I am traveling solo. It fits nicely in my purse.
These wallets are available in my Etsy shop as well as on my Website. I've been making a few changes to the website in the past few weeks, like I merged back the fabric section into the website. Hopefully, I now can update the listing more regularly. Having a small business is not as glamorous as it looks on Instagram. But as long as we enjoy it, it's worth it!
Recently I introduced the new wristlet pattern, Hanami Pochette. I've been working on the pattern since early November or so and plan to release it in December. But life happens! I had tooth problems and had to visit the dentist a couple of times, then my son's pre-board exam started and at the same time, we were busy with his college applications. So my mind was all over the place.
Now about the Hanami Pochette. It is a versatile minimalist wristlet wallet that is perfect for carrying essential items. The largest size can fit the largest iPhone Pro Max and also can be used to carry passports when traveling. The medium size can fit in the basic iPhone model.
The small size is my personal favorite because I like to carry small bags and it fits perfectly in my purse. The wrist strap can be easily used as a key fob. Here are the latest ones I made.
This pochette is a friendly project. The pattern comes with full-scale templates with step-by-step photos that are easy to follow. If you want to up your game in bag making, this will be the perfect project. Watch the video above for more details. And if you have any questions, you can always email me or leave a comment here.
I’m still in scrappy mode this week! After diving into making the adorable mini purses I wrote about in my last post, I couldn't resist the urge to keep
going. So, what did I do next? I dug more into my scrap bins and started
piecing together some more patchwork panels.
First
up, I whipped up a Rosie Keychain Wallet using some brown scraps, and I have to
say, it turned out pretty awesome. In fact, I'm so thrilled with the result
that I've got plans to make a few more Rosie Wallets. They're just too cute to
resist!
But
that's not the only thing that's got me excited. I've also made a couple of NunoSmall Wallets too! For
the pink and purple wallets, I used the same quilt-as-you-go method as the mini purses.
Now,
for the red wallet, I decided to go traditional by making two mini log cabin
blocks, using 1.25-inch strips, and then threw in an extra strip in the middle
to make it a perfect fit for the Nuno Wallet. And I’m super happy with the
result! Making patchwork quilt wallets has been at the top of my list.
In
the original pattern of Rosie wallet I did not use batting, but in this
patchwork version, I used low loft
batting and quilted it pretty densely to make the panel flatter. When you
want to make a patchwork or quilted version of a wallet, remember to change the
interfacing to lightweight interfacing. The interfacing will give more structure and also make the wallet more durable.
I shared my work progress and a few tips and tutorials on my YouTube Channel. Make sure to check them out!
Hello there! It's been a
while since I posted here. I hope you're all doing well and healthy!
I recently returned from my holiday to Indonesia and have been
keeping busy working on my latest creation - the Rosie Wallet! This wallet is
not only stylish, but it's also functional and can hold more than 10 cards,
folded notes, and coins. It's a great pattern for both beginners and
experienced sewists and makes for the perfect gift during festive seasons and
birthdays.
Before my trip to Indonesia last month, I made several gifts (although I didn't get a chance to take pictures of all of them). My friends and sisters instantly loved the gift because it was easy to slip into their small bags or jeans without being bulky.
Rosie Wallet is pretty easy to make and with 2 in 1 zipper pocket, you can easily have 2 zipper pockets by installing 1 zipper! I think it's my current fave of pocket. Because we always need space to keep odds and ends in our wallets, such as my hijab pins, a ring, etc.
The Rosie Wallet features:
- Slim and compact design - 2 slip pockets for cash and extra cards - 4 cardholders - can fit in 3 cards in each slot! - Hidden Kam snap button closure - Dual Compartment Exterior Zipper Pocket
It does not take much material to make this wallet. You can practically make the wallet using the scraps! That is how I first came up with the idea!
As for the binding, in this pattern, I included step-by-step photos to finish the binding by machine and also you can watch the VIDEO TUTORIAL for more details.
The pattern is now 25% off on both ETSY and WEBSITEuntil the end of the month!
I hope you enjoy making the wallet. If you have any questions, leave a comment or two, I'd be glad to help you.
Please use hashtag #chezvies or #chezviespatterns when sharing your handmade wallet so that others can see your beautiful works too.