Powered by Blogger.

Hand quilted Trivets - Moonshine and Valentine

 Here are some 9980 hours to mastering hand quilting 😃


I'm a big fan of Suzuko Koseki and I collected a few of her books. The one I particularly love and want to learn from is the Modern Quilts book. It has an interesting quilt pattern from simple to complicated ones, or at least it looks complicated to me :D. 

In these 2 mini quilts, I am using Indian Handloom fabrics in high contrast colors. I was not sure in the beginning but once done, they turned out really pretty. Sometimes, we have to try something out of our comfort zone! 


Colorful Trivet


The book only gave dimension of the block but not really gave instructions. But I supposed it was to be pieced in half circle. So I did with this teal and orange one. 

I made another one which I cut 5" square and piece quarter circle block. I don't know if this is the correct term :D. 


I called these block my Moonshine and valentine - just because it the shape remind me of the moon and I was watching C-Drama with the same title. Johnny Huang is stunning in the drama 💙! 


Hand Quilted Trivet
Mug Rug

On the back, I used glace cotton fabric in dark teal and I love the texture of the finished quilt. They turned out very soft. The trivets finished at 8" x 8" and it's just the perfect size for anything. From mug rug, doily, trivets, or even for indoor plant mat.

I am still curious about the block and plan to make more but using poplin cotton instead of handloom fabrics. Although handloom colors are gorgeous, it's a bit too stiff for circle piecing. Maybe I can do better with cotton or Bali Batiks! 


I bought this local brand needle Jyoti Needles before I did the Kantha Workshop. I was skeptical in the beginning but the shop owner didn't have Pony Needle when I went. And guess what? It turned out really good and all the needles are sharp. I always have a problem with Pony Needle for hand sewing my wallet. But this one turned out better than Pony. I may need to stock up now.


I am still doing the quilting based on the Kawandi Quilt as I really love it. I plan to make more small kawandi quilts too, but it may take a while before I finally get down to make it. I have a few UFO quilts that I want to finish. Most of them are small quilts and a few single bed quilts. 


If you want to know how I did the quilting, I uploaded a small video on my Youtube Channel. It was recorded during my first Instagram Live. You can watch it here. 


Thank you for stopping by, I hope you enjoy your visit!

Happy Sewing,

Elvira

***Linking up to these wonderful Blogs ***


Resources:

Book: Modern Quilts by Suzuko Koseki

Fabric: Handloom / Shotcotton


A finished quilt - Under the Sea Jelly Roll Race Quilt

 Finally a finished quilt!


Jelly Roll Quilt


I finished the jelly roll top early this year and it was approximately 60 x 60 inches. I made the jelly roll from Indian block print fabrics in turquoise /emerald green shades. 
I thought I'll add a white border on top and bottom to make a 60 x 80 inches quilt, but I changed my mind when I found the teal green print in my stash just enough for the border! 


Initially, I thought I will do hand quilting but I don't have to confident LOL. I am still learning to make smaller hand quilted mug rugs and coasters and to jump into making a big one will be too ambitious, I think haha! So, after finished making the quilt sandwich in the afternoon, I went ahead and quilted it in the evening. No fancy quilting, simply wavy lines about 2 inches apart in my Jack machine. I used a stitch length 4 and it turned out ok. 


On the back, I made a panel from Indian batik which I got from Tina a few years ago and I got a matching floral print from my stash. 


I am inspired by Saira's quilts on Instagram. In case you want to make backing like this, I cut the middle panel at 42" x 62" as I want approximately 10" borders all around. The floral fabric has a printed border on one side, and luckily it was long enough that I can put on the top and bottom borders. 


The quilt is a birthday gift for my younger son. He loves green and he's happy with this one. Now, the quilt will be happily used - just in time for winter. He's been using the first quilt I made years ago

the elder son is helping me with the photoshoot! 


I posted the quilt on Desi Quilters Group on Facebook and Barbara mentioned that Under the Sea would be a perfect title for this quilt! Thanks, Barbara! 


I'm glad I got one UFO quilt done and I still have 2 more big quilt tops to quilt. I hope I can finish them within this year. I picked the backing already and I got a full roll of cotton batting, so I really have to make an effort and finish them :D. 

Thank you for stopping by!

Stay creative, stay safe!

Elvira


Kantha - More Than Just a Running Stitch


Kantha Embroidery
my first Kantha Embroidery


I joined a Kantha Embroidery Online Workshop early this month. It was a 3-day workshop and I really had a great time learning. 
Brinda Ma'am and Nafisa are really patient with all of us and encourage us to take our time. I was pretty slow with my progress cos it was a busy week for me. 

Kantha Embroidery Sampler

We started making a sampler stitch on day one. It's amazing to learn that all the beautiful Kantha designs are done only with one simple stitch. The art of creating design with one stitch is really challenging. Creatively challenging! Kantha is an embroidery art which is originated in Bengal (West Bengal, Orissa, Tripura, and Bangladesh). 

The purpose of doing a sampler stitch is to familiarize us with the stitches and flow of work since it's different from regular embroidery. I have not done embroidery for years so the sampler really helped me. As I progress I noticed, my stitches are getting better. I used poplin cotton fabric and 3 strands of embroidery thread. 

Kantha stitch sampler

Once we're done with the sampler, we moved on to work on a design. We were given 4 designs by Nafisa and I chose this one below.  Nafisa and Brinda Ma'am kept telling us to take our time deciding what stitch we want to use in our design. That way everyone will have a different result. It's really inspiring to see others embroidery even though we're using the same design but the end results are different. You can check others' works on the Moments of Quiet Facebook Page.


Kantha Stitch Design


Kantha Embroidery Pattern


Kantha Embroidery detail

If you're interested to join the workshop, check out Moments of Quiet Facebook Page 

While Kantha is widely popular, it is also loosely interpreted as just a big running stitch in quilting, which is basically not. Kantha is more intricate than that. 

Nafisa showed us her 100 years old Kantha quilt belongs to her great-great-grandfather and also a few samples of Nakshi Kantha of Bangladesh. 

Nakshi Kantha
Nakshi Kantha (Source: ich.unesco.org)

Kantha tells the story of cultures and history. While the Indian Kantha has evolved in terms of design, including animal and intricate floral patterns, the Bangladesh Nakshi Kantta still sticks to the original Kantha with geometric patterns. 

I am glad I decided to join the class. Learning the history behind this ancient art is really refreshing. There are several books available on Amazon which I think I'll buy. Thank you Brinda Ma'am and Nafisa for the great workshop! 

Here's our virtual selfie moment! Learning and sewing with others are really fun! I'm looking forward to join in more online workshops! 


Thank you for stopping by! I hope you enjoy your visit to my blog.

Happy Crafting,
Elvira

Linking up to these wonderful blogs

Few Small Wallets and new Etsy Search Algorithm


Black Cat Wallet!

I've been having a lot of fun making a few bi-fold wallets! I tried out different fabrics, from quilting cotton to linen and denim.
It feels good to finally sewing wallets and stuff after so many months making face masks. I'm still making a few for family and friends and also offer face masks in my Etsy Shop. The Trio Spacious Face Masks is quite popular and it feels good to get nice feedback from buyers! Thank you !!

Besides that, last month I was busy with getting my tax ID done. Lucky me, my dear hubby is a CA so he's been a great help. I am totally blank when it comes to tax! Finally, all those are done and there's a couple of things I need to do regarding my small business. After getting my GSTIN done, I feel like I'm doing a real business. It's scary at the same time! I need to learn more and get all my papers organized! Wish me luck!

Back to the wallet, I'm working on the pattern right now. It's progressing quite slow, I am about 70% done with the editing, I just need to edit a couple of photos and add them in the pattern! There will be a zipper version and a flap version. I'm so excited to share the pattern. It's super easy! Once I'm done with a few custom orders, I'll be able to sit and finish the pattern.  Hopefully, I can release it within this month. 


 Small Bifold Wallet

The above photo is a few of the flap versions that I made and they are available in the SHOP now. And here's the zipper version:


ETSY NEW SEARCH POLICY

By the way, last week in the Etsy Q3 report, they said they are going to implement Personalized search. WHich means Etsy is doing what Google and others are doing. What does this mean? This mean:
1. Etsy is showing potential buyers search results based on their search history. 
2. Every buyer will see a different result even if they search using the same keywords.
3. Etsy is showing more local shops. But if you sold one item to a buyer from a particular city, state, or country, your products might be shown in the search result of that particular city, state, or country. This happened to me several times last month, where I sold a few items to people in the same state in the USA within a week. 

If you want more in-depth analysis you can tune in to Kara Buntin Youtube Channel. She's the best! I learned a lot from her video series and her class! 

Now, what can we do as an Etsy Seller in India?
1. Do not change your keywords right now. Instead, observe your Etsy stats more and start working on your social media marketing. I shared about Basic Pinterest Marketing with Etsy India Sellers at our Monthly community meet last month. 

2. Optimize your listing, especially those which don't get enough views or visit. Etsy search trend changes every week or so. Optimizing old listing or almost expired listing, do help in boosting in search placement. 

3. If you're using Etsy ads, make sure to optimize the listing before put them in Ads!

I hope these little tips help! Competition is tough everywhere, but if you learn how to do it properly and hold on to your dreams, you will make it!

Thank you for stopping by today!

Have a nice day!
Elvira


Reopening My Etsy Shop after Vacation Mode

 As you know, I really enjoy making simple and small quilts. And since I took the Kawandi Quilt Workshop last month, I've been hook to hand quilting. I have many small patchworks waiting to be made into something, but always got sidetracked. Well, I always have several projects going on besides working on orders. But you know what? Working in something you love is a great mood booster. And no, you don't have to follow so and so design or style or trend. Just simply do what you're happy to do. Even if it's a simple project. 


Last week I finally open my UFO/WIP bins and started working on small hand quilting projects and I am so happy with the result. In the Kawandi workshop last month, Saba told us about big stitch quilting (check out this post), which apparently trending now. I looked up about it on Pinterest and it's basically running stitch hand quilting like sashiko, Kantha, boro, and kawandi. Now, there is more than just running stitch! All those arts have a significant style and history behind it. And I'm so happy I'll be learning more about Kantha in next month's Workshop with Brinda Ma'am. so stay tuned and make sure to subscribe to my blog :D. 


I've been procrastinating about re-opening my small quilt shop on Etsy and finally a few days ago I did it! Wish me luck and if you have a little time, do check it out and favorite the shop! Thanks!!

VISIT MY QUILT SHOP

Right now, I only listed ready to ship items. Mostly are mug rugs and coasters! I really love the rectangular coasters. I used solid color at the back, so it will have a unique design and make it reversible! 


The coasters come in a set of 2 and since the gifting season is here if you buy 3, I offer free Express Shipping (5-7 days delivery)! The offer is also valid in my Handmade Shop.


What happened during Vacation Mode? 

Well, if you also thinking of re-opening your Etsy shop after a long hiatus like me, there are a few things you have to keep in mind.

According to Etsy, here's what happened when you put your shop on Vacation Mode:

  • Your shop will still appear if someone searches for your exact shop name, but will not appear as an auto-suggestion in Search or other shopping tools.
  • Your items won’t appear in Search.
And when you re-open your shop, it's basically like starting a new shop. What I noticed tho, my products still WON'T appear in searches for at least 24 hours after I activated the shop. Well, I used to put my fabric shop and handmade shop on vacation mode when I travel for a month or two, but I always able to bounce back within a few days. 
I think it's because the shop was not active for a long period of time, and during that time many changes have happened in Etsy, and all my previous data sort of deindexed. Now, I will have to work from scratch again! How exciting is that! :D

Now, how to get your shop up and running again after a long vacation mode?

I've been reading a few blogs and articles and I'm trying out a few things right now. When I checked my stats, I still have visitors every month even though it's very minimal. The visit mostly comes from my other shops. 
Here are a few things I am doing now:
  • Edit my shop - fill up all the shop policy, announcement, about info, etc
  • Editing the listing photos. If you have stock of your previous products, you can retake the photos, editing the title, tags, and description. 
  • Adding new products at least one every day! If you have many items to list, DO NOT list them all at once. By listing one or a few products each day, your shop will get a little booster in search placement. 
  • Post shop updates every day and
  • Share it on Social Media as much as you can. Using Etsy social media updates comes with a link to your listing. It's very convenient instead of copy-paste the link from the browser.
  • If you have a blog, it's a good time to post about it too (like what I am doing now).
  • If you have a small budget to spare, you can consider using Etsy Ads, starts with a minimum amount, and increase it as needed.
I've seen an increase in views and visit since yesterday and hopefully will hear a ka-ching soon :D

If you're thinking of opening an Etsy shop, use this LINK to get 40 free listings! 

Thank you for stopping by today.
Happy Sewing!

~ Elvira


Etsy India : Sharing and Autumn Sewing

India

Sharing

I've been pretty busy last week as I was asked by the Etsy India team to share my experience as an Etsy seller. Radhika from Etsy India has been a great help during the full week preparation. I had to send photos and video clips for the social media promo, etc. It was a great learning experience for me and also great fun. I truly hope more Indian crafters would take a leap and start their own business. If you want to catch up on the event it's on Etsy Facebook Page. 


Virtual Selfie with Etsy India Team


Thank you to those who personally message me and told me that they learned a lot from the session. I hope I can share more in the future. Maybe on this blog if you like or a video on my Youtube Channel, Insha Allah.

Sewing

On the sewing front, I was busy making these Mini Travel Wallets for a custom order.  I do love how they turned out esp the Panda! I had the fabric for quite sometimes. It's Linen I bought from my trip to Indonesia and wondering what should I make. I actually cut one for a zipper pouch and it's still waiting to be finished. Insha Allah by next week.
This time I tried to batch sewing the wallet and finish hand sewing the binding in one sitting and a few episodes of Kdrama :D. I really do enjoy the hand sewing part of my wallet. I took a couple of photos and will put them up on my Etsy Shop for a custom order. I am preparing for ready to ship items more now, so if you're looking for one of a kind gift, be sure to favorite the shop! Well, maybe not so many, as I am working solo, but I'll try to add a few products at a time. Wish me luck!!
Also, I do upgrade to express shipping via FedEx for certain products! 


Mini Wallet Pattern | Handmade Travel Wallets

Autumn

Although we don't have the color-changing tree moments during Autumn, it still is my favorite season. The sun shines brightly but milder. The humidity is going down which makes the afternoon more pleasant. Here are a few shots from our compound. 

Olive tree


Olive tree


Thank you for reading my blog, I hope you enjoy your visit :)

Until next time,
Stay safe!

- Elvira_


Video Tutorial How to Sew Spacious 3D Face Mask

Sometimes we run too fast and think too little ~ To Dear Myself (CDrama)


Finally, I finished a couple of Trio 3D Face Masks. Don't you love these rose print masks? I got the fabric from Indonesia and I made a couple of wallets with it, you can see them HERE.

This mask is now fave with everyone. My SIL loved it cos it's not fogging her spectacles so much. That's an added bonus. I put up a video on how to put this 3D Face Mask together. I hope the video will help those who need to see a clearer picture.


I quite enjoyed making the video, but the editing part it a bit tiring. My son said to do voice over, I need to learn that. Trust me even a simple video tutorial needs a lot of retakes and editing. I have to keep several masks ready to sew, incase I mess up :D. 

Since Etsy is introducing video features, I've been learning to take a short video (15 seconds max) that is quite informative for the customer. It is really a challenge but it's fun to learn new things. In the beginning, I was not sure if 15 seconds are enough to show your products, but now I really enjoy creating it. It's good for my Instagram Reels too. If you observe all these video features on social media, people can be really creative within those 15 seconds. 
You might find people complaining, but for me, instead of complaining why not use the time to learn. If others can do it, we can also do it.


Before Etsy introducing this new feature, I used to post videos on my Youtube Channel under Product Review and post the link on my Etsy Listing description. It helps to a certain extent especially for first buyers who are not sure about my products. Like this short video, I make to show how to adjust the elastic cord on the mask. 


Another thing I'm busy with nowadays are attending webinars conducted by Etsy India. Our seller support group on Facebook is quite active and informative. This online community is really great, even for seasoned sellers. There's always something new I learn. Truly, if you want to keep doing what you do, you have to keep learning, be observant, and do your own research in your own niche.  There's no short cut to success. You gotta do the hard work, be it researching your SEO, retaking your product photos, redoing your listing, etc. 


If you find the video tutorial helpful, please share it especially to those who might need it. 

Thank you for stopping by!

Stay safe & happy sewing!

Elvira


Tutorial : How to Make Easy Fabric Key Fob


I got a bunch of key fobs that I ordered from Aliexpress before the Pandemic. I'm lucky that I got all my hardware before the lockdown started in March. 

Personally, I love using a swivel hook for a wristlet, like the one I shared HERE but this key fob looks fancier, isn't it? 

This is a beginner-friendly project for you who just started a sewing journey. It's super easy! If you're in India, you might want to refer to THIS POST about bag interfacing in India. 

Materials needed: 
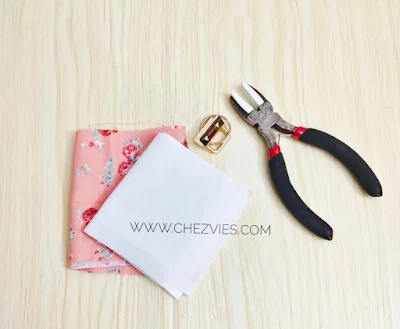
1. Main Fabric of your choice (preferably cotton) - 3.75" W x 11" H" 
2. All Purpose Interfacing - 3.75" W x 11" H
3. 1" wide key fob
4. Plier (I have one with attached cushioning, if you don't have one just use a flat plier and cover the key fob with batting or fabric scraps so it won't scratch the hardware).

Fabric Key Fob Tutorial

Let's start!

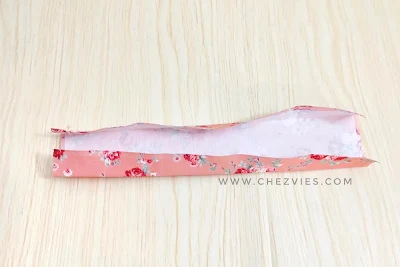
1. Fuse the interfacing on the wrong side of the fabric, and fold the long edges towards the center. Then fold it again to make a scant 1" wide strip. Use wonder clips to hold it in place. 


2. Topstitch using scant 1/8" seam allowance on both long edges, then sew a few lines 1/8" apart. The dense stitching will make the wristlet sturdier. 


3. Notch the raw edges using pinking scissors or simply using normal scissors. This will stop the fabric from fraying. (you can also apply clear nail polish on the raw edges).


4. Bring the short ends together and sew in place. 


5. Fit the key fob and mark where the prongs are. Make a hole in the marks you just made. This way you won't break the prongs. Trust me, I broke a couple of them :D. 
 

6. Carefully replace the kef fob and use the plier press it nicely and make sure it won't come off when you pull it. 


et voila! Your key fobs are ready. This will make a great gift for your family and friends!


If you like to use a swivel hook, you can follow my previous tutorial. In this key fob tutorial, I am using all-purpose interfacing which gives the wristlet enough structure. 
But if you're using a swivel hook, you can use medium weight interfacing or a combination of all-purpose interfacing and batting. If it's too thick for your sewing machine, you can always use rivets.  Don't be afraid to experiment to see which one you like better. 

If you find this tutorial useful, please share it because sharing is caring :). 


Thank you for reading my blog.

Stay safe & happy sewing!

Elvira


Latest Fabrics

Latest Video