Powered by Blogger.

More Patchwork Wallets

Red Patchwork Wallet


Hello,

For the past couple of weeks, I have been having fun making small wallets. I made more patchwork wallets too using scraps from other wallets like the one I shared in my previous post. I think I am keeping one of them for myself as I haven't changed my wallet in the past 3 years.

Last week I made 3 wallets in brown color. One was patchwork and the other two were from patchwork print fabric.


Patchwork Wallet
Nuno Small Wallets


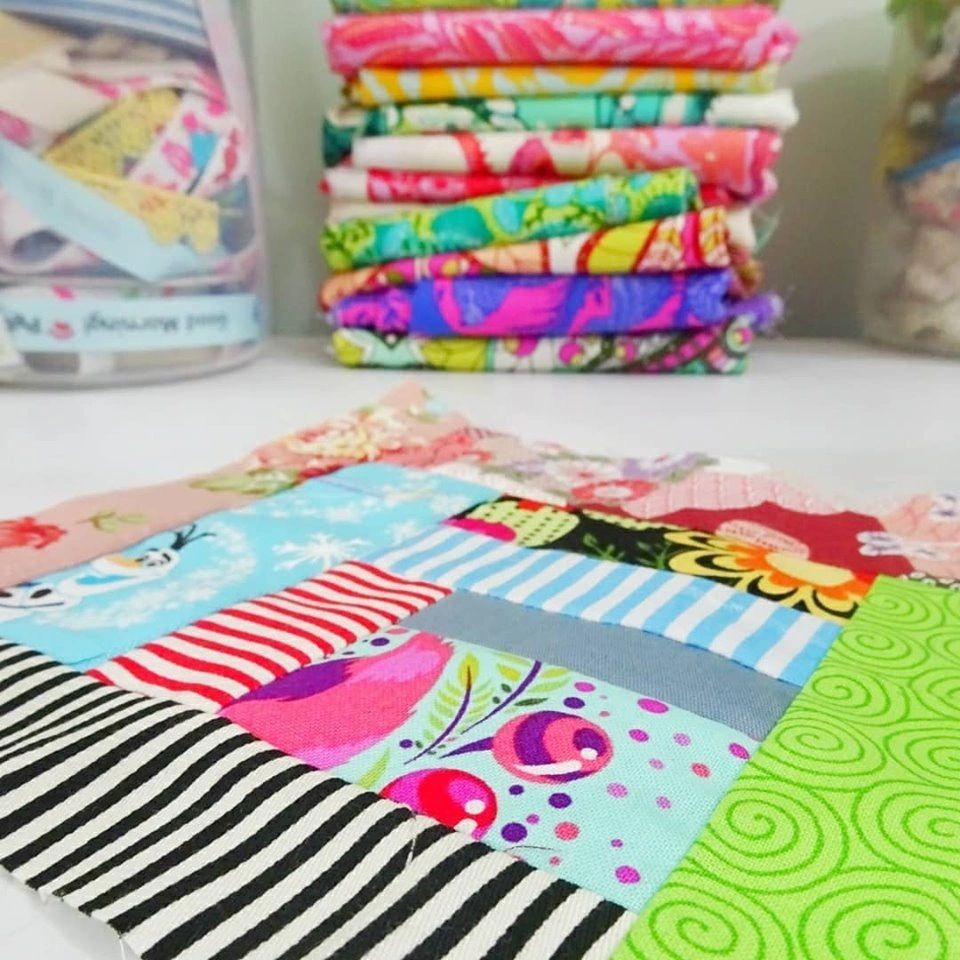
Well, creating your own patchwork panel is more fun of course, because we can mix and match whatever we fancy. Someone asked me on Instagram how to mix and match colors for patchwork. I think the best is to follow your instinct. At the end of the day, the patchwork that you created is a reflection of who you are, an extension of yourself as a crafter.

For me, sometimes it takes me 5 minutes to come up with the combo that I like, sometimes it takes a few days and a few patchwork tops that I am not happy with (that will go to my orphan block bin).
Here is another patchwork wallet I made using Rosie Wallet patterns. When making a quilted wallet, we need to adjust the combination of interfacing that we use. I talked about it in this Video. It may take you a couple of trials and errors before you find the combo that you like. Everyone has personal choices. Just do what you like best!


Making these patchwork wallets is addictive! Sometimes when I feel uninspired, I just dig into my scrap bin and make small patchwork panels. Many of them are still in my WIP bin. They are in various sizes. Now I have to find a suitable project for them.


That's all for today, have a nice day!

Happy Sewing!

Elvira


Pattern Update - Voyage Passport Wallet

 Hello, 

Passport Wallet Small


Recently I updated the Voyage Passport Wallet pattern to include the zipper closure tutorial, especially for those who prefer the written tutorial to the Video Tutorial. The pattern is the same as the original one and I only added the instructions for zipper closure. 

If you purchased the Voyage Passport Wallet Pattern before Dec 7, 2023, you can download the tutorial for FREE. The Add-On file DOES NOT INCLUDE a complete tutorial to make the passport wallet.

The Voyage Passport Wallet is a quick and easy-to-make accessory with a minimalist design that can hold a lot of items. It can hold up to four passports (two on each sleeve), as well as two cardholders. Its compact size makes it perfect for carrying it in your travel handbag or backpack.


Small passport wallet
Voyage Passport Wallet Pattern

Small passport holder

A few video resources are also included in the pattern now, such as how to machine sew the binding and how to make DIY Bias Binding.


The trick for sewing a zip-around wallet is to always use a zipper foot! I don't always use it as the regular foot I am using is pretty narrow (don't be like me 😀 ) and if you can set the speed, use the slower speed. Take your time to learn. It's not rocket science, so with enough practice, I am sure you can master it too. 


In the tutorial, I showed how to sew the zipper end tab the easy way, but you can always use the metal zipper end or the button style like in this video

Don't forget to use the coupon code CVG20 when purchasing the pattern either from my WEBSITE or ETSY SHOP.

Thank you so much once again for your continued support! If you have any questions regarding sewing or quilting and want me to make video tutorials, simply reply to this email. I'd love to hear your ideas! 


Until next time,


Happy Sewing!


Elvira


Doll Quilts


Blue Doll Quilt


Hello,

It's been a month since my last blog post. In the past few weeks, I've been having fun making doll quilts and even trying to make a few accessories. I always love making small quilts and wondering what else I can use them besides the usual mug rugs or coasters. I started reading blogs and watching videos on doll quilt making. And decided to try it. 


Crochet doll with pillows

I started making mini patchwork pillows from scrap. Those are 1:12 scale pillows. So much fun to make. The best part is I can use my leftover batting for the insert

I looked up on YouTube for a DIY doll bed. OMG, there are just so many of them with different ideas, from using ice cream sticks to using cardboard and twigs. 

I tried making it from cardboard too but not as good as that on YouTube haha! Instead of painting or using fabric to cover the cardboard, I used leftover wallpaper. It did not stick properly tho! I hate working with glue. I try to avoid as much as I can. The bed was OK but it's not good as a photo prop I think. 


DIY Doll Bed from Cardboard


Next, I tried making the armchair following this tutorial. I used an Amazon box and cut them into round shapes. I stacked around 5 pieces of cardboard and then added batting on the top before covering it with fabric. For the sides of the chair, I use double-fold binding to cover it. For the chair back, I used cardboard from the toilet tissue roll! Glueing the fabric is a bit tricky but I managed pretty OK. For the chair legs, I used the satay sticks! I am thinking of getting a thicker stick but have not found any. For the time being, this will do! 


korean doll on a quilt
Pink Doll Quilt with Patchwork Pillow


Kantha Doll Quilt 


I made 2 more quilts in Blue. These are 12x12 inches and also come with 2 pillows. For the first one, I made a simple 8-patch using 2.5" squares and then added blue stripe borders. I did hand quilting here using cotton thread and it turned out very soft! 


Blue Doll Quilt with 2 Pillows 


And for the second one, it's just a very simple quilt using 2 pieces of fabric. I used 2 FQ fabrics from block print fabrics  bundle.  

For the front and batting, I cut 12" x 12" and then cut 16" x 16" for the backing fabric. The faux binding is done by machine and then I hand quilt the rest. It's great experimenting. For the faux binding, depends on the finished width you desire, and then multiply that by 4. So if the quilt size is 12x12 inches and you want 1" wide binding, it means 12" + 4" = 16". So you need to cut the backing 16" x 16". 

If you're wondering about the doll bed, I got them from Amazon India (search for Laddu Gopal bed). It's a real wood and comes intact with the mattress so it's pretty heavy. The size is just perfect. 


Block Print Doll Quilt with Pillow


1:12 Scale Doll Pillows 

That's all for today. Thank you for stopping by, leave a comment or two if you happen to be here or have any questions. 


Happy Sewing, 

Elvira


Linking up to these wonderful BLOGS

Celebrating 10K Subs

Hello, 

I want to share with you the happy news today that my YouTube channel has gained 10K subscribers! I can't thank you enough for your support and encouragement through the years. At the beginning of this year, I was asked what is my resolution, I said I just wanted to grow my YouTube channel and reach 10K subscribers. I want to be able to share more tutorials, tips, and tricks on sewing and quilting. It was not an easy journey especially when you work alone from ideation, recording to editing, and finally uploading the videos. But this is something I really enjoy doing and I hope to continue doing.


As a small token of appreciation, I'm giving a discount of 30% off on Patterns, 25% on Fabrics, and 20% off on Handmade Wallets.

Use the Coupons below when making the purchase on both ETSY and WEBSITE. Coupon Valid through Sunday, 22 October 2023.


Shop Patterns on ETSY | WEBSITE


Shop Handmade ETSY | WEBSITE


Shop Fabrics ETSY | WEBSITE


Thank you so much once again for your continued support! Going forward, I hope to be able to share more tutorials regularly. Stay tuned!

Happy Sewing!

Elvira

More Patchwork Quilt Wallets

Quilted Purse
Patchwork Nuno Wallets


Hello, 

I’m still in scrappy mode this week! After diving into making the adorable mini purses I wrote about in my last post, I couldn't resist the urge to keep going. So, what did I do next? I dug more into my scrap bins and started piecing together some more patchwork panels.


First up, I whipped up a Rosie Keychain Wallet using some brown scraps, and I have to say, it turned out pretty awesome. In fact, I'm so thrilled with the result that I've got plans to make a few more Rosie Wallets. They're just too cute to resist!


Quilted Rosie Wallet


But that's not the only thing that's got me excited. I've also made a couple of NunoSmall Wallets too! For the pink and purple wallets, I used the same quilt-as-you-go method as the mini purses.


Purple Patchwork Wallet


Pink Patchwork Wallet

Now, for the red wallet, I decided to go traditional by making two mini log cabin blocks, using 1.25-inch strips, and then threw in an extra strip in the middle to make it a perfect fit for the Nuno Wallet. And I’m super happy with the result! Making patchwork quilt wallets has been at the top of my list. 


Red Patchwork Wallet

In the original pattern of Rosie wallet I did not use batting, but in this patchwork version, I used low loft batting and quilted it pretty densely to make the panel flatter. When you want to make a patchwork or quilted version of a wallet, remember to change the interfacing to lightweight interfacing. The interfacing will give more structure and also make the wallet more durable. 


I shared my work progress and a few tips and tutorials on my YouTube Channel.  Make sure to check them out! 


Thank you so much for stopping by today!

Happy Sewing!

Elvira 


Linking up to these wonderful BLOGS


Latest Fabrics

Latest Video